

Tips to Begin Making A Strip Quilt
Jun 3rd 2020
Ever wondered what to do with all those scraps? The following information is from Strip Your Stash by Gudrun Erla- learn some helpful tips to begin your bag making journey!
Collecting and Storing Your Strips
Whenever I have yardage in less than a 1/4 yard, I always cut it into 21/2˝-wide strips. These days a vast collection of coordinated strip packs is also available in quilt shops. The different fabric companies call them different names—Jelly Rolls, Roll-Ups, Bali Pops, Tonga Treats—but they are all pretty much the same thing—a collection of 21/2˝ strips from a single fabric line. The precut packets are a great way to start a collection of strips or to grab for use in an already-coordinated quilt.
If you feel your strip stash needs more variety, there are many ways to do that economically. Round up your quilting friends and organize a “strip swap.” Get four quilter friends. Cut four identical strips of six different fabrics, which totals about 13/4 yards. Meet with your friends and trade strips so that each person in the swap receives six different strips from four different people. You go home with 24 different strips. Choose themes for each swap—holiday fabric, batiks, florals, basics, and so on. Swaps like this could be done on a larger scale, within quilt guilds, in classes, or at your local quilt shop.
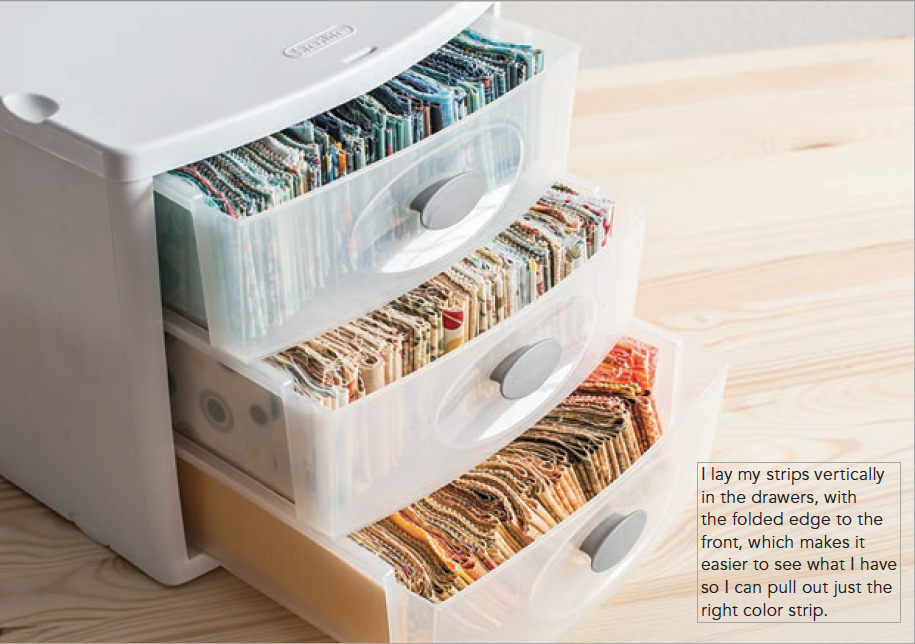
I like to organize my strips by color. I store them in clear plastic drawers that measure 12˝ × 9˝ and 23/4˝ deep. A strip cut from the full width of the fabric folded in half twice fits perfectly. Mostly I save full width-of-fabric strips. But sometimes I save two half-strips of the same fabric, because I may be able to use it as one strip in a pattern, which is a great option for leftover fat-quarter pieces.
Preparing Your Strips
I never prewash my fabrics, and so far I have not had any issues with dye running when I do wash my quilts. If you buy precut strip packets, they certainly should not be pre-washed, because they will end up a tangled mess and not the same size as when they went in the machine. When I get a strip packet or jelly roll, I always start by pressing my strips with a little steam, being careful not to distort them. Pressing the strips takes care of most of the shrinkage, if any. Make sure to press the center crease out if your pattern requires making full width of fabric strip units. After pressing, I measure the strips to make sure that they are 21/2˝ wide.
Some companies have pinked strips, and the pinking can be different sizes. Therefore, I recommend measuring strips; if the pinking makes the strip a little bit wider then 21/2˝, trim it to 21/2˝ right away for more accurate piecing.
Background Fabrics
My favorite choices for backgrounds are tone-on-tones and textured prints. Solids also work well as backgrounds because they will give your quilt a flatter overall look and sometimes a vintage feel, especially when you mix them with prints. I do use neutral colors quite a bit, ranging from white to black and any shade of gray in between. Although the neutrals will not fight with the other colors, it is still important to try them together.
Here is an example: I thought I had the perfect background for my Feathers quilt all picked out and ready before I started sewing. But once I had finished the strip units and started laying out the quilt with the background, I realized that the gray was too light for my strips to really stand out and shine. I tried another darker back-ground that I had, but that one didn’t work either because there was too much black in it. Third try was the charm with the perfect shade of gray. Yes, there really are much more than 50 shades of gray in the world.
-


