

"That will quilt out, right?"
Posted by Angela Walters on Nov 4th 2016
We're so pleased to have a guest post from Angela Walters today! She shares her best tips for quilting out piecing mistakes. Get more wonderful tips in her new DVD, Start Free-Motion Machine Quilting with Angela Walters, and get more inspiration in Quilting Is My Therapy—Behind the Stitches with Angela Walters.
Some of the scariest words that you can say to a professional machine quilter are, “That will quilt out, right?" It usually means that I am going to have to get creative with the quilting to make the quilt flat.
Even though it can be scary to hear, the truth is that some piecing mistakes will quilt out. With a little gentle stretching or fabric maneuvering, the quilting can hide mistakes or even “suck up” extra fabric. Over the years, I have gotten skilled at managing unruly tops.
In fact, the very moment that I got my longarm quilting machine, Grandpa handed me a stack of quilt tops that he had acquired from various thrift shops, flea markets, and garage sales. These quilts were…..special. They were lovingly made, perhaps with more love than skill. It was those quilts that began to teach me how to “quilt out” some mistakes.
For the longest time, I have wanted to put together a blog post about how you can “quilt out” some of your mistakes. But I hesitated for obvious reasons. Pointing out a customer’s piecing mistakes on my website isn’t necessarily the best business plan.
Finally, though, a perfect opportunity presented itself. Last week I started on a quilt top by the worst piecer that I have ever quilted for. Every time one of her quilts is on my machine, I know that I am going to have to deal with some piecing problems. If you keep it a secret, I will tell you who it is………………..It’s me, of course! I may be good at machine quilting, but my sewing skills leave a lot to be desired. What can I say? When I am piecing, I am trying to quickly get to my favorite part….the quilting!!!
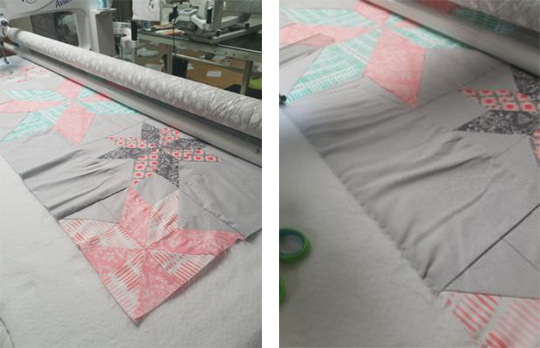
You can see what I was dealing with below. I am not sure what I did wrong, but it’s obvious that it needs a little help. The pieced border isn’t straight, as you can tell by the wrinkles. I call these friendly borders because they wave at me when I walk in the room.
If you have some friendly borders on your quilts, here are some tips to help you manage the quilting for the best possible result.
1. Use a serpentine line to secure the edge of the borders.
Sewing straight across the edge of the quilt will push all the fullness to one side which will result in tucks. Instead, I quilted so that it went on and off the edge to hold the fullness in place for now. My goal was to keep the fullness evenly spread out.
You don’t have to sew down the edge of course, but I am trying to keep the quilt square and doing this helps make sure that happens.
2. Start quilting the design, trying to avoid tucks.
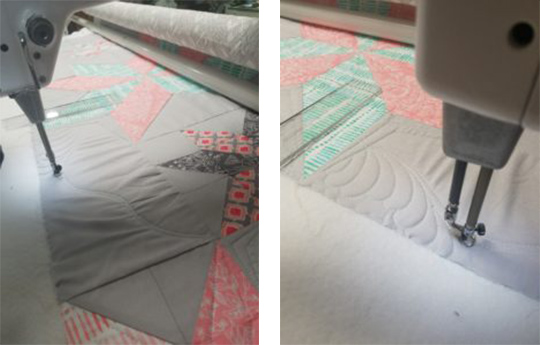
The whole time I am quilting, I am trying to keep the fabric from getting a tuck. Sometimes, it isn’t possible. If I have to allow a tuck to happen, I try to keep it where it will be less noticeable. In this example, I’d rather a tuck in the filler. That means, as I am quilting the feather, I am pushing the fabric in whatever direction I need to prevent a tuck from happening.
You can see the fullness in the fabric around the feather. I had to deal with that later, but at that time, I was only paying attention to the feather.
3. Use the filler to “suck up” fullness in the fabric.
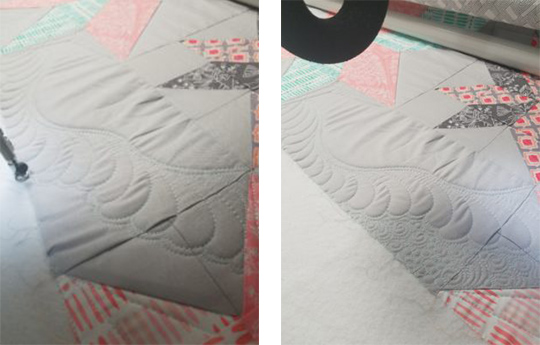
Once one side of the feather was done, I had to contend with the fabric left around it. The picture makes it look better than it actually was, there was quite a bit of extra fabric.
Using a dense filler helps take in some of the extra fabric, so that’s what I did around the feather. As I quilted, I tried to manipulate the fabric so that there would be as few tucks as possible.
I did end up getting a small tuck or two. But, I tried to get them as far from the feather as possible. Very few people look close enough at the filler to see any tucks and I am definitely not going to point it out. It’s not about whether or not you make a mistake, it’s how you make your mistakes as unnoticeable as possible.
4. Repeat on the other side.
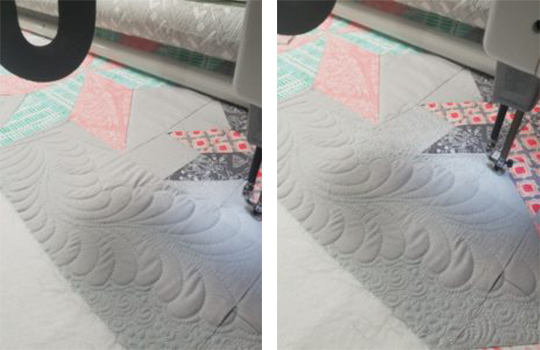
I did the same on the other side of the feather, quilting the main part first and then filling around it. (I could have quilted the whole feather first and then filled around it, either way works fine)
And, voila, a quilt that’s flat and square, with just a few tucks hidden here and there.
5. Don’t point out the mistakes.
This is the most important part of the process, don’t show anyone where the mistakes are. They won’t see them, and there’s a chance that you will forget where they are too. Now, I know I just showed you my mistakes. But that’s different, it’s my job!
I would show you the whole finished quilt, but you are going to have to wait just a little bit. It’s for an upcoming secret project. I can’t wait until I can share it with you!!
Here’s a sneak peek that I shared on my Instagram.
Your Turn
Do you have any particular tips for dealing with not-so-perfect quilt tops? If so, I’d love to hear them.
Happy Quilting!


