


Maple Mini Tutorial
Heather Kojan is a contributor to Classic Modern Quilts. Today, as part of our continuation of National Sewing Month, she's presenting a wonderful tutorial on making a Maple Leaf mini quilt!
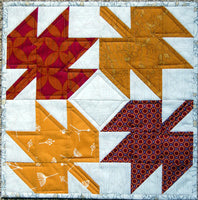
It's time to start thinking about fall. And when I think about fall, I think about Maple Leaf blocks. And yes, I'm (almost) always thinking in terms of quilt blocks. I love the maple leaf block. It's in my top five favorite blocks, along with Log Cabin, LeMoyne Star, Shoo Fly and Churn Dash.
To celebrate the upcoming season and National Sewing Month, I made this mini quilt (only about 13˝ square). I'm calling it Maple Mini! (I've given up on clever quilt names. Honestly, I'd be happy naming them Quilt 1, Quilt 2, etc.)
It was a lot of fun to make, fairly easy, and I thought I'd write up a little tutorial if you'd like to make one for yourself.
Supplies:
Print fabrics:
4 each of at least 6 ½˝ x 8 ½˝ or a 3 ½' x 18˝ strip
Sub-cut into: (2) 3˝ squares
(4) 2 ½˝ squares
Background fabric:
(1) fat quarter or ¼ yard
Sub-cut into: (8) 3˝ squares
(4) 2 ½˝ squares
(8) 2˝ squares
Binding: (2) 1 ¼˝ x width of fabric
Backing fabric: one square 15˝ x 15˝
Batting: one square 15˝ x 15˝
Use ¼˝ seam allowance throughout.
Finished size: 13˝ x 13˝
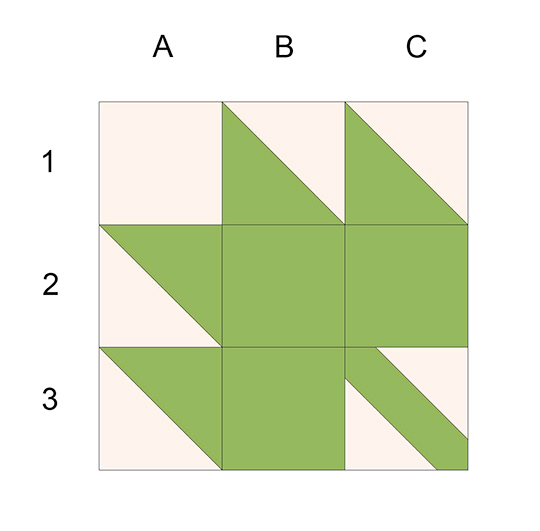
Make half-square triangles:
Take each of your background 3˝ squares. Draw a diagonal line on the wrong side of the background fabric from one corner to the opposite corner (I like to use a mechanical pencil). Pair each with a print 3˝ square. Place squares right sides together. Stitch a seam ¼˝ away from each side of the drawn line. Cut on diagonal line to create 2 half-square triangle units. Press seams towards darker fabrics. Trim to 2 ½˝ square. Repeat for remaining squares. You should have 4 half-square triangle units of each print/background combination.
Make the stems:
Take (1) 2 ½˝ square of print fabric and (2) 2˝ squares of background fabric. On each of the background fabrics, draw a diagonal line from one corner to the opposite corner. Place one background square on your print square, right sides together, matching up the corners. Stitch on drawn line.
Press background away from print fabric. Place second background square in the opposite corner. Stitch on drawn line. Press background fabric as before. You can trim the extra background/print fabric ¼˝ away from the seam if desired. Repeat for remaining 3 stem units.
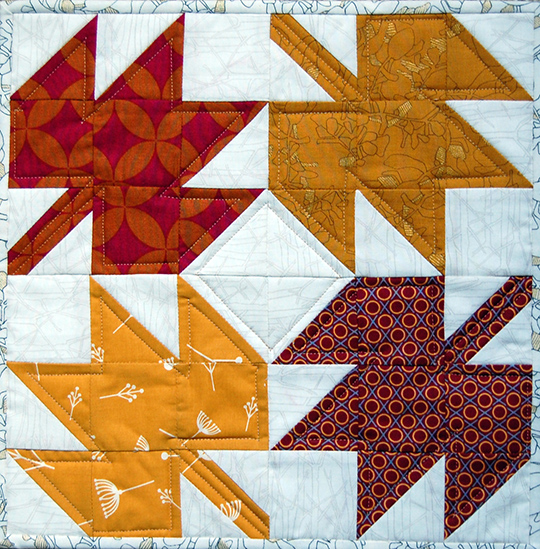
Lay out your pieces as shown below. Stitch together columns A and B. Add column C. Press resulting rows 1 and 3 in one direction, row 2 in the opposite direction. Stitch rows 1 and 2 together, nesting the seams as you go. Add row 3. Press.
Arrange your 4 maple leaf blocks as shown in the sample. Feel free to change the orientation of the leaves as you wish.
Quilt as desired. I did straight-line stitching, following the lines of the leaves.
Make binding:
On mini quilts, I'll often do single-fold binding. To do this, I join binding strips on the diagonal. On one long edge, press a seam ¼˝ to the wrong side of the fabric. This edge will be folded to the back of the quilt. Sew the binding to the quilt top as usual, matching the raw edges. Turn the binding to the back of the quilt and hand stitch the binding to the back.
Enjoy your Maple Mini!
As a contributing author of Classic Modern Quilts, I'm so happy to be welcomed into the C&T Publishing family!
I'd love for you to visit my blog: heatherkojan.blogspot.com
Happy Fall and National Sewing Month!
Would you like to win a copy of Classic Modern Quilts? Enter our giveaway here: a Rafflecopter giveaway! US residents only; winner will be announced one week from today.
Congratulations to Julie B., winner of this giveaway! We hope you find lots of inspiration!


