

Make the Wee Village Town Pillow!
Posted by Deirdre Quirk on Apr 18th 2017
Please enjoy this free project by Wendy Williams, from Make Pillows!
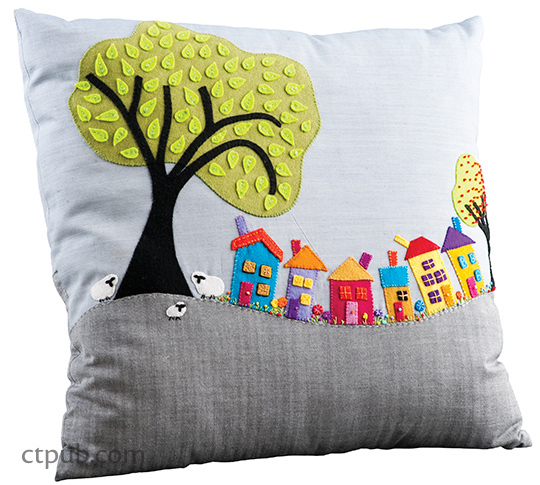
FINISHED SIZE: 20˝ × 20˝
What a charming village! The background fabrics for this pillow are shot cotton in two shades of gray. Try using other colors or even small prints. Choose colors that allow the felt to contrast.
Materials
Yardage is based on 44˝-wide fabric, unless otherwise noted.
LIGHT GRAY SHOT COTTON: 3/4 yard for pillow front
DARK GRAY SHOT COTTON: 1 yard for pillow front and back
MUSLIN (OR SIMILAR): 3/4 yard for backing the appliquéd pillow front
WOOL FELT: 8–10 squares 5˝ × 5˝ of different colors, including white
BLACK WOOL FELT: 1 square 10˝ × 10˝
GREEN WOOL FELT: 2 squares each 10˝ × 10˝ of 2 different greens
FUSIBLE BATTING: 20 1/2˝ × 20 1/2˝
ZIPPER: 18˝
PERLE COTTON THREAD: size 8 in a variety of colors, including black, white, and green
PILLOW FORM: 22˝ × 22˝
Cutting
LIGHT GRAY Cut 1 square 20 1/2˝ × 20 1/2˝. Cut 2 pieces 20 1/2˝ × 11 1/4˝.
DARK GRAY Cut 1 piece 10 1/4˝ × 20 1/2˝.
MUSLIN Cut 1 square 20 1/2˝ × 20 1/2˝.
APPLIQUÉ PIECES
Print the appliqué pattern (download here) at 250%. The patterns pieces also show suggested stitching.
NOTE: All the pieces are cut from wool felt, so there is no need to leave a seam allowance on the patterns.
1. Trace the appliqué patterns on to the dull (paper) side of freezer paper and cut on the drawn lines.
2. Press the freezer-paper templates onto the wool felt.
3. Cut out all the appliqué pieces.
Construction
APPLIQUÉ
Note: I like to stitch as much of the individual wool appliqués as I can before I apply them to the background.
1. Stitch all the windows, roofs, and so on to the appropriate pieces.
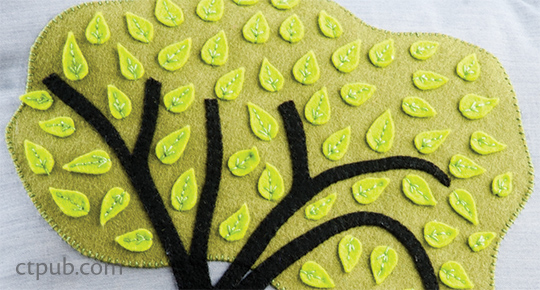
2. Pin the tree branches over the tree and whipstitch them in place.
3. Stitch the leaves to the tree with a backstitch.
Add Shapes to Background
The curved dark gray fabric is appliquéd onto the light gray fabric.
1. To create the landscape curve, place the dark gray 10 1/4˝ × 20 1/2˝ piece right side up on top of the right side of the light gray 20 1/2˝ × 20 1/2˝ square, keeping the lower edges even. With a chalk pencil, draw in a curved line on the dark gray piece, using the project photo as a guide.
2. Trim the curve of the dark gray piece, leaving a 1/4˝ seam allowance. Pin and needle-turn the edge with a small running stitch close to the folded edge. Baste the outside raw edges of the gray fabrics together.
3. Using the project photo and appliqué patterns as a guide, start adding the shapes to the background. Use appliqué pins to hold the shapes in place while you stitch them to the background. Add flowers using small dots of wool and colonial knots. Make the sheep faces with little chainstitches. Add apples to the tree with small colonial knots.
4.Optional: Add embellishments, such as buttons and beads, for added dimension.
FINISH
1. Fuse the fusible batting to the back side of the pillow front, following the manufacturer’s instructions. Press lightly, as you don’t want to flatten the felt shapes.
2. Place the muslin 20 1/2˝ × 20 1/2˝ piece against the batting side of the front, and staystitch around the outside edges. This helps stabilize the appliqué and neaten the back of the pillow top.
3. Using your favorite sewing method, insert the zipper in the light gray 20 1/2˝ × 11 1/4˝ pieces.
4. Close the zipper almost, but not quite all the way, and place the pillow front and back right sides together. Trim the back as necessary. Sew around the pillow edge with a 1/4˝ seam allowance, pivoting at each corner with the needle down.
5. Open the zipper and turn the pillow through to the right side. Insert the pillow form.
WENDY WILLIAMS began her career as a teacher of fashion, expanding to teach patchwork and quilting. She is a prolific designer of quilts, housewares, clothing, and bags. She started her pattern business, Flying Fish Kits, by selling patterns and kits online. Kathy lives near Sydney, Australia.
WEBSITE: flyingfishkits.com.au/kits
This project originally appeared in Wild Blooms & Colorful Creatures by Wendy Williams, available from C&T Publishing.


