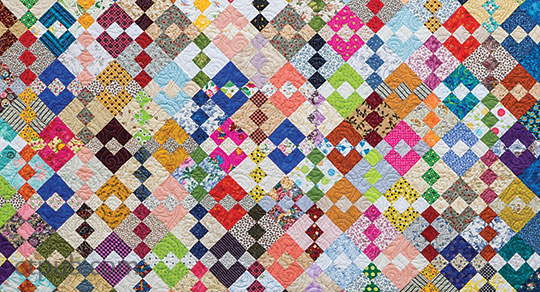
Make Bonnie Hunter's Carolina Chain Quilt
This wonderful, scrappy project comes from Addicted to Scraps by Bonnie K. Hunter.

Finished block size: 9 ̋ × 9 ̋ • Finished quilt: 77 ̋ × 89 1/2 ̋
I love the positive/negative aspect of this traditional block, and any quilt that has chains running through it is a definite favorite in my book.
Because I already saved strips in the 2 ̋ width required for this terrifically fun and scrappy quilt, I was sewing in no time! Processing scraps at the end of any project is just part of the routine for me. I don’t want a box of random and untamed scrap sizes, so I set to work during the cleanup process to cut anything less than half a fat quarter into strips in a variety of usable sizes.
Having the scraps already cut—ready to go in various widths and with strips on hand in a variety of colors—makes it easy to dive right in to a project. Quilts requiring hundreds of different fabrics would be daunting if I had to take the time to iron fat quarters and cut strips before I could even start to cut the required pieces—not to mention how long it would take before I could actually sew something.
MATERIALS
Yardage is based on 40 ̋-wide fabric.
Dark scraps: 4 1/4 yards total for blocks
Light neutral scraps: 4 1/4 yards total for blocks
Blue scraps: 1 yard total for setting triangles
Orange print: 3/4 yard for binding
Backing: 7 1/4 yards
Batting: 85 ̋ × 98 ̋
CUTTING
Dark Chain Quarter-Blocks
From light neutral scraps, cut: 154 matching sets of 2 rectangles 2 ̋ × 3 1/2 ̋ and 2 squares 2 ̋ × 2 ̋
From dark scraps, cut: 154 matching sets of 3 squares 2 ̋ × 2 ̋
Light Chain Quarter-Blocks
From light neutral scraps, cut: 156 matching sets of 3 squares 2 ̋ × 2 ̋
From dark scraps, cut: 156 matching sets of 2 rectangles 2 ̋ × 3 1/2 ̋ and 2 squares 2 ̋ × 2 ̋
Setting Triangles and Binding
From blue scraps, cut: 11 squares 7 5/8 ̋ × 7 5/8 ̋; cut each square on the diagonal twice to yield 44 side triangles 2 squares 7 1/4 ̋ × 7 1/4 ̋; cut each square on the diagonal once to yield 4 corner triangles
From orange print, cut: 9 binding strips 2 ̋ × width of fabric
Cutting Note: Each block quadrant requires only 2 fabrics in 2 shapes as a set. I worked with 2 ̋ strips, stacking strips 4 layers high to quickly cut the pieces I needed for each block unit. I used as many different fabric pairs as possible to get the look I desired. I placed pieces in zipper plastic bags for easy transport when sewing on the road. Cutting everything ahead meant that I did not need to travel with a rotary cutter or a mat.
Note: The letters in the following instructions refer to the letters on the piecing diagrams.
Dark Chain Quarter-Blocks
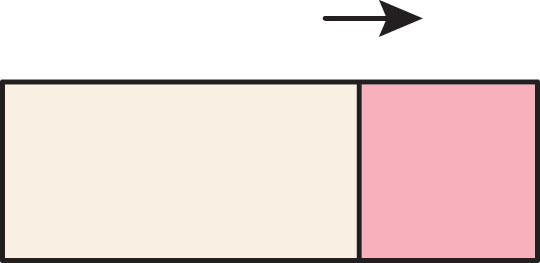
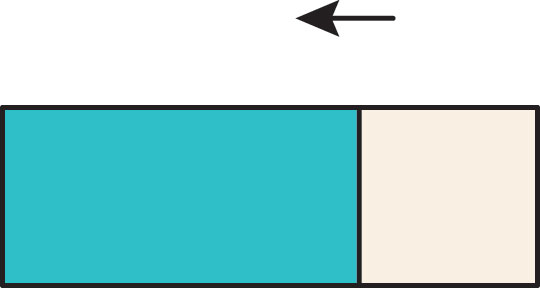
A. Sew a dark 2 ̋ × 2 ̋ square to a light 2 ̋ × 3 1/2 ̋ rectangle to make a block row. Press. Make 2 rows.
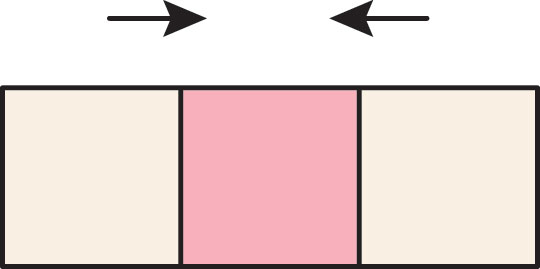
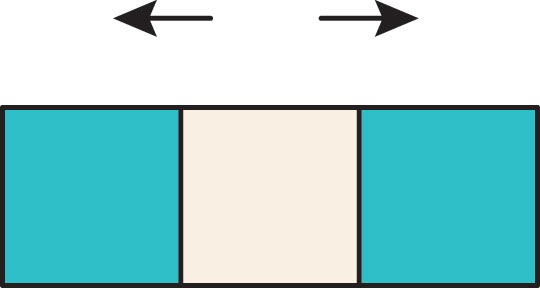
B. Sew a dark 2 ̋ × 2 ̋ square between 2 light 2 ̋ × 2 ̋ squares. Press. Make 1 row.
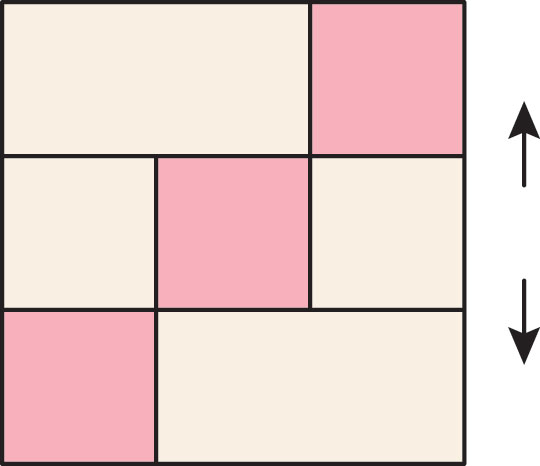
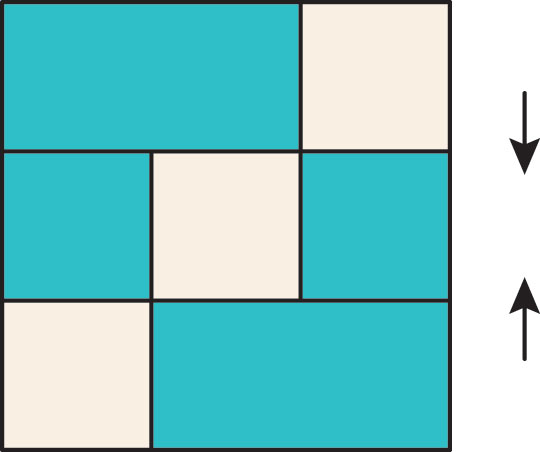
C. Arrange and sew the row of squares between the 2 rows with rectangles, matching the seams to make the quarter-block. Press. Repeat the steps to make 154 dark chain quarter-blocks. You’ll use 144 for the larger blocks; reserve 10 for the pieced setting triangles.
Light Chain Quarter-Blocks
Repeat the steps for the Dark Chain Quarter-Blocks, reversing the value placement so that the quarter-blocks have light chains and dark backgrounds.
D. Sew a light 2 ̋ × 2 ̋ square to a dark 2 ̋ × 3 1/2 ̋ rectangle to make a block row. Press. Make 2 rows.
E. Sew a light 2 ̋ × 2 ̋ square between 2 dark 2 ̋ × 2 ̋ squares. Press. Make 1 row.
F. Arrange and sew the row of squares between the 2 rows with rectangles, matching seams to make the quarter-block. Press. Repeat the steps to make 156 light chain quarter-blocks. You’ll use 144 for the large blocks; reserve 12 for the pieced setting triangles.
Block Assembly
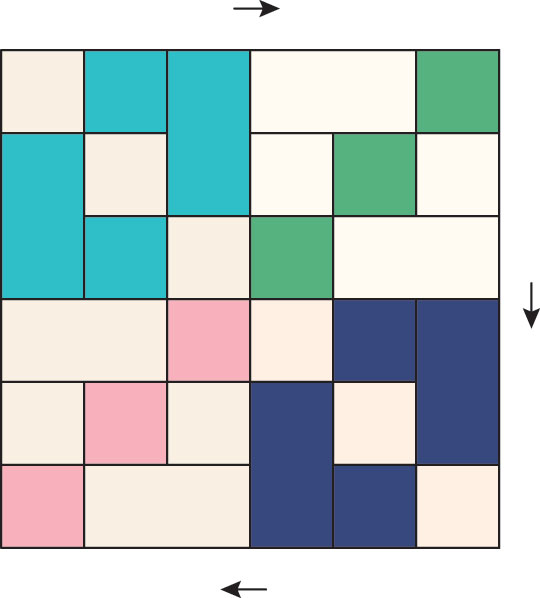
G. Arrange and sew 2 light chain and 2 dark chain quarter-blocks together as shown. Press. Make 72 blocks.
Pieced Setting Triangles
H. Sew a blue side setting triangle to adjacent sides of a reserved dark chain quarter-block as shown. Press the seams toward the triangles. Make 10.
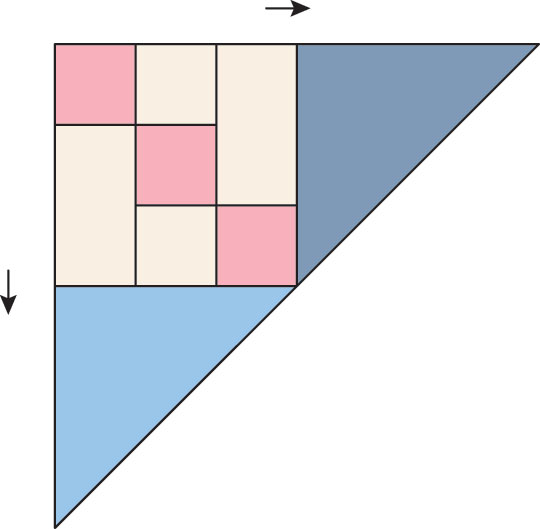
I. Repeat the process to sew a blue side setting triangle to adjacent sides of a reserved light chain quarter-block as shown. Press toward the triangles. Make 12.

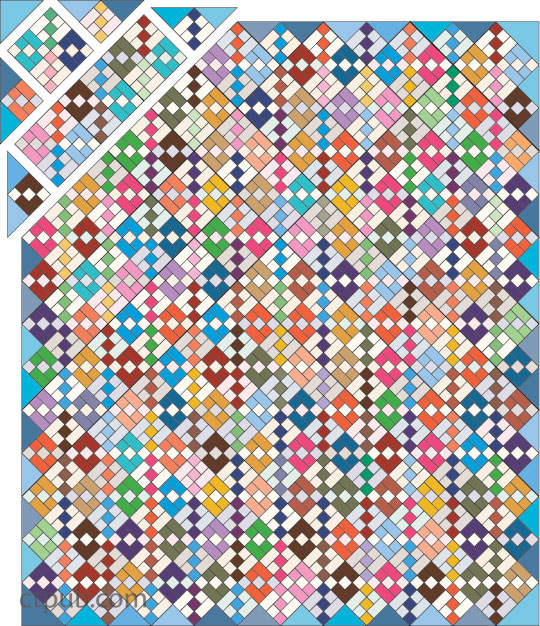
Quilt Assembly
Lay out the blocks in an on-point setting as shown in the quilt assembly diagram; make sure the blocks are oriented correctly, with dark chains running down the quilt from top to bottom and light chains running side by side across the quilt. Fill in around the edges with the pieced setting triangles and corner triangles to complete the dark and light chains.
I like to piece diagonally set quilts into 2 sections and then join the sections. This keeps things from being too unwieldy as the quilt grows. Starting in a corner, sew the blocks and setting triangles into diagonal rows. Press seams in opposing directions from row to row to facilitate nesting seams. Join the rows into 2 sections; press the seams in one direction. Sew the 2 sections together to complete the quilt center. Press.
Trim It Up!
The outer edges of a diagonally set quilt can be a bit wobbly and may need to be trimmed. Use a 24 ̋ ruler, placing the ruler’s 1/4 ̋ line where seams cross on the corners of the setting triangles. Straighten the edge with a rotary cutter, leaving a 1/4 ̋ seam allowance beyond the block corners around the edges of the quilt. This helps make sure that the quilt corners are also square.
Staystitch the Edges
Diagonally set quilts can also be stretchy. Even though the setting triangles have the straight of grain along the outside edge, the blocks are set on point with the bias grain running from top to bottom and side to side. Stop the stretch by staystitching 3/16 ̋ away from the edge of the quilt top, just within the 1/4 ̋ seam allowance. Set your sewing machine for a longer stitch length and do not stretch the quilt top when sewing.
Finishing
Layer, quilt, and bind as desired. I machine quilted Carolina Chain with light blue thread in an edge-to-edge design called Paisley by Patricia Ritter of Urban Elementz. I cut binding strips 2 ̋ wide and sew the binding to the quilt with a 1/4 ̋ seam. This gives me a 1/4 ̋ finished binding that doesn’t nip off the points of my blocks.