

Kim Diehl’s Simple Double-Dipped Quilts Mystery Holiday Stitch-Along: Part 3
Dec 12th 2023
Welcome to Part 3, the final part, of Kim Diehl’s Simple Double-Dipped Mystery Holiday Stitch-Along! Read below to find directions for cutting and piecing fabric.
TABLE RUNNER
Cutting the Binding
From the fat quarter of red or green print chosen for the binding, cut: 6 strips, 2 1⁄2" × 21"
Assembling and Finishing the Table Runner
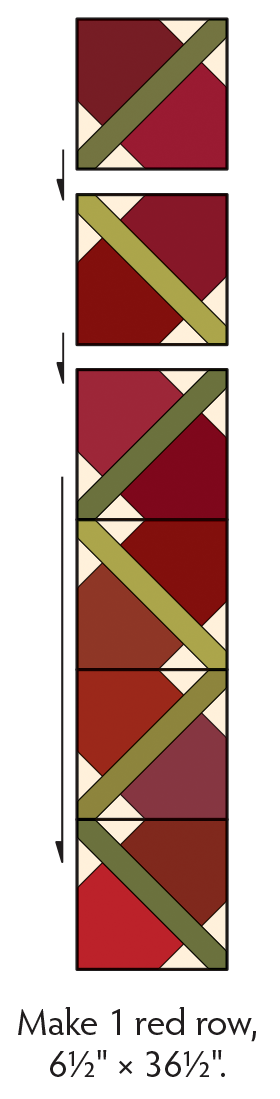
1. Lay out the six red blocks from Part 1 end to end in one row, rotating the blocks as shown. Join the blocks. Press the seam allowances to one side, all in the same direction.
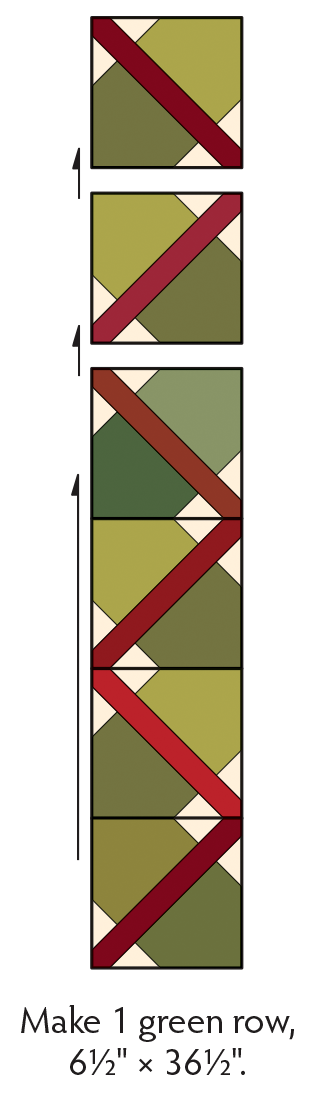
2. Lay out the six green blocks from Part 2 end to end in one row, again rotating them as shown. Join the blocks. Press the seam allowances to one side, in the opposite direction of how the red blocks are pressed.
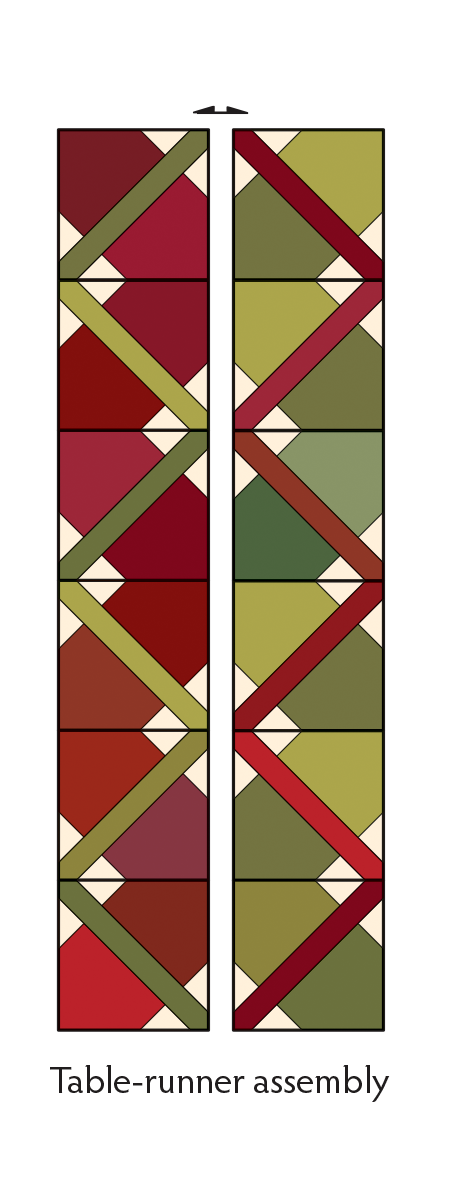
3. Referring to the illustration, join the red and green rows. Press the seam allowances open.
4. Referring to Raising the Roof in Simple Double-Dipped Quilts, follow the instructions provided in “Completing the Quilt” on page 56 to finish and bind the table runner.
TABLE TOPPER
Cutting the Binding
From the red or green print for binding, cut:
4 strips, 2 1⁄2" × 42"
Assembling and Finishing the Topper
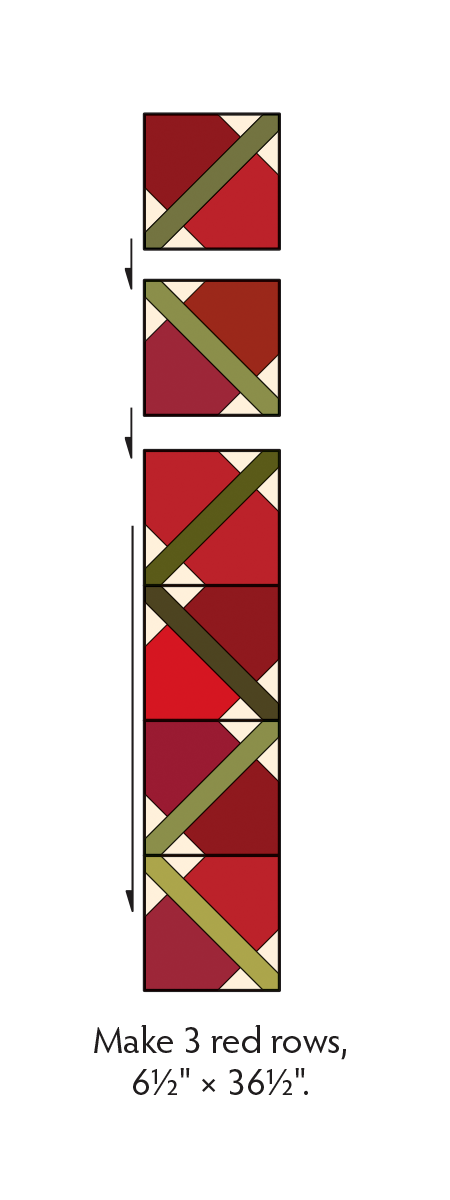
1. Lay out six red blocks from Part 1 end in one row, rotating the blocks as shown. Join the blocks. Press the seam allowances to one side, all in the same direction. Repeat to piece a total of three red rows.
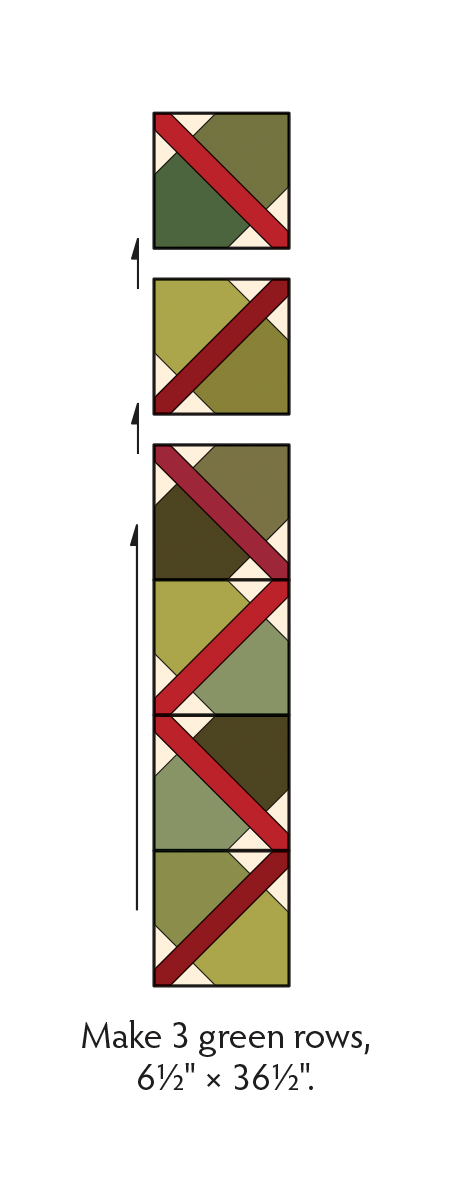
2. Lay out six green blocks from Part 2 end to end in one row as shown. Join the blocks. Press the seam allowances to one side, in the opposite direction of the pressed blocks from Step 1.
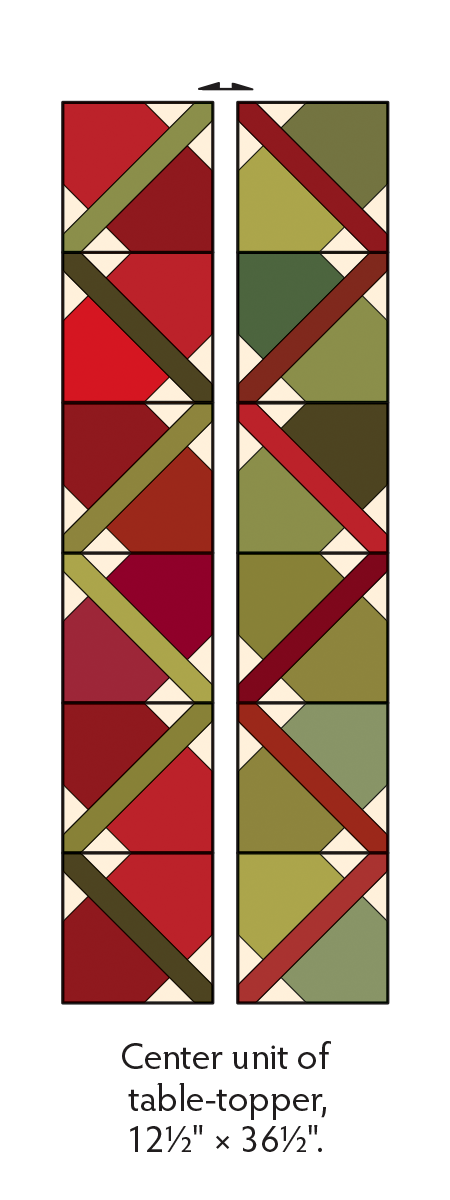
3. Join one red and one green row as shown to form the center unit of the table topper. Press the seam allowances open.
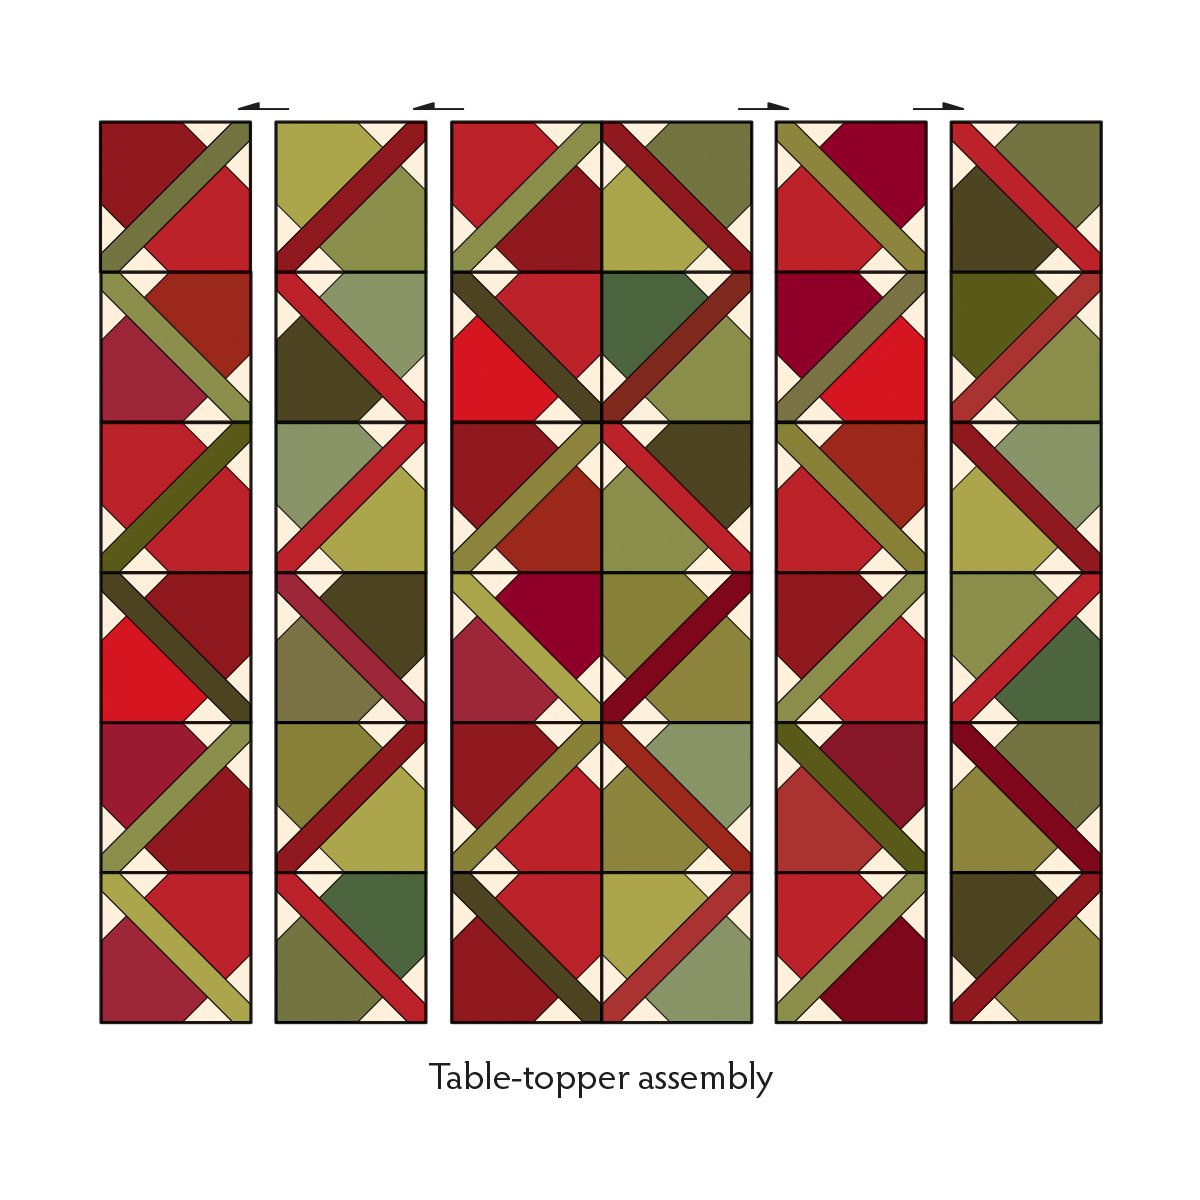
4. Referring to the illustration, join a red row and a green row to each long side of the pieced center unit, positioning the rows so the red and green row colors alternate. Press the seam allowances toward the newly added rows.
5. Refer to "Completing the Quilt" on page 56 of Simple Double-Dipped Quilts to finish and bind the table topper. Or see “Skirting the Issue” on page 4 to finish it as a tree skirt!
PROJECT NOTES
- You will need a copy of Simple Double-Dipped Quilts for individual block instructions for this mystery quilt.
- Page numbers referenced in each section may differ if you’re using an eBook, so project names and section titles are referenced to help you easily find the needed steps.
- For the best use of your fabrics, please save your scraps each week to use in subsequent weeks.
DOUBLE-TAKE TIP
Skirting the Issue
Here’s a great alternate idea for using for your table topper.
With a few easy steps, you can transform it into a tree skirt!
Here’s how:
1. Lay your quilted and trimmed table topper flat on your work surface. Choose a small round plate in the size you’d like your tree skirt opening to be, position it onto the middle of the four-block unit at the center of the topper, and use a pencil or water-soluble marker to trace around the plate to mark a circle onto the quilted topper.
2. Use a rotary cutter and acrylic ruler or scissors to cut through all quilt layers along the center seam on one side of the topper, continuing until you reach the traced circle. Finish cutting along the drawn line of the circle to remove the center portion of the quilt.
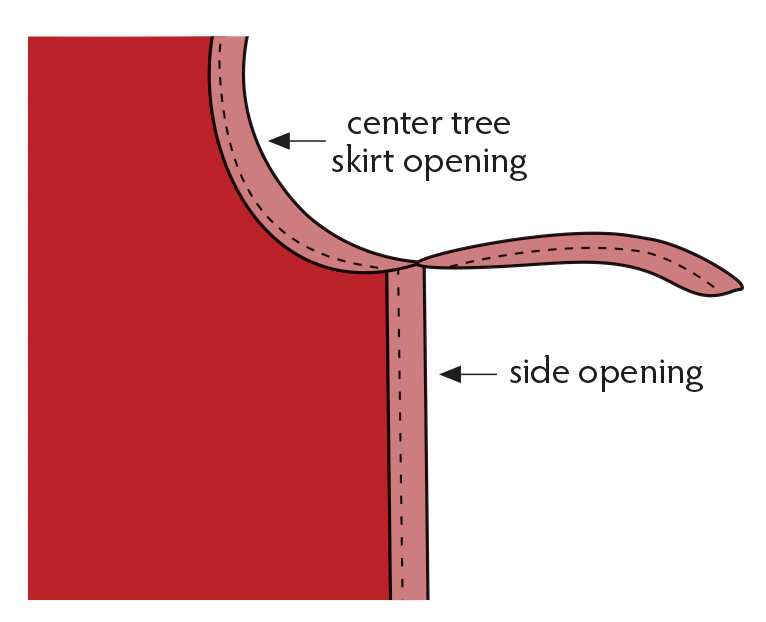
3. Beginning at one corner of the circular opening, apply the binding, working down the first cut edge and continuing around the perimeter of the quilt to bind all raw edges, except for the circular opening. (Note: It isn’t necessary to finish or turn under the raw ends where the binding starts and stops, as they’ll be enclosed when the ties are added.)
4. Measure the circular opening and add 20" to this measurement for ties; cut a 2"-wide bias strip from your binding print (or a complimentary print) in this length.
5. Use a bias-tape maker designed to produce 1"-wide double-fold tape to press the bias strip flat with the long raw edges meeting at the center of the strip. Fold this pressed strip in half crosswise to find the midpoint; finger press the position.
6. With the folded side of the strip facing upward, align the finger-pressed center crease with the center point of the circular opening. Pin the bias strip in place around the circular opening, stopping at each corner. Beginning and ending with a couple of back stitches, machine stitch the strip in place 1⁄4" in from the raw edge of the circular opening, starting and stopping at each corner. Fold the loose portion of the stitched strip over to the back of the quilt and hand stitch it in place, beginning and ending at the corners.
7. Working on one end at a time, align the long folded edges of the bias strip that extend beyond the quilt; machine stitch them together, a few threads in from the folds, to form a tie. As you approach the tie end, turn the raw edges inward and continue stitching to encase them within the folds. Repeat to complete the other tie.
...
This is the final part of the stitch along!
Follow Kim Diehl on Instagram for updates. Use the hashtag #simpledoubledippedquiltsmysterystitchalong in any Instagram posts along the way.
For more information on the Simple Double-Dipped Mystery Holiday Stitch-Along, including the supply list and schedule, visit the first stitch-along blog post here.


