

Get a Taste of Wool Appliqué with a Free Project
Posted by Deborah Gale Tirico on Apr 10th 2018
Please enjoy this fun, free project taken from A New Dimension in Wool Appliqué—Baltimore Album Style by Deborah Gale Tirico.
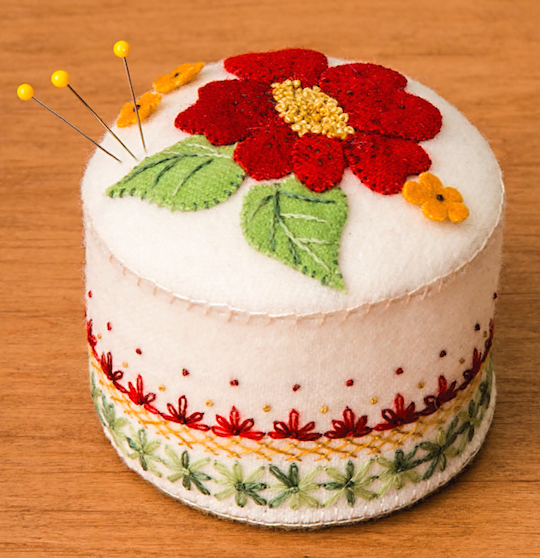
Red Majesty Pincushion
LEVEL: Intermediate FINISHED SIZE: 4˝ diameter, 2 1/2˝ high
Pincushions have long been a sewing basket staple. All stitchers, from dressmakers to quilters, need a hearty pincushion by their side. And felted wool is the perfect fabric for the job, because needles slide into this unique fabric like butter, making it easy to insert and remove pins quickly. This pincushion features fancy embroidery bands that decorate the sides and a floral design for the top.
Supplies
- Freezer paper for pattern making
- Clear acetate for placement guide
- Skirtex upholstery stiffener, 5" × 5"
- White felted wool for top and sides, 8" × 13"
- Weeks Dye Works felted wool in the following dimensions or other wool fabric in similar colors:
- Louisiana Hot Sauce (dark red), 5" × 5"
- Meadow (light green), 2" × 4"
- Mustard (golden yellow), 1" × 3"
- Weeks Dye works wool thread in Cayenne (red), Ivy (green), Molasses (dark brown), and Whiskey (gold)
- White perle cotton #8
- Craft stuffing
- Fine archival pen
- Transparent 6˝ ruler
- Download the patterns here.
Make the Pincushion
PREWORK
PREPARE THE BASE FABRIC
Whatever the final shape of your project—whether square, circle, or oval—it is important to mark the edges in order to center the appliqué design accurately. When marking the base for wool projects, use a freezer-paper pattern and a pen.
1. Trace the pattern for the project base onto the matte side of a piece of freezer paper.
2. Cut out the shape and iron it onto your wool fabric with a hot iron. The shiny side of the freezer paper should be down and against the fabric.
3. Trace a line around the outside of the freezer-paper pattern onto the wool fabric. Use a white gel pen if the fabric is dark or a black fine archival pen if the fabric is light. Keep the pen completely perpendicular to the fabric so that the ink flows easily and your marks are smooth.
4. Remove the freezer paper. You will have a line marking the edge of the design area, which can be cut away once the appliqué and embroidery are completed. Do not cut out the base fabric shape until you are finished with your appliqué and embroidery; the base and the backing should always be cut together.
5. Rough cut around the shape so that there will be less fabric to deal with as you work. For the base shape, cut about 1/2" larger than the marked line all the way around; for especially small shapes, cut 1/4" larger.
MAKE A PLACEMENT GUIDE
Position a piece of clear plastic acetate over the pattern and tape it in place to avoid slippage. Use small pieces of tape and 8 mm acetate, which can be found at craft and fabric stores in the home decoration department. This type of acetate is often used for table covers and slipcovers.
MAKE THE APPLIQUÉS
1. Create the leaf and flower appliqués for the top of the pincushion using freezer-paper pattern methods. Position the patterns according to the placement guide.
2. Pin and baste in place.

APPLIQUÉ
1. Appliqué the flower petals with cayenne thread and the leaves with ivy, using the slanted-needle technique.
2. Secure the small mustard flowers using a single colonial knot with 2 lengths of molasses thread to anchor them in place.
EMBELLISH
1. Embellish the flower centers with colonial knots using 2 lengths of whiskey thread.
2. Embellish the Louisiana hot sauce petals with seed stitches and a single length of molasses thread.
3. Embellish the leaves with a stem stitch in ivy thread.

MAKE AN EMBROIDERY GUIDE FOR THE SIDES
1. Use a fine archival pen to mark dotted lines around the perimeter of the side pattern.
2. From the bottom dotted line, mark additional dotted lines 1/2˝, 1/4˝, and 3/8˝ from the bottom.
3. Cover all the lines with a tiny running stitch, using the dotted lines as your guide.
4. Flip the fabric over so the side with just the running stitch becomes the side you will embroider.
EMBROIDER
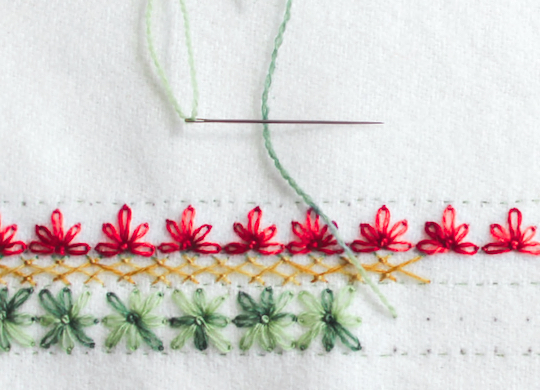
The Bottom Band
1. Using a transparent 6" ruler, mark the first band with a fine archival pen on the side with the running stitches. Make dots in 1/4" increments, starting 1/4" above the bottom. These dots mark the centers as well as the space between the lazy daisy squares.
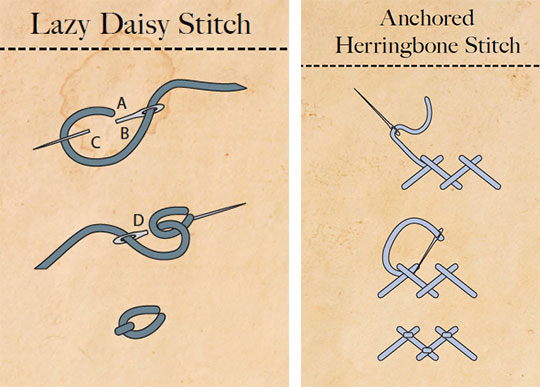
2. Using ivy thread and referring to the illustration below, make a lazy daisy stitch on all 4 corners and on the top middle, side middle, and bottom middle from the center. Once these are finished, complete the flower with a single colonial knot in the center.
The Middle Band
Refer to the illustration above of the anchored herringbone stitch. Work the middle band in an anchored herringbone stitch with whiskey wool thread. Use the bottom flowers as a guide and work this stitch in 3 rows: the right, the left, and then the anchor stitches.
The Top Band
Work the top band much as you worked the bottom band, but here the stitches are configured in a triangle and there are only 5 lazy daisy stitches. Work this band in cayenne thread and finish with a single colonial knot in the center.
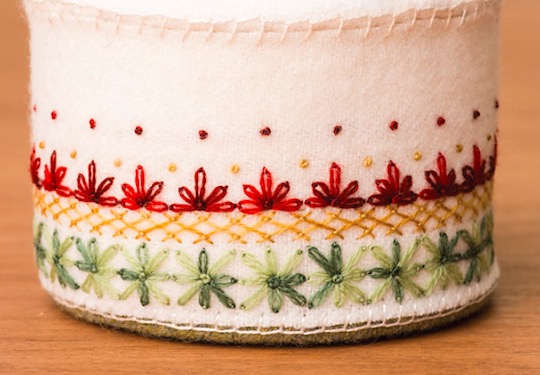
The Knots
Using the transparent ruler and fine archival pen, mark a dot at the center top of the cayenne band. These dots will be covered in colonial knots using whiskey wool thread. Mark another dot 1/4" above the center of the top band and cover these dots with a colonial knot in cayenne thread.
FINISHING
1. Using freezer-paper methods, cut the sides, top, and another circle from the top pattern in white.
2. Cut out the side piece, removing any fragments of the running stitch guide. With right sides together, sew 1/4" seam along the short sides of the rectangle and reverse the side piece so the right sides are facing out.
3. Stabilize the bottom piece with Skirtex upholstery stiffener. Leave the tops unstabilized to make it easier to insert pins.
4. Blanket stitch the bottom piece to the sides with white perle cotton #8. Stuff and blanket stitch the top.
5. Drop a few pins in it and away you go!
For more great projects like this one, check out A New Dimension in Wool Appliqué—Baltimore Album Style.


