

Free project with Heidi Staples: Typewriter Mini Quilt
Posted by Heidi Staples on Mar 1st 2015
Happy National Craft Month! In honor of craft month, we are hosting some of our fabulous authors on our blog who will be sharing free projects, behind the scenes of the making of their books, giveaways, and more! To kick off craft month, please join us in welcoming Sew Organized author Heidi Staples!
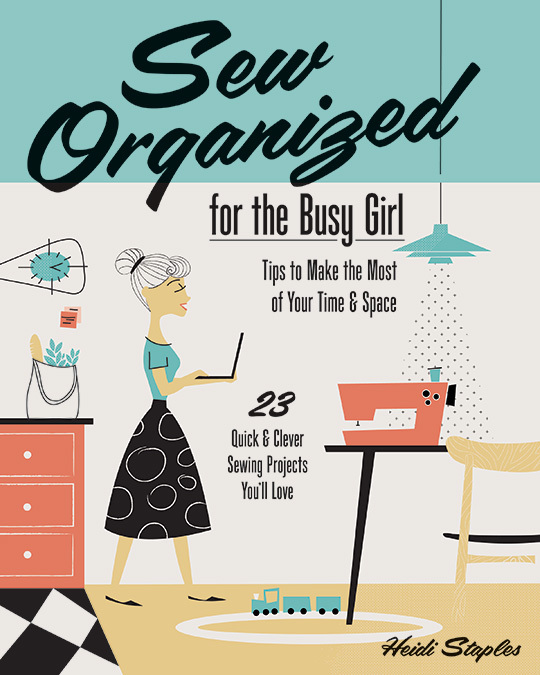
My name is Heidi Staples, and I'm so thrilled to be here today on the C&T blog! I've spent the last few years writing about my everyday sewing adventures on my blog Fabric Mutt, but now I get to share even more with all of you in my new book, Sew Organized for the Busy Girl.
This has been such a personal project for me. I've met so many people who are also desperately seeking ways to stay creative in the midst of a busy life, and I wanted to write a book that would be useful for all of us. Reading Sew Organized for the Busy Girl is kind of like sitting down with me in my sewing room while we share helpful ideas, talk about what's going on in our lives, and work on our projects together. I've done my best to keep things real and be honest about the joys and struggles that I face on a daily basis as I make time for sewing. In these pages you'll find background about my own sewing journey, great advice from some of my blogging friends, activity pages where you can journal your own thoughts, and organizational tips for people at all levels of sewing experience and ability. I've also included plenty of projects that are quick to sew and easy to customize for different occasions and people. I wanted this book to be the first thing you turn to when you need a last minute gift, easy-to-implement advice, or just a fun project that you can actually finish in one afternoon!
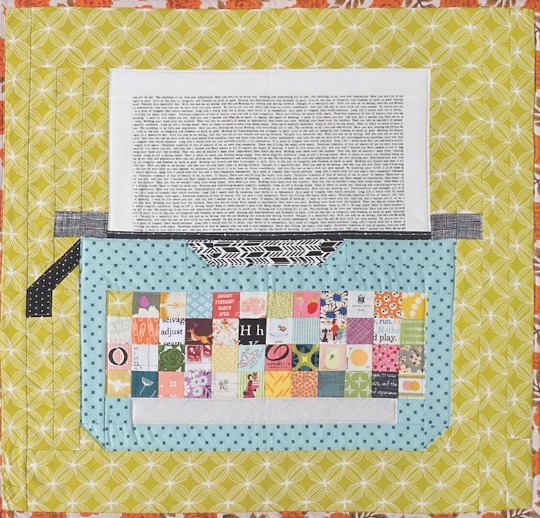
I've written so many free tutorials for my blog Fabric Mutt, and today I'd like to share what may possibly be my favorite one yet: the Typewriter Mini Quilt. It's no secret that I'm absolutely in love with all things retro, and typewriters are no exception. This project is a fun way to use up tiny leftovers of your favorite fabrics, including the text prints that I so adore. I personally think that this quilt would look adorable in any number of settings: a college dorm room, a home office, even a stylish nursery. Every bit of the pattern is done with traditional piecing which you can follow through the diagrams below from the pages of my sketchbook. Get out your scrap bucket and spend a weekend putting together your very own fabric puzzle!
Typewriter Mini Quilt
Finished quilt: 29 x 31"
Fabric Requirements and Cutting Instructions
| Fabric | For | Cutting |
| Various scraps, enough for 48 squares 2'' x 2'' and 1 rectangle 2'' x 15 1/2'' | Keyboard | From each of the 48 prints, cut 1 square 2'' x 2''. |
| Space bar | From 1 print, cut 1 rectangle 2'' x 15 1/2''. | |
| 1/2 yard aqua print | Sides of space bar | Cut 2 squares 2'' x 2''. |
| Below keyboard | Cut 1 strip 2'' x 18 1/4''. | |
| Half square triangles on the typewriter body | Cut 2 squares 2 1/2'' x 2 1/2'' | |
| Sides of keyboard | Cut 2 strips 2'' x 7 3/4''. | |
| Above keyboard | Cut 1 strip 2'' x 21 1/2''. | |
| Sides of type bars | Cut 2 strips 2'' x 6 1/2''. | |
| 1/4 yard black sketch print | Platen roller | Cut 4 squares 2'' x 2'' |
| 1/4 yard black herringbone print | Type bar | Cut 1 square 2 1/2'' x 2 1/2''.
Cut 1 rectangle 2'' x 6 1/2''. |
| 1/4 yard black-and-white lined print | Paper bail | Cut 1 strip 1'' x 18 1/2''. |
| 1/4 yard textured white print | Paper side margins | Cut 2 strips 2'' x 8''. |
| Paper top margin | Cut 1 strip 2'' x 18 1/2''. | |
| 1/4 yard text print | Typed paper message | Cut 1 rectangle 3'' x 15 1/2''. |
| 1/8 yard black dot print | Carriage return lever | Cut 2 squares 2 1/2'' x 2 1/2''.
Cut 1 square 2'' x 2''. |
| 2/3 yard green print | Half square triangles for lower corners of typewriter body and carriage return lever | Cut 3 squares 2 1/2'' x 2 1/2''. |
| Right side of typewriter body | Cut 1 strip 2'' x 9 1/2''. | |
| Left side of typewriter body | Cut 1 strip 2'' x 12 1/2''. | |
| Sides of paper | Cut 4 strips 2'' x 8 1/2''. | |
| Above carriage return lever | Cut 1 strip 2'' x 11 1/2''. | |
| Below carriage return lever | Cut 1 strip 2'' x 8''. | |
| Borders above and below block | Cut 2 rectangles 4'' x 25 1/2''. | |
| Side borders | Cut 2 strips 2'' x 28 1/2''. | |
| 1 yard batting | Quilting | Cut 1 rectangle 31'' x 33''. |
| 1 yard color dot print | Backing | Cut 1 rectangle 31'' x 33''. |
| 1/2 yard orange print | Binding | Cut 4 strips 2 1/2'' by width of fabric. |
Making the Quilt
Sew the Half-Square Triangles
If you're unfamiliar with how to make half square triangles, you can find illustrated directions here.
1. Pair a 2 1/2'' green square and a 2 1/2'' aqua square to make 2 half-square triangles. These will be used in Step 4.
2. Pair a 2 1/2'' aqua square and a 2 1/2'' herringbone square to make 2 half-square triangles. These will be used in Step 6.
3. Pair 2 sets of 2 1/2'' green squares and 2 1/2'' black dot squares to make 4 half-square triangles. You will use 2 of these in Step 11 and 1 in Step 12.
Assemble the Blocks
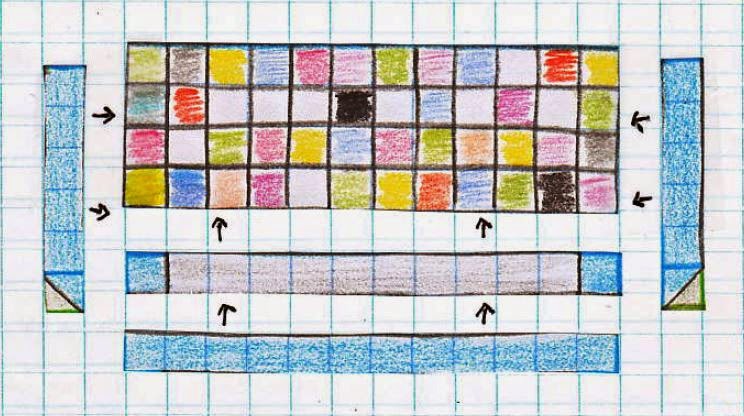
1. Arrange the 48 print squares in a grid, 12 across and 4 down. Sew the blocks in 4 long rows and then sew the rows together.
2. Sew the 2'' aqua squares to the short ends of the 2'' x 15 1/2'' space bar. Sew this unit to the bottom of the keyboard.
3. Sew the 2'' x 18 1/4'' aqua strip beneath the space bar unit.
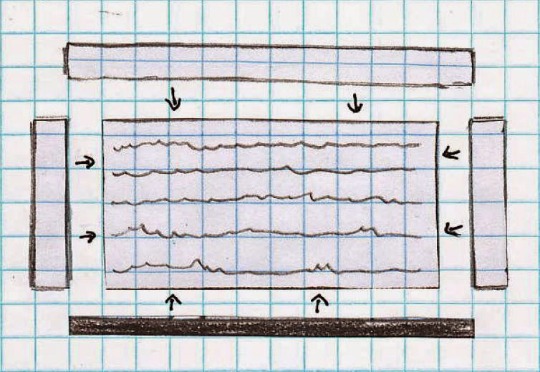
4. Sew an aqua/green half-square triangle to a short end of each 2'' x 7 3/4'' aqua strip, referring to the diagram (below) for triangle placement. Sew the strips to opposite sides of the keyboard.
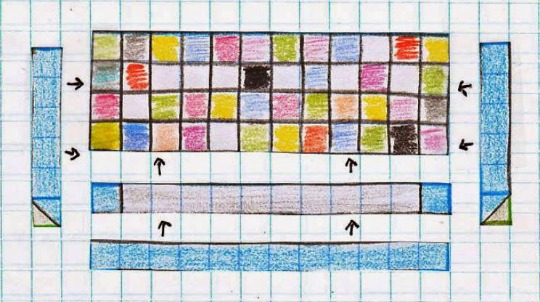
| Steps 1-4: Create a keyboard from 48 print squares, then add strips for the sides and bottom of the typewriter body. |
5. Sew the 2'' x 21 1/2'' aqua strip to the top of the keyboard.
6. Sew the aqua/herringbone half-square triangles to opposite ends of the 2 1/2'' x 6 1/2'' herringbone rectangle (referring to the diagram below for triangle placement); add both 2'' x 6 1/2'' aqua strips to either end of this unit. Sew this row to the top of the keyboard panel.
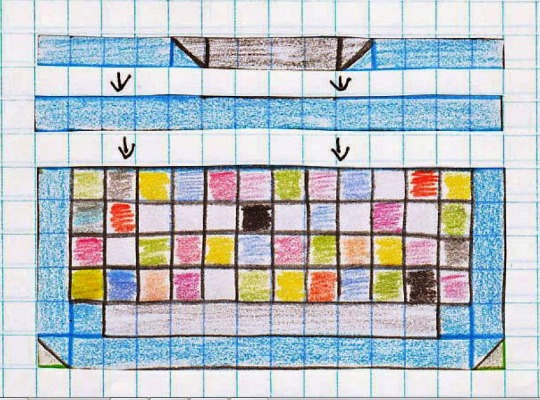
| Steps 5-6: Add strips for the top of the typewriter body and the edges of the type bar. |
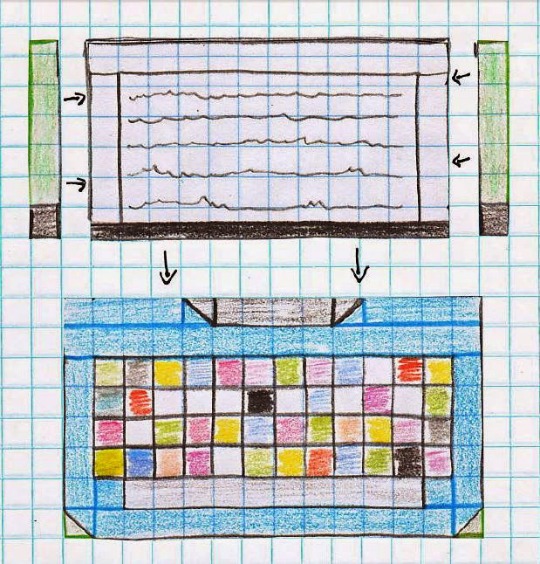
7. Sew the textured white side margins to the sides of the text print. Sew the top margin to the top of the unit. Sew the black-and-white lined 1'' x 18 1/2'' strip to the bottom of the paper section.
| Step 7: Add the side and top margins to the text print. Sew a dark strip to the bottom of the paper. |
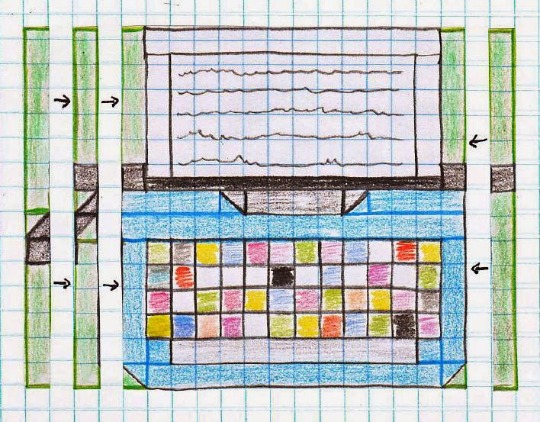
8. Sew a 2'' black-sketch square to the short end of a 2'' x 8 1/2'' green strip. Make 4. Sew 1 of these units to either side of the paper section. Save the other 2 units for Steps 10 and 11.
9. Sew the paper and keyboard sections together.
| Steps 8-9: Sew background/black strips to each side of the paper unit; add the paper unit to the keyboard. |
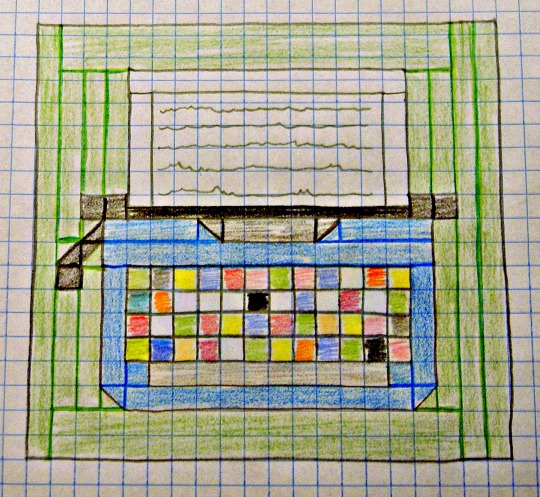
10. Sew a 2'' x 12 1/2'' green strip to the black sketch end of a black sketch/green unit from Step 8 (see diagram below). Add to the right side of the unit from Step 9, making sure that the black squares line up properly.
11. To the remaining sketch/green unit from Step 8, sew 2 green/black dot half-squares and a green 2'' x 9 1/2'' strip (see diagram below). Add to the left side of the typewriter block, matching black squares.
12. Sew a green 2'' x 11 1/2'' strip, a green/black dot half square triangle, a black dot 2'' square, and a green 2'' x 8'' strip together (see diagram below). Add to the left of the unit from Step 11.
| Steps 10-12: Sew background/black strips to each side of the paper unit; add the paper unit to the keyboard. |
13. Sew the 4'' x 25 1/2'' green borders above and below the typewriter block. Sew one 2 x 28 1/2'' strip to the left side of the typewriter block, and add the 2 remaining 2 x 28 1/2'' strips to the right side of the quilt.
| The finished quilt top! |
Finishing the Quilt
1. Stack in this order from bottom to top: quilt backing (right side down), batting, and quilt top (right side up).
2. Quilt and bind as desired.
If you make one of these little quilts, please share it! You can use the hashtags #typewriterminiquilt and #seworganized on Instagram, and be sure to tag us @fabricmutt and @ctpublishing so we can get a peek at what you're sewing.
Want more projects from Heidi's new book, Sew Organized for the Busy Girl? You're in luck! We're giving away one copy to one lucky winner! Enter here: a Rafflecopter giveaway


