

Free Project from Foolproof Crazy-Quilt Projects
Posted by Jennifer Clouston on Jan 24th 2017

Sew a bright and funky sewing pouch with these instructions from Foolproof Crazy-Quilt Projects! Finished size: 5˝ × 10˝.
FABRIC AND SUPPLIES
• Small scraps at least 5˝ square for the crazy design
• 1 piece of foundation fabric 9˝ × 13˝
• 2 pieces of lining fabric each 9˝ x13˝
• 1 piece of backing fabric 9˝ × 13˝
• 2 pieces of lightweight fusible fleece 9˝ × 13˝ (I use Vilene H630 by Pellon.)
• 1˝ wide twill tape 120˝ (Or you can use binding.)
NEEDLES AND THREADS
• Milliners #03 needle for Perle cotton #8 thread
• Chenille #22 needle for 4mm and 7mm silk ribbon
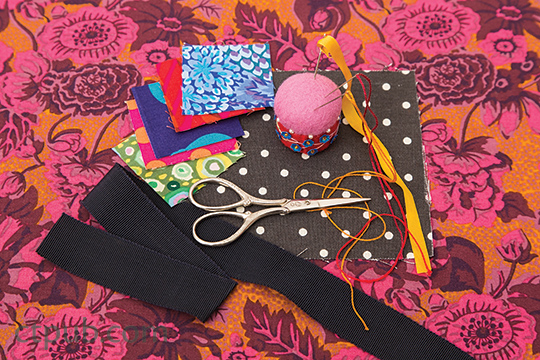
Fabrics, needles, threads, and tape
Construction
Pattern includes 1/4˝ seam allowance.
Making the Front Panel
Use Pattern 2 (pullout page P3) for the front panel.
1. Follow the foundation piecing method (page 10) to complete the front panel.
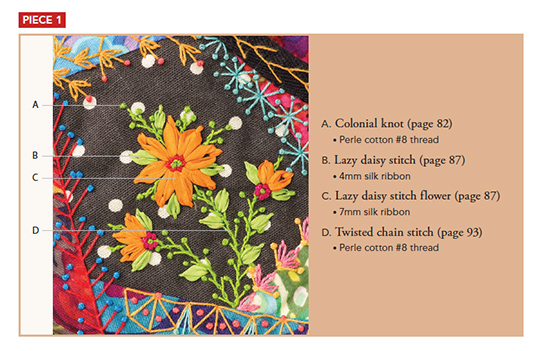
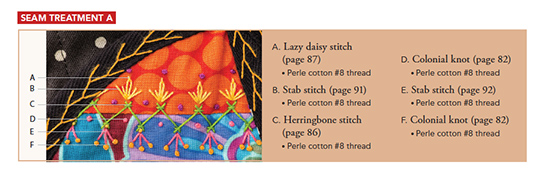
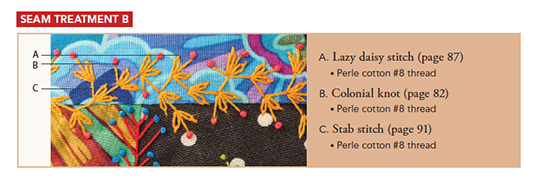
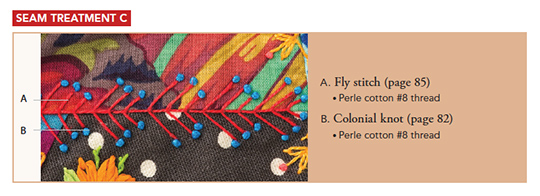
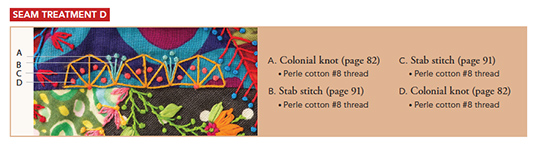
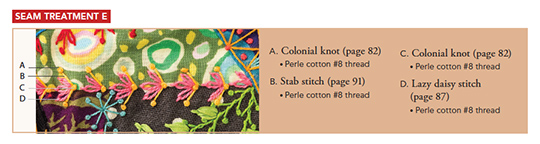
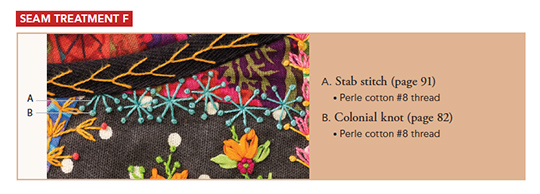
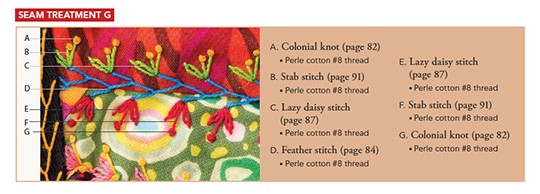
2. Follow the stitch maps (pages 20–22) to complete the seam treatments. 3. Trim the completed front panel on the cutting line.
Stitch Maps
Making the Back Panel
1. Trace the perimeter lines of Pattern 3 (pullout page P3) onto the right side of the backing fabric.
2. Fuse the fleece to the wrong side of the backing fabric.
3. Trim on the cutting line.
Adding the Lining
1. Trace the perimeter lines of the front panel onto the lining fabric.
2. Trim the lining fabric on the cutting line.
3. Place the lining fabric face down on the work surface. Lay the embroidered panel right side up on the lining fabric. Align the edges and baste around the perimeter of the panel.
4. Trace the perimeter lines of the back panel onto the lining fabric. Trim on the cutting line.
5. Lay the lining fabric right side down on the work surface. Lay the backing fabric right side up on the lining fabric. Align the edges and baste around the perimeter of the back panel.
6. Mark diagonal lines 1˝ apart on the back panel.
7. Machine or hand quilt along the marked lines.
Assembly
1. Cut an 11˝ section of the twill tape. Fold the tape in half lengthwise. Place the folded tape over the top of the embroidered panel, enclosing the raw edges. Making sure that the tape is even on both the front and back, machine stitch the tape a scant 1/8˝ from the tape’s edge. Trim off the excess twill tape.

Machine stitch tape.
2. Place the back panel of the pouch with the lining fabric facing you on the work surface.
3. Lay the embroidered front panel right side up on the back panel. NOTE The front panel is slightly larger than the back panel.
4. Align the rounded seams of the pouch.
5. Using a scant 1/4˝ seam allowance, machine stitch around the rounded edge of the pouch, leaving the top open.
Machine stitch around rounded edge of pouch, leaving top open.
6. Cut a 21˝ section of the twill tape. Fold the tape in half lengthwise and place the folded tape over the domed shape of the pouch, enclosing the raw edges; pin.
7. Make sure the tape is even on both the front and back; then machine stitch in place a scant 1/8˝ from the edge of the tape to join the front and pack pouch panels. Trim off the excess twill tape.

Panels joined, leaving top open
8. Measure the circumference of your waist (yes, I know this is scary!) and add a yard to your measurement. Cut the twill tape to the final measurement.
9. Find the center of the length of the tape by folding it half widthwise. Match the center of the tape with the middle of the top edge of the back panel. Pin in place.

Pin tape in place.
10. Fold the twill tape in half widthwise and begin stitching the tape from 1 end, a scant 1/8˝ from the edge.
11. Continue stitching until you reach the edge of the pouch. Enclose the raw edges of the top of the pouch inside the folded tape.
12. Continue stitching the tape until you reach the end.
13. Knot both ends of the tape and trim any loose threads.
14. Use contrasting threads to embroider the tape with a feather stitch.


