

Finishing the Quilt! Tips & Tricks
Aug 26th 2020
The following information is from Cabin Fever by Natalia Bonner and Kathleen Whiting. Read some tips and trick on how to finish a quilt, plus enter our giveaway at the end for a free ebook copy.
Backing
Plan on making the backing a minimum of 8˝ longer and wider than the quilt top. Peice, if necessary. Trim the selvages before you piece to the desired size.
To economize, piece the back from any leftover quilting fabrics or blocks in your collection.
Batting
The type of batting to use is a personal decision; consult your local quilt shop. Cut batting approximately 8˝ longer and wider than the quilt top. Note that your batting choice will affect how much quilting is necessary for the quilt. Check the manufacturer’s instructions to see how far apart the quilting lines can be.
Layering
If you are taking your quilt to a longarm quilter, you don’t need to layer or baste it. Spread the backing wrong side up and tape the edges down with masking tape. (If you are working on carpet you can use T-pins to secure the backing to the carpet.) Center the batting on top, smoothing out any folds. Place the quilt top right side up on top of the batting and backing, making sure it is centered.
Basting
Basting keeps the quilt “sandwich” layers from shifting while you are quilting.
If you plan to machine quilt on your domestic machine, pin baste the quilt layers together with safety pins placed about 3˝–4˝ apart.
Begin pin basting in the center and move toward the edges, first in vertical and then in horizontal rows. Try not to pin directly on the intended quilting lines.
If you plan to hand quilt, baste the layers together with thread using a long needle and light-colored thread. Knot one end of the thread. Using stitches approximately the length of the needle, begin in the center and move out toward the edges in vertical and horizontal rows approximately 4˝ apart.
Add two diagonal rows of basting.
Quilting
Quilting, whether by hand or machine, enhances the pieced or appliquéd design of the quilt. You may choose to stitch in-the-ditch, echo the pieced or appliquéd motifs, use patterns from quilting design books and stencils, or do your own free-motion quilting.
Finishing the Binding Ends
METHOD 1
After stitching around the quilt, fold under the beginning tail of the binding strip 1/4˝ so that the raw edge will be inside the binding after it is turned to the back side of the quilt. Place the end tail of the binding strip inside the beginning folded end. Continue to attach the binding and stitch slightly beyond the starting stitches. Trim the excess binding. Fold the binding over the raw edges to the quilt back and hand stitch, mitering the corners.
METHOD 2
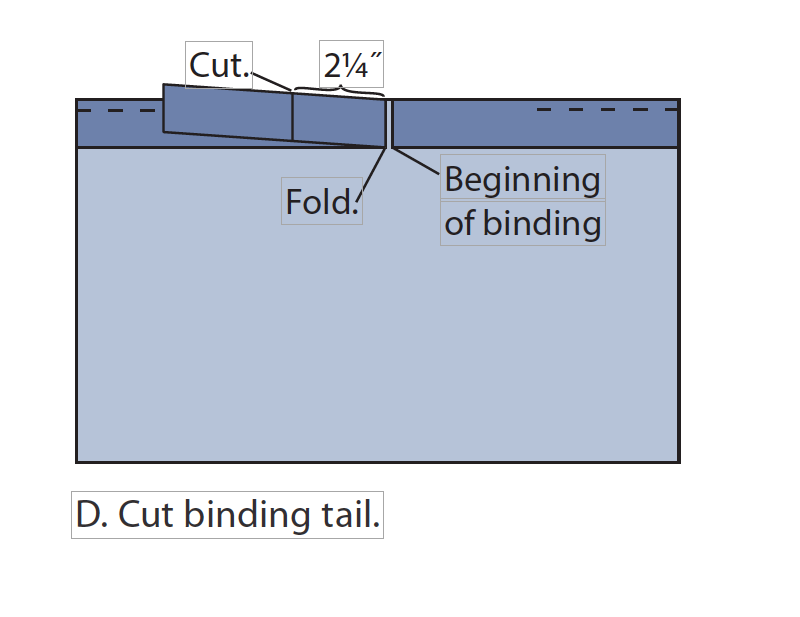
1.Fold the ending tail of the binding back on itself where it meets the beginning binding tail. From the fold, measure and mark the cut width of the binding strip. Cut the ending binding tail to this measurement. For example, if the binding is cut 21/4˝ wide, measure 21/4˝ from the fold on the ending tail of the binding and cut the binding tail to this length.
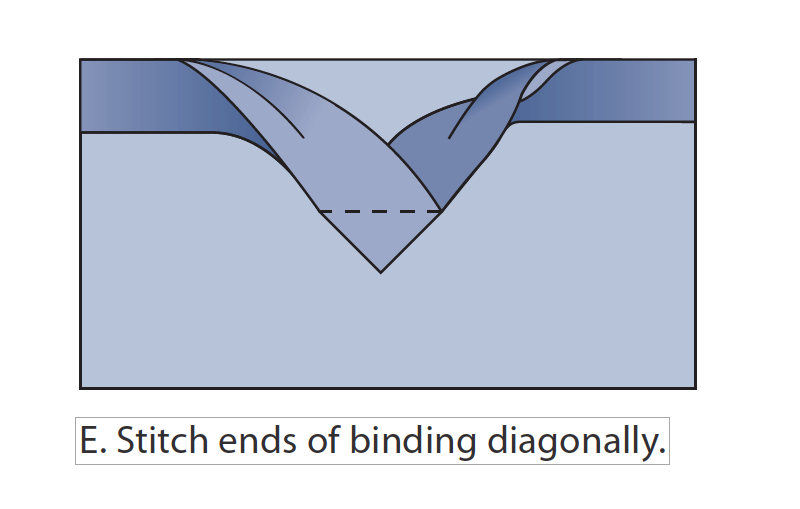
2.Open both tails. Place a tail on top of the other tail at right angles, right sides together. Mark a diagonal line from corner to corner and stitch on the line. Check that you’ve done it correctly and that the binding fits the quilt; then trim the seam allowance to 1/4˝. Press open.
3.Refold the binding and stitch this binding section in place on the quilt. Fold the binding over the raw edges to the quilt back and hand stitch.
Enter giveaway for Cabin Fever
-


