
Continuous Bias Binding
Posted by The Tech Editors on Jul 1st 2015
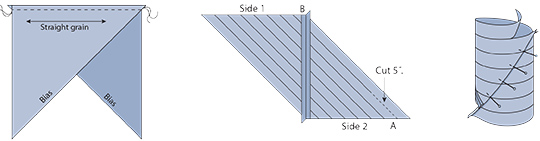
A continuous bias involves using a square sliced in half diagonally and then sewing the triangles together so that you continuously cut marked strips to make continuous bias binding. The same instructions can be used to cut bias for piping. Cut the fabric for the bias binding or piping so it is a square. For example, if yardage is 1/2 yard, cut an 18˝ × 18˝ square. Cut the square in half diagonally, creating two triangles.
Sew these triangles together as shown, using a 1/4˝ seam allowance. Press the seam open.
Using a ruler, mark the parallelogram created by the 2 triangles with lines spaced the width you need to cut your bias. Cut about 5˝ along the first line.
Join Side 1 and Side 2 to form a tube. The raw edge at point A will align with the raw edge at B. This will allow the first line to be offset by one strip width. Pin the raw edges right sides together, making sure that the drawn lines match. Sew with a 1/4˝ seam allowance. Press the seam open. Cut along the drawn lines, creating one continuous strip.
Press the entire strip in half lengthwise with wrong sides together. Attach binding to quilt as described in our PDF How to Finish Your Quilt, available as a free download here.


