

Block Failure Imminent
Posted by Amy Barrett-Daffin on Aug 27th 2019
When I agreed to make five tutorial videos for the The NEW Quick & Easy Block Tool, I made the false assumption that the blocks would be Quick & Easy…not the tool.* I was sorely incorrect. No jokes on what ASS-uming means—I know, I know. Anyway, I sewed the five blocks at home and was miserable. I am not a precision crafter. My name is Amy Barrett-Daffin, and I am NOT a precision crafter. I am a colorful, innovative, organic, and playful crafter. Let me give you an example: I tried three different ways to get an accurate 1/4” seam and failed. I tried the seam guide on my Bernina. I tried the 1/4” foot. I tried using a seam guide stuck to the top of the machine. No matter what I tried, I was seriously unhappy with my results.
*I should probably explain this just a little… the block tool features some quick and easy blocks, but also some intermediate and some advanced blocks. The tool itself is quick and easy to use (as advertised!) because each block has clear instructions in a simple chart and block illustrations. There are also really helpful piecing instructions. (Gailen’s note: Including a couple that would have really helped Amy when sewing her block (if she had bothered to read them), particularly when aligning odd angles — see page 124.)
But here’s the problem: I had already done all the other parts of the videos, and the sewing was all I had left. So I did what any reasonable craft book publisher would do: I called in a Stunt Sewist! Someone who revels in precision piecing, who used to be one of our technical editors, and who is always willing to jump in and accept a challenge. And the Stunt Sewist is…Gailen Runge from kraft-tex University. She is the bubbly, sparkly redhead with a delightful laugh and great ideas on how to make any process easier. As C&T’s Creative Director, Gailen and I have been working together for seventeen years. Gailen jumped into the video shoot that day and did a wonderful job with her straight, pressed, and precisely-pieced seams. When she was done, she did say that I had picked really hard blocks, which made me feel somewhat better. The whole experience got me thinking about what I had learned. I wanted to do a comparison of our blocks side by side and share with you my aha! moments and some of the pitfalls encountered while piecing my blocks.
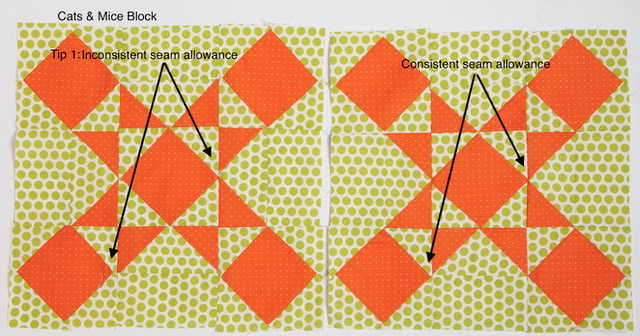
1. I was inconsistent with my seam allowance. Note to self, don’t change anything mid-seam as nothing will match up when you are done.
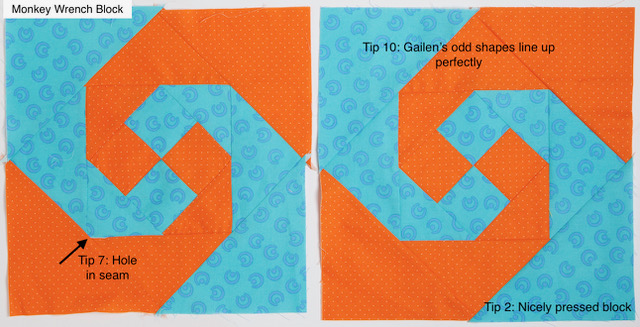
2. Press as you go so that your block is as flat as possible.
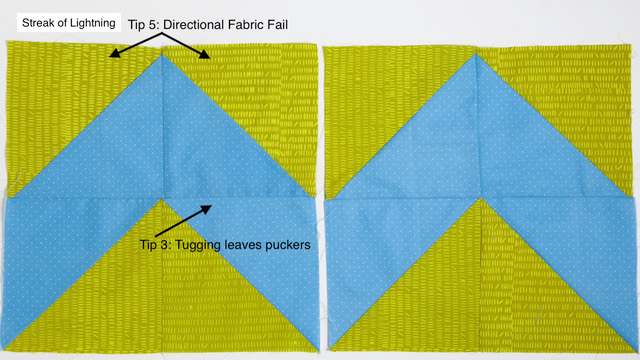
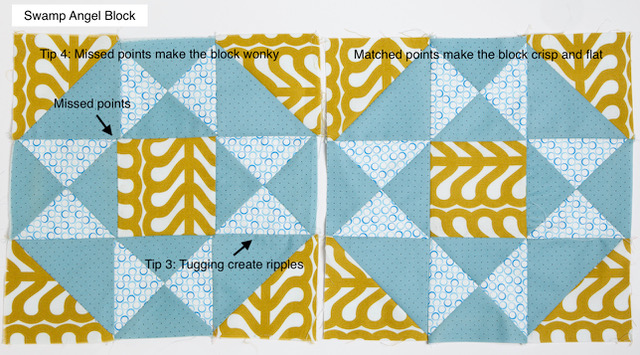
3. Don’t tug on fabric—really, don’t tug. It makes it wonky, wrinkly, and just UGH! (Gailen’s note: When sewing together two pieced pieces, sometimes all of the seams won’t line up, particularly if one side has more seams than the other. Instead of starting from scratch, you should try gently stretching the shorter side just a bit, particularly between seams you match up and pin, as you sew. Press and check out the results. Often the fabric will give just enough.)
4. Use a pin to line up where the fabric joins if you are hoping to have your points meet. Stick it between the seams that need to meet and pin it on either side. In fact…just use a lot of pins, they solve myriad issues. (Gailen’s note: See number 3. If you need to get a little give going, pin where you need to match and then let the rest stretch and flow just a bit.)
5. When using a directional fabric, think through how the blocks are going to go together and make sure you cut the fabric correctly…sigh.
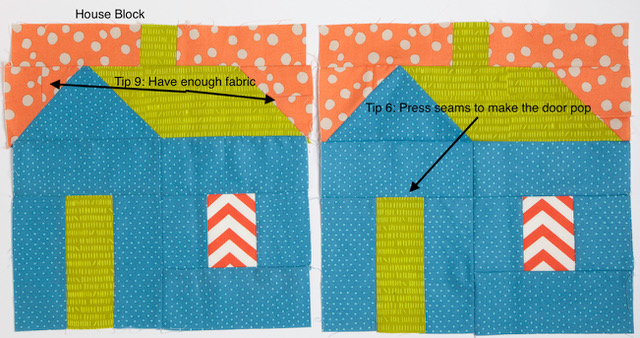
6. Press seams to be underneath the darker of the two fabrics, thus avoiding the dreaded shadow of the seam below. (Gailen’s note: This is a great rule but there are exceptions… be prepared to press toward the light fabric if it means you can nest seams. Also, in some blocks, such as a house block, some pieces should visually come forward, such as the front door. I press the seams toward those pieces so that they have more prominence. In these instances, you can often mitigate the dreaded shadow by trimming the darker seam down a hair.)
7. Line up the fabric on both sides so you don’t miss some and have a hole!
8. Patience. Patience. Patience. (Gailen’s note: And sometimes wine.)
9. Have enough fabric so you don’t have to make do and make it sloppy.

10. (Courtesy of Gailen) When sewing together odd-shaped pieces, such as when you are adding the smaller triangles to the side of the larger triangle to make Flying Geese, know how to align your fabrics. Some shapes require that you line up a corner and offset the bunny ears. Other shapes require that you center a piece and have the bunny ears of another piece poke out evenly on either side. The block tool has a guide for these shapes! I bookmark that page for myself.
11. And last but not least…If you get frustrated and throw a sewn block at your sister right when she arrives for a lovely evening of dinner and tell her to tear out your stitches…It is probably time for a glass of wine and a break from your blocks.
Check out my first two video tutorials featuring the Quick & Easy Block Tool: How to Make a Swamp Angel Block and Lightning Block Tutorial.


