
")
ABCs as Easy as 1, 2, 3! (free project plus giveaway!)
Posted by Vicki Hansen on Sep 11th 2015
Today Vicki Hansen, author of Alphabet Zoo, is sharing the cutest project with us for National Sewing Month! Thanks so much Vicki!
Aren’t grandkids the best? I could just gobble mine up. If you are like me, one of the great pleasures of having young children in your life is celebrating special occasions with a handmade gift. Today I’m going to show you how to create this adorable framed ABC.
I’ve taken the inspiration for this project from my book Alphabet Zoo…Lions and Tigers and Quilts for You. The book features an embroidery alphabet where the capital letters are shaped like the animals they represent. Lower case letters are also included, offering boundless opportunities for personalized creativity. While the framed ABC is not one of the projects in the book, I did base it on the brightly colored pillow shown here on the cover.
This project is easy and takes just an hour and a half or so to put together, along with a couple of evenings embroidering as you watch your favorite movies.

First, gather your materials:
¼ yard white muslin
Fabric scraps 4˝ x 6˝–three pinks, three blues, and three yellows—one solid and two patterned of each
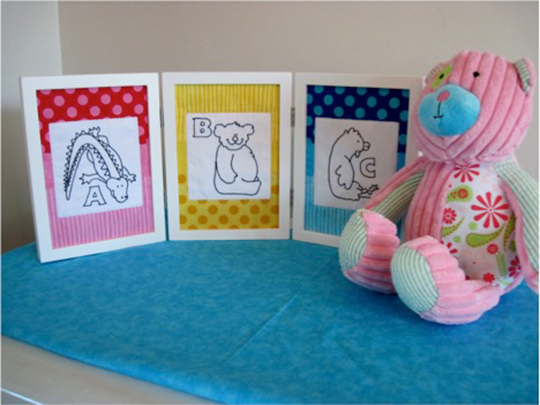
A triple-hinged picture frame with 5˝ x 7˝ openings
Size 12 black perle cotton, embroidery needle, and embroidery hoop
Batting–approximately 18˝ x 8˝
Spray adhesive or fabric glue (optional)
Light source, rotary cutter, mat, ruler
From the muslin, cut 6 squares, approximately 8˝ x 8˝. (These will be trimmed later—the larger dimension leaves room for ease in using an embroidery hoop.) I like to layer my blocks with another square of muslin for stability, thus six squares rather than three. This is optional, but it makes a crisp-looking finished block with no thread shadows.
Transfer the ABCs to the muslin. My favorite method is to use a Frixion pen and a light box. It’s true that Frixion’s marks will return when the temperature drops below 14 oF, but it you should ever discover that you’ve accidentally left your project in the freezer while looking for a Fudgsicle, just hit it with a hair dryer, and you are good again. Click here for the link to download the full-size templates.
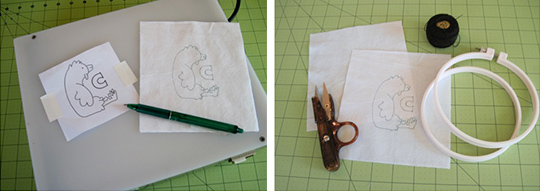
After your design is transferred to the block fabric, layer with a second square of muslin, smooth, and you are ready for the embroidery hoop. Embroider the designs using a backstitch, with French knots for the eyes, and double French knots for the alligator’s nose.
Trim the finished embroidery blocks to 3 ¾˝ width x 4˝ height.
From each of the patterned fabrics, cut a 3˝ x 5˝ strip. Cut a 2˝ x 5˝ strip from each solid.
From the batting, cut three 5˝ x 7˝ pieces.
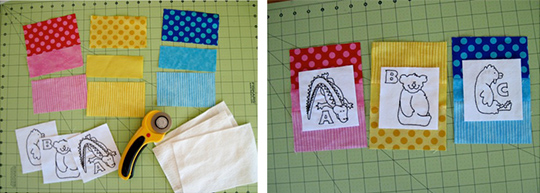
Stitch like-colored strips together along the long edges, solid color in the center.
Center the embroidered blocks on the colored strips, and appliqué with a blanket stitch or raw-edge single stitch. A couple of dots of fabric glue, or fusible webbing, will keep the appliqués in place while you sew.
Layer the completed appliquéd blocks with the batting. Sew a straight stitch just around the outside edge of the appliqué to attach it to the batting.
Remove the glass and the inner cardboard sheet from inside the frames. With a bit of fabric glue, or spray adhesive, fasten your design to the cardboard sheet. Reassemble the frames, stand back, and admire your work.
Have a creative weekend!
Vicki Hansen
Want to win a copy of Vicki's book Alphabet Zoo for more cute projects like this? You can enter our giveaway here: a Rafflecopter giveaway. We'll choose and announce a winner one week from today; US residents only.
Congratulations to Cheryl S., winner of the giveaway! We hope you find lots of great projects to make, and thank you so much to everyone else who entered.


