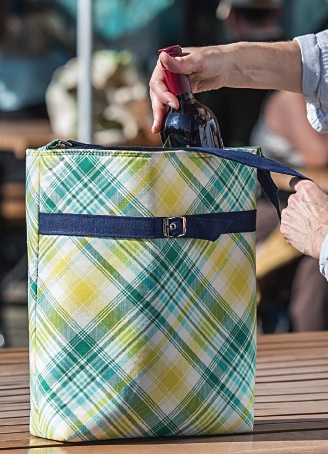
Two-Bottle Tote

From On the Go Bags–15 Handmade Purses, Totes & Organizers
By Lindsay Conner and Janelle MacKay
Class Description:
Students will sew a sturdy tote bag, the perfect size to carry two bottles of wine, groceries, or several books (see p. 74). The tote features an interior divider panel secured with hook-and-loop tape. This project is geared toward intermediate-level sewists who want to take their hardware skills to the next level. Students will apply interfacing and stabilizers, install eyelets with a setting tool, add a magnetic snap, and make a fabric strap with D-rings.
Class Length:
This workshop can be completed in one 3½ to 4-hour setting, or in two 2-hour classes. To complete the project more quickly, have students arrive with fabric already cut and interfacing fused to the back.
Class Supply List:
Required Text: On the Go Bags
- Quilting cotton: 44˝ wide
- Outer fabric: ½ yard
- Outer accent fabric: 1/3 yard (or use linen or home decor fabric)
- Lining fabric: ½ yard
- Interfacing: 1¾ yard of 20˝-wide light- to mediumweight, woven, fusible interfacing (such as Pellon Shape-Flex SF101)
- Stabilizers:
- Heavyweight: 10˝ × 6˝ of one-sided, fusible, heavyweight interfacing or stabilizer (such as Pellon Peltex 71F)
- Lightweight: 1 piece of 16˝ × 41˝ lightweight stabilizer (such as ByAnnie’s Soft and Stable, Automotive headliner foam, or a fusible needled fleece)
- Sew-in hook-and-loop tape: 8˝ length
- Rectangular rings or D-rings: 1˝ size, 2 for bag strap
- Strap buckle with center bar and pin: ¾˝ size
- Magnetic purse snap: ¾˝ size
- Eyelets with setting tool: 2, 3/16˝ size
- Hammer and punch for eyelets (may be shared among students)
- Water-soluble fabric marker
- Walking foot for sewing machine
Classroom Preparation:
The classroom setup should include several rotary cutters, long rulers, and mats. Also, provide an ironing station for every three students attending. Keep in mind the number of students, and consider having them arrive with fabric already cut and interfaced to save time. That way there’s less waiting around to use a cutting mat or iron (for fusing).
Class Agenda:
Instructions for the Two-Bottle Tote project are included on pp. 74-82.
1. Fuse the interfacing and attach stabilizer (can be completed before class).
2. Assemble the exterior bag.
a. Make the shoulder strap.
b. Make the decorative belt.
c. Assemble the exterior panels.
d. Attach the base.
e. Make and attach the strap tabs.
3. Assemble the lining.
a. Make the divider.
b. Attach the hook-and-loop tape.
c. Attach the magnetic snap.
d. Assemble the lining.
4. Attach the exterior to lining.
a.Press and topstitch the opening.


