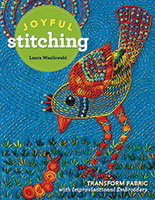
Rare Songbird Class Plan

From Joyful Stitching: Transform Fabric with Improvisational Embroidery
Stitch a colorful bird on wool fabric using free-form embroidery stitch combinations. Learn how to transfer the bird shape to wool, fill it in with easy embroidery stitches, and complete the design with a blazing sun, swirling air currents, and a curious bug.
Class Description:
This easy hand embroidery class is fun for all skill levels. Learn how to transfer the Rare Songbird pattern to wool, how to choose thread colors and sizes, how to match threads with the correct needle sizes, and how to make fourteen different embroidery stitches using the step-by-step directions beautifully illustrated in the book.
Class Length:
This class can be taught in one 3-hour class or in two 3-hour classes taught on two separate days.
Three hours: Students learn how to transfer the bird shape to wool and begin their outline stitching. Some may begin filling in the bird’s body with stitchery.
Two days: On day one, students learn how to transfer the bird shape to wool and begin their outline stitching. Some may begin filling in the bird’s body with stitchery. On day two (allow enough time in between the two days for stitching, possibly up to one week), students have had the opportunity to add more hand embroidery to their bird design. They learn how to finish the edges of the embroidery and about different display options.
Class Supply List:
• Required text: Joyful Stitching: Transform Fabric with Improvisational Embroidery
• Fabric: Boiled or felted wool measuring 7” x 9” (see p. 33)
• Thread (see p. 33):
- Size 5 perle cotton thread in brown to outline pattern shapes
- Size 8 perle cotton threads in these colorways:
- Variegated orange/yellow for the tail, wing, eye, legs, beak, bug, crest, sun, and edging
- Variegated yellow/gold for the body
- Variegated green/gold/yellow for the grass and back
- Light blue-green for the neck, eye, wing, legs, crest, and sun
- Variegated purple/dark blue for the neck, back, toes, and crest
- Size 12 perle cotton threads in these colorways:
- Black for the eye
- Pea green for the grass
- Light blue-green for the sky
• Hand embroidery needles: Sizes 3 and 5 (see p. 8)
• Tracing paper 7” x 9”
• Black marker
• Scissors
• Thimble (optional)
• Thread Magic (optional) (see p. 7)
Classroom Preparation:
Each student will need table space and access to good lighting for stitching.
Classroom Agenda:
Instructions for the Rare Songbird project begin on page 32.
Introductory section:
- Discuss felted wool (see p. 5).
- Discuss perle cotton thread sizes and needle sizes (see pp. 6–8).
- Discuss additional embroidery tools (see pp. 7–8).
- Show the step-by-step embroidery stitch directions (see pp. 13 – 27).
Transferring the pattern:
- Follow the instructions (see p. 9) for tracing and transferring the bird pattern (see p. 59) to the wool.
- Use the size 5 thread and a size 3 needle to transfer the pattern.
- Remove the paper to reveal the outline of the bird shape.
Stitch the design:
- Stitch the outlines of the bird’s body (see pp. 33–34) using the recommended stitches.
- Stitch the bird’s tail and wing (see p. 34) using the recommended stitches.
- Stitch the bird’s eye, beak, and crest (see p. 35) using the recommended stitches.
- Stitch the bird’s legs, the bug, and grass (see pp. 35–36) using the recommended stitches.
- Stitch the sun, sky, and edging (see p. 36) using the recommended stitches.
- Review display options (see p. 58)


