Class Plan #1: Around and Round
Class Plan #3: Harmony Table Runner
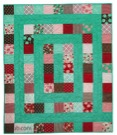
Class Plan #1: Around and Round

Finished size: 49 ½˝x 58 ½˝
Class Description:
A stack of 5˝ charm squares and a coordinating solid are all that you need to make a fun, fast throw quilt top. This project is very versatile and would work well with any type of fabric style, from reproductions to batiks to solids to everything in between. Around and Round is a great project for the novice but equally satisfying for more advanced quilters.
Class Length:
1 class, approximately 4–5 hours. Most students should be able to get the majority of the quilt top assembled before the end of class. Please note that beginners may need more time than more advanced students to complete the project.
Class Supply List:
- Required text: I Love Precut Quilts!by Tricia Maloney
- 2 packs of 5˝ charm squares
- 1 ¼ yards coordinating solid fabric
- Sewing machine in good working order with a new needle
- Neutral thread
- Scissors, straight pins, seam ripper, etc. (basic sewing kit)
- Cutting mat (if cutting station is not provided)
- Rotary cutter with a fresh blade
- Ruler (6˝´ 24˝ size suggested)
- Pressing mat/board and iron (if pressing station is not provided)
Classroom Preparation:
Students will each need enough space for sewing and cutting, as well as somewhere to lay out their long strips of squares. If supplying cutting and pressing stations, one of each is suggested for every 3–4 students.
Class Agenda:
Instructions for Around and Round are found on pp. 9–11 in the text.
Prior to class:
- Students will need to choose their charm squares and coordinating solid. The fabrics could be offered as a kit, but students may have more fun selecting what they want. This is a good opportunity to suggest add-on items that students might not have thought of—sewing machine needles, thread, rotary cutters/blades, rulers, etc.
- If the students are more advanced, you might consider having them cut the strips from the coordinating solid at home.
Class day:
- Students need to be prepared and bring all necessary items to class.
- Begin the class with the students cutting their solid coordinating strips, if they haven't done so already at home.
- Once the strips are cut, it is helpful to have the students label them so that they do not get the strips confused.
- Following the instructions in the book, students will sew assorted 5˝ squares together into rows.
- After the squares are sewn together into strips, the students will assemble the quilt top, beginning with the center and working outward.
Follow up:
- This is completely optional but is very helpful, particularly for less confident quilters.You may want to add an additional session about finishing the quilt—how to layer the quilt top with batting and backing, machine quilting (in the ditch, diagonal lines, or free-motion quilting), labeling, and finally binding. This is a great opportunity to make additional suggestions for add-on items, such as curved safety pins, clips, basting spray, backing fabric, batting, coordinating quilting thread, hand-sewing needles, etc.

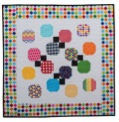
Finished size: 39˝x 39˝
Class Description:
Bounce is a great versatile project featuring 5˝ charm squares. It could be a wall quilt, a baby quilt, or even a table quilt. With the size options offered in the book, you can make this quilt any size that you desire! This project is beginner-friendly but is interesting enough for more advanced quilters, too.
Class Length:
1 class, approximately 4–5 hours. Most students should be able to get the majority of the quilt top assembled before the end of class. Please note that beginners may need more time than more advanced students to complete the project.
Class Supply List:
- Required text: I Love Precut Quilts! by Tricia Maloney
- 1 pack of 5˝ charm squares (for the wall quilt–sized project, see the size options on p. 19 for additional fabric requirements)
- 7/8 yard background fabric
- 1/6 yard accent fabric (optional)
- 3/4 yard fabric for border
- Sewing machine in good working order with a new needle
- Neutral thread
- Scissors, straight pins, seam ripper, etc. (basic sewing kit)
- Cutting mat (if cutting station is not provided)
- Rotary cutter with a fresh blade
- Ruler (6˝´ 24˝ size suggested)
- Pressing mat/board and iron (if pressing station is not provided)
Classroom Preparation:
Students will each need enough space for sewing, as well as cutting and quilt assembly. If supplying cutting and pressing stations, one of each is suggested for every 3–4 students.
Class Agenda:
Instructions for Bounce are found on pp. 16–19 in the text.
Prior to class:
- Students will need to choose their charm squares and background fabric. The fabrics could be offered as a kit, but students may have more fun selecting what they want. This is a good opportunity to suggest add-on items that students might not have thought of—sewing machine needles, thread, rotary cutters/blades, rulers, etc.
- If the students are more advanced, you might consider having them cut the strips from the coordinating solid at home.
Class day:
- Students need to be prepared and bring all necessary items to class.
- Begin the class with the students selecting the charm squares that they want to include in their project (depending on the size of quilt chosen for the class).
- Next, the students will make the required number of Snowball block units, adding the background rectangles. If desired, follow the book instructions to add accent squares.
- After deciding how to arrange their blocks, students will sew their blocks into rows and then sew the rows together.
- Finally, students will add an inner background border and an outer border.
Follow up:
- This is completely optional but is very helpful, particularly for less confident quilters.You may want to add an additional session about finishing the quilt—how to layer the quilt top with batting and backing, machine quilting (in the ditch, diagonal lines, or free-motion quilting—or preparing the quilt to be sent out for longarm quilting), labeling, and finally binding. This is a great opportunity to make additional suggestions for add-on items, such as curved safety pins, clips, basting spray, backing fabric, batting, coordinating quilting thread, hand-sewing needles, etc.
Class Plan #3: Harmony Table Runner

Finished size: 51˝x 17˝
Class Description:
On your mark! Get ready! GO! Grab a roll of 2 ½˝ strips and get ready to make this easy, fun, and oh sew pretty table runner that can be completely finished in one class. Harmony is a great table runner project for the novice but equally satisfying for more advanced quilters.
Class Length:
1 class, approximately 4–6 hours. Most students should be able to complete the entire project, although less confident students may need additional time.
Class Supply List:
- Required text: I Love Precut Quilts! by Tricia Maloney
- 1 jelly roll of 2 ½˝ strips (please note that 1 jelly roll can make several Harmony runners)
- Backing fabric: 1 ¾ yards
- Batting: 55˝´ 21˝
- Sewing machine in good working order with a new needle
- Neutral thread
- Scissors, straight pins, seam ripper, hand-sewing needle, etc. (basic sewing kit)
- Cutting mat (if cutting station is not provided)
- Rotary cutter with a fresh blade
- Ruler (2 ½˝´ 18˝ size suggested)
- Pressing mat/board and iron (if pressing station is not provided)
Classroom Preparation:
Students will each need enough space for sewing and cutting, as well as somewhere to layer their table runners for finishing. If supplying cutting and pressing stations, one of each is suggested for every 3–4 students.
Class Agenda:
Instructions for Harmony Table Runner are found on pp. 34–36 in the text.
Prior to class:
- Students will need to choose their jelly roll. This is a good opportunity to suggest add-on items that students might not have thought of—sewing machine needles, thread, rotary cutters/blades, rulers, etc.
Class day:
- Students need to be prepared and bring all necessary items to class.
- Begin the class with the students cutting their strips into squares and rectangles following the instructions in the book.
- Once the cutting is done, students will assemble the quarter Log Cabin blocks.
- Next, students will sew arrange and sew their blocks together following the diagram in the book.
- After the runner tops are completed, you will need to demonstrate the envelope-style finishing technique in the book. Then students will layer their runners following your example and will finish their projects.
- Once students have turned their runners right side out, they will need to smooth the runner, press, and sew the opening closed.
- Quilting is optional for this project.

Finished size: 96˝x 8˝
Class Description:
A collection of mod fat quarters and an updated Log Cabin quilt block make a bold statement! Or try batiks, solids, tonals . . . anything goes. This project is a good fit for confident beginners to advanced quilters.
Class Length:
1 class, approximately 4–5 hours. Most students should be able to get the majority of the bed runner top assembled before the end of class. Please note that beginners may need more time than more advanced students to complete the project.
Class Supply List:
- Required text: I Love Precut Quilts! by Tricia Maloney
- 13 coordinating fat quarters (1 accent, 2 light neutral, 3 medium neutral, 2 dark neutral, 3 contrasting, and 2 black) (see the book for further information about fabric choice)
- Sewing machine in good working order with a new needle
- Neutral thread
- Scissors, straight pins, seam ripper, etc. (basic sewing kit)
- Cutting mat (if cutting station is not provided)
- Rotary cutter with a fresh blade
- Ruler (6˝´ 24˝ size suggested)
- Pressing mat/board and iron (if pressing station is not provided)
Classroom Preparation:
Students will each need enough space for sewing, as well as cutting and assembling blocks. If supplying cutting and pressing stations, one of each is suggested for every 3–4 students.
Class Agenda:
Instructions for City Houses are found on pp. 44–46 in the text.
Prior to class:
- Students will need to choose their fat quarters. It may be better to offer a variety of kits with the required variety of fat quarters instead of leaving students on their own. This is also a good opportunity to suggest add-on items that students might not have thought of—sewing machine needles, thread, rotary cutters/blades, rulers, etc.
- If the students are more advanced, you might consider having them cut the strips at home.
Class day:
- Students need to be prepared and bring all necessary items to class.
- Begin the class with the students cutting their strips, if they haven't done so already at home.
- Once the strips are cut, it is helpful to have the students label them so that they do not get the strips confused.
- Following the instructions in the book, students will assemble 8 blocks.
- After the blocks are completed, the students will sew the blocks together into one long strip, as per the instructions in the book.
Follow up:
- This is completely optional but is very helpful, particularly for less confident quilters.You may want to add an additional session about finishing the quilt—how to layer the quilt top with batting and backing, machine quilting (in the ditch, diagonal lines, free-motion quilting, or preparing the quilt to send it out to a longarm quilter), labeling, and finally binding. This is a great opportunity to make additional suggestions for add-on items, such as curved safety pins, clips, basting spray, backing fabric, batting, coordinating quilting thread, hand-sewing needles, etc.

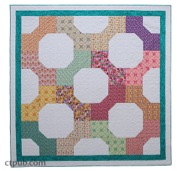
Finished size: 88˝x 88˝
Class Description:
16 giant Bow Tie blocks makes this large bed-sized quilt quick to put together. The trick is matching layer cake squares and charm squares! This project is appropriate for everyone from confident beginners to advanced quilters.
Class Length:
2 classes, approximately 3 hours each.
Class Supply List:
Required text: I Love Precut Quilts! by Tricia Maloney
16 pairs of 10˝ layer cake squares (for a total of 32 squares)
16 pairs of 5˝ charm squares that match the layer cake squares (for a total of 32 squares)
3 ½ yards fabric for background and outer border
1 yard accent fabric for inner border
Sewing machine in good working order with a new needle
Neutral thread
Scissors, straight pins, seam ripper, marking pen, etc. (basic sewing kit)
Cutting mat (if cutting station is not provided)
Rotary cutter with a fresh blade
Ruler (6˝´ 24˝ and a 1˝´ 12˝ size suggested)
Pressing mat/board and iron (if pressing station is not provided)
Classroom Preparation:
Students will each need enough space for sewing and cutting, as well as somewhere to assemble their quilt tops. If supplying cutting and pressing stations, one of each is suggested for every 3–4 students.
Class Agenda:
Instructions for Big Bow Ties are found on pp. 47–49 in the text.
Prior to class:
- Students will need to choose their layer cakes and charm squares, background/border fabric, and accent inner border fabric. The fabrics could be offered as a kit, but students may have more fun selecting what they want. This is a good opportunity to suggest add-on items that students might not have thought of—sewing machine needles, thread, rotary cutters/blades, rulers, etc.
Class day 1:
- Students need to be prepared and bring all necessary items to class.
- Begin the class by having students pair up their sets of layer cake squares and charm squares (they should have 16 sets of 2 layer cake squares and 2 charm squares).
- Next, students will sew the Bow Tie blocks together following the instructions in the book.
- If students do not get all of their blocks assembled before the end of class, have them finish the blocks for homework before the second class.
Class day 2:
- Students will arrange their Bow Tie blocks and sew them together into rows, then sew the rows together.
- Next, students will cut the accent border and sew it to the quilt center.
- Finally, students will cut the outer border and sew it to the quilt.
At the end of the second class, you might want to have a discussion about finishing the quilt. Perhaps your shop offers longarm machine quilting services or rentals or has a list of local quilters. You might want to mention how to prepare their quilt tops to go to a longarm quilter. Don't forget to suggest thread, clips, curved pins, basting spray, batting, backing, binding fabric, etc.


