Flip & Fuse Appliqué Technique
From Flip & Fuse Quilts
Class Description:
This is an easy technique class that can be taught in one afternoon. Minimal prep work is required. Students will learn the "Flip & Fuse" appliqué technique. No hand needlework is required.
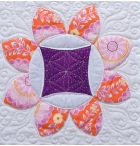
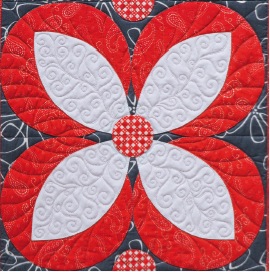
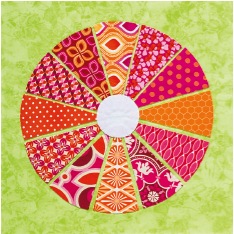
Suggested Class Project: Pick one of three designs to make a pillow! After giving the entire class a 20 to 30 minute group lesson on how to "Flip & Fuse," each student will make a 12˝ Summer Breeze pillow, an 18˝ Coral Blossoms pillow, OR an 18˝ Wagon Wheels pillow.
*Note: These three projects are easy to kit for students to purchase. Individual pieces can even be precut so the project is class-ready, if desired for last-minute sign-up students.
Class Length:
1 long afternoon class (4 hours is ideal)
Class Supply List: Sewing machine and basic sewing supplies, precut project materials, clear .004 nylon monofilament thread, scissors, pencil, small Phillips-head screwdriver, and pillow form for selected project.
Student Prep Work: Cut out the following fabric and fusible interfacing
fabrics for selected pillow project before class. Purchase a pillow form.
Summer Breeze 12˝ Flower Block Pillow
Background Fabric
Cut (1) 12 ½˝ x 12 ½˝ square
Cut (4) 2˝ x 4˝ rectangles
Flower Petals
Cut (8) 3˝ x 3 ½˝ rectangles
Flower Center
Cut (1) 5 ½˝ x 5 ½˝ square
Fusible Interfacing
Cut (4) 2˝ x 4˝ rectangles
Cut (8) 3˝ x 3 ½˝ rectangles
Cut (1) 5 ½˝ x 5 ½˝ square
Pillow Backing Fabric
Cut (2) 9˝ x 12 ½˝ rectangles
12˝ Pillow Form
Coral Blossoms 18˝ Pillow
Background Fabric
Cut (1) 18 ½˝ x 18 ½˝ square
Large Circle Fabric
Cut (4) 9˝ x 9˝ squares
Melon Fabric
Cut (4) 4 ¾˝ x 9 ½˝ rectangles
Small Circle Fabric
Cut (1) 3˝ square
Fusible Interfacing
Cut (4) 9˝ x 9˝ squares
Cut (4) 4 ¾˝ x 9 ½˝ rectangles
Cut (1) 3˝ square
Pillow Backing Fabric
Cut (2) 12˝ x 18 ½˝ rectangles
18˝ Pillow Form
Wagon Wheels 18˝ Pillow
Background Fabric
Cut (1) 18 ½˝ x 18 ½˝ square
Wheel Fabrics (Variety)
Cut (12) 6 ¾˝ x 3 ¾˝ rectangles
Wheel Center
Cut (1) 3 ½˝ square
Fusible Interfacing
Cut (12) 6 ¾˝ x 3 ¾˝ rectangles
Cut (1) 3 ½˝ x 3 ½˝ square
Pillow Backing Fabric
Cut (2) 12˝ x 18 ½˝ rectangles
18˝ Pillow Form
Classroom Preparation:
Several ironing stations will be needed.
Teacher Prep List: For each student in the class, cut the listed pieces of fabric and lightweight fusible interfacing to hand out at the beginning of the class.
Cut (1) 5 ½˝x 5 ½˝ square of fabric
Cut (1) 5 ½˝ x 5 ½˝ square of lightweight fusible interfacing
Cut (1) 6 ½˝ x 6 ½˝ square of background fabric
Class Agenda:
Group Session: Start the class by teaching the Flip & Fuse appliqué method following the directions for "How Flip & Fuse Works" located on pp. 5-6 in the book.
Give each student a precut 5 ½˝ square of fabric, 5 ½˝ square of lightweight fusible interfacing, and 6 ½˝ square of background fabric.
Have them trace the large circle located on p. 76 onto the smooth (non-glue) side of the fusible interfacing.
Follow the steps 1 through 7 on pp. 5-6.
This is a great opportunity for students to sort out any machine problems, decide what appliqué stitch they like best, and correct any problems (such as thread tension or presser foot pressure issues) before diving into their pillow project.
Individual Session: Time to make a pillow! Have students work on the block for their selected project. This will take a couple of hours.
Summer Breeze Flower
Summer Breeze is located on pp. 8-13. Students will be making a single block (shown in an alternate colorway in the bottom right-hand corner of p. 13). The block in the quilt is 10˝ square when finished; however, the pillow will be on a 12˝ finished size background.
Templates for Summer Breeze are located on pp. 76-77.
Coral Blossoms
Coral Blossoms is located on pp. 61-64. Students will be making a single 18˝-square finished size block (shown in an alternate colorway on the right side of p. 64).
Templates for Coral Blossoms are located on pp. 88-89.
Wagon Wheels
Wagon Wheels is located on pp. 44-48. Students will be making a single 18˝-square finished size block (shown in an alternate colorway on p. 48).
Templates for Wagon Wheels are located on p. 84.
Group Session: Time to show everyone how to take a finished block and turn it into a pillow using a very simple envelope enclosure.
Note: Students work at all different speeds. I show the finishing technique when I have a small cluster of fast sewers who are ready to proceed. I gather everyone around and teach them the simple finishing method but encourage slower sewers to continue working at their own pace. Quilting is fun, not a race! :-)
Envelope Enclosure Method:
Fold one long edge of a pillow backing fabric piece over ¼˝ and then over again to encase raw edge. Pin in place.
Use matching thread to topstitch this fold down. Repeat for second backing piece.

Place pillow front right side up.
Place first backing piece right side down, as shown, with the finished seam toward the middle.
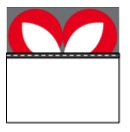
Place second back piece right side down, as shown, with the finished seam toward the middle.
Place pins around the outside to hold the three pieces in place.
Use a ¼˝ seam to sew all three layers together around the edge of the pillow. Continue sewing all the way around the pillow.

Snip excess bulk in the corners.
Remove all of the pins and turn the pillow cover right side out. Insert pillow form and you are done!


