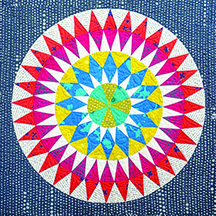
Bullseye Quilt

A foundation paper-piecing class for Block 1 from the Nine-Block Bullseye quilt. The circular part of this block can also be used as the center for either of the larger Bullseye quilts.
From Bullseye Quilts from Vintage to Modern
Class Description:
This class focuses on foundation paper piecing and set-in circles. You will make the Bullseye center and Rings 1 and 2 from the Nine-Block Bullseye quilt. You can stop there and add corners to make one 20²´ 20² block to use in the Nine-Block quilt or you can add more rings (outside of class) to make a larger Bullseye quilt. This class is suitable for skilled beginners and beyond, who will leave class with the satisfaction of having mastered a new quilting skill.
Class Length:
6 hours.
Class Supply List:
Fabric for 1 Block:
If you are a fast sewist, bring fabric for two blocks to class. It’s unlikely that you will get to a second block, but it could happen.
Place your pieces in separate, labeled bags.
Center
1 - Cut 4 light medium pieces 2 1/4" x 3 1/4".
2 - Cut 4 dark medium pieces 2 1/4" x 3 1/4".
Ring 1
1 - Cut 16 light pieces 1 3/4" x 3".
2 - Cut 16 dark pieces 2" x 3 3/4".
3 - Cut 16 light-medium pieces 2 1/2" x 2 1/2".
Ring 2
1 - Cut 32 light pieces 2 1/2" x 3 1/2".
2 - Cut 32 medium-dark pieces 2" x 3 1/4".
3 - Cut 32 medium-dark pieces 2" x 2 3/4".
4 - Cut 32 light pieces 1 3/4" x 3".
Block Corners
Cut 2 rectangles 10 1/2" x 13".
Additional Supplies:
- Required text: Bullseye Quilts from Vintage to Modern by Becky Goldsmith
- Rotary cutting mat
- Rotary cutter
- 3" x 12" or 6" x 12" ruler
- A sewing machine in good repair that you know how to use!
- Piecing thread
- Good fabric scissors
- Good paper scissors
- A stapler and extra staples
- Pins for piecing
- Clear tape
- Seam ripper (just in case)
- An extension cord and surge protector with multiple outlets (in some venues you may not be able to, or need to, use it)
- A portable iron and mat (in some venues you may not be able to use it)
You know what you like to have in class. It might be a chair, a cushion for the chair provided, or a light... whatever it may be, bring it with you.
Shop Owner’s Kit List:
I have found that it is better to provide students with the foundation papers already printed on vellum. That way you are sure that everyone has what they need to be successful. I charge a kit fee for these copies.
Each student will need the following copied onto vellum. Have more on hand for students who sew quickly or who want the convenience of buying them already copied.
1 copy of P1 (center)
3 copies of P2 (ring 1)
7 copies of P3 (ring 2)
You might also want to include 4 sheets of peel-and-stick, self-adhesive laminate used to make the corner template.
Classroom Preparation:
This is a machine-sewing class where students will also need room to trim as they sew. The more space each person can have, the better. It’s good to have multiple irons.
Class Agenda:
To teach this class well, you need to read through all of the instructions in the booklet. It is especially important to make at least one block before you teach it.
Prepare models of the different steps that you want to teach in class.
I have a constructed Center and Ring 1 made and ready to pin and sew together to illustrate how to sew a set-in circle.
Be sure you have made the corner template for this block so that you can show how to make and use it.


