
Free project with mul•tex—”Homescape” art quilt
Posted by Tristan Gallagher on Mar 8th 2012
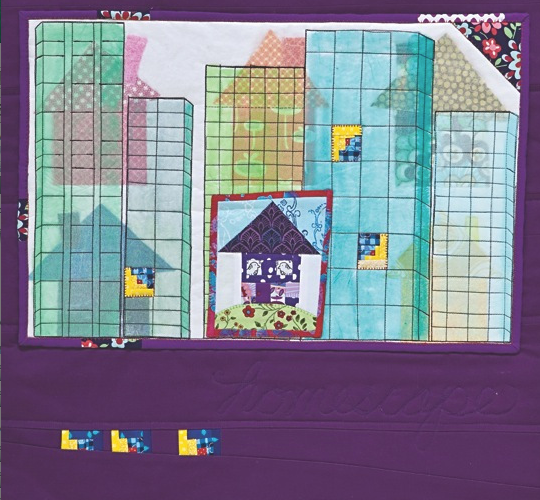
Lydia Carlsgaard, a member of our Creative Troupe, used the transparent quality of mul•tex™ to add layers and depth to her wonderful art quilt. The fusibility of mul•tex also simplified the quilting process by eliminating the need for a walking foot and pins.
Materials:
- mul•tex - 11½” x 17¼” piece
- Assorted print fabrics- enough for 5 houses (4½” squares), 5 rooftops (2½”x5″ triangles), 5 chimneys (1″ x 2″) plus additional scraps for the focal house block and mini-window patches
- Background fabric for top panel of quilt (white shown here) 12″ x 18″
- Background fabric for bottom layer of quilt (purple shown here) 20” x 21”, plus binding
- Black backing fabric 20” x 21”
- Batting pieces 22” x 22” and 13″ x 19″
- Acrylic ink or paint – 3 colors (blues and greens shown)
- Pencil and ruler
INSTRUCTIONS:
This art quilt is constructed by layering a collaged quilted panel on top of a plain background quilt.Using your assorted printed fabrics, cut out 5 each of the house, roof and chimney shapes. The house base is approximately 2½” -3” square. The roof can be approximately 2½” high by 4”-5’ wide. The chimney size can be any size. You can be loose with these measurements…varying the size and shapes can add interest.
- Place background fabric (white) on top of batting. Arrange houses on background fabric, then sew into place by following the perimeter of the house parts.
- Using a pencil and ruler, sketch buildings onto the dull side of the mul•tex (use masking/painters tape to hold the edges flat while working on it).
- Blend inks/paints with water to lighten the color (so the mul•tex remains transparent). Paint each building with a light coat (alternating colors). Allow to dry, then trim them out.
- Fuse the shiny side of the mul•tex buildings on top of the houses with a dry iron – just a few seconds of pressing on medium heat (place a sheet of Silicone Release Paper or a pressing cloth between the mul•tex and the iron to prevent it from warping).
- Using a contrasting thread color, sew over the sketched building lines.
- Piece together a focal house block (as shown or from your own pattern) approximately 4” x 5” overall
- Construct mini-window patches (log cabin block shown here) to fit 3 windows in your buildings.
8. Attach the focal house block and window patches to the top panel using a blanket or buttonhole stitch.
9. Trim the top panel to 11 1/2 x 17 1/2" and add a binding. Optional blanket or buttonhole stitch can be used for a decorative edge between quilt and binding.
10. Construct the background quilt (this quilt is 18½” x 19½”) as desired…whole cloth or do some piecing at the bottom. Lydia added the title of her quilt with a free-motion stitch.
11. Attach top panel to the background quilt using a slipstitch.
Many thanks to Lydia for sharing her amazing talents and creativity!


