


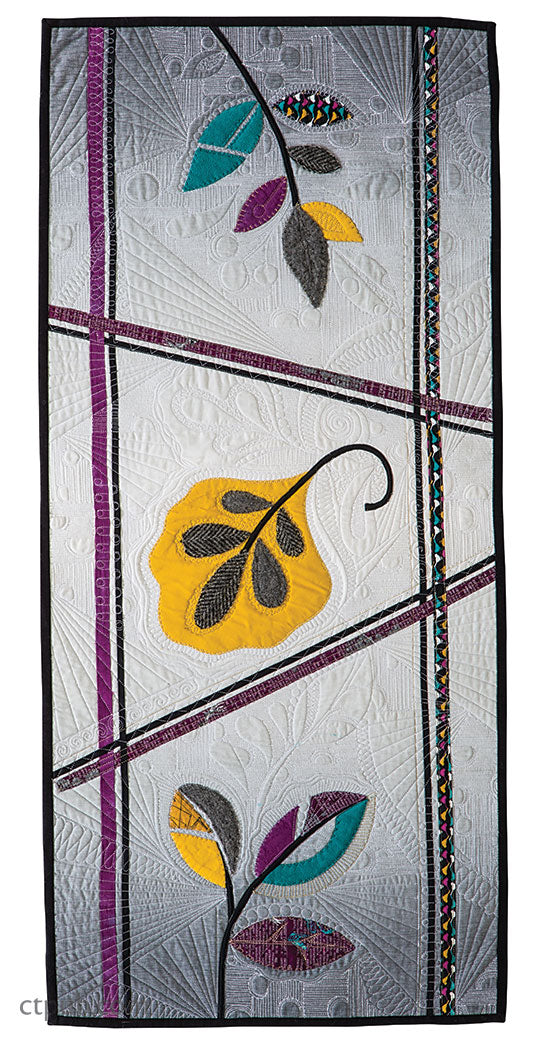
Try Appliquilting with a Table Runner!
This fun project combining appliqué and quilting comes from Appliquilting—Appliqué and Quilt at the Same Time! by Gina Perkes.

FINISHED QUILT: 15 1/2 ̋ × 34 1/2 ̋
MATERIALS
Note: Yardage calculated with 42 ̋ usable width of fabric. (WOF = width of fabric)
- Gray felted wool: 5 ̋ × 9 ̋
- Teal Ultrasuede: 4 ̋ × 5 ̋
- Gray gradation: 1/2 yard
- Gold solid: 7 1/2 ̋ × 9 ̋
- Purple print: 5 1/2 ̋ × 5 1/2 ̋
- Assorted multicolor prints: 3 strips 1 ̋ × WOF and approximately 10 ̋ × 10 ̋ total of scraps
- 1/4 ̋ black fusible bias tape: 4 yards
- Backing: 2/3 yard
- Binding: 1/3 yard
- Batting: 2/3 yard
Additional Supplies
- 2 wash-away appliqué sheets (such as Wash-Away Appliqué Sheets by C&T Publishing) 8 1/2 ̋ × 11 ̋
- Washable glue stick
- Washable glue with micro tip attachment on bottle
CUTTING
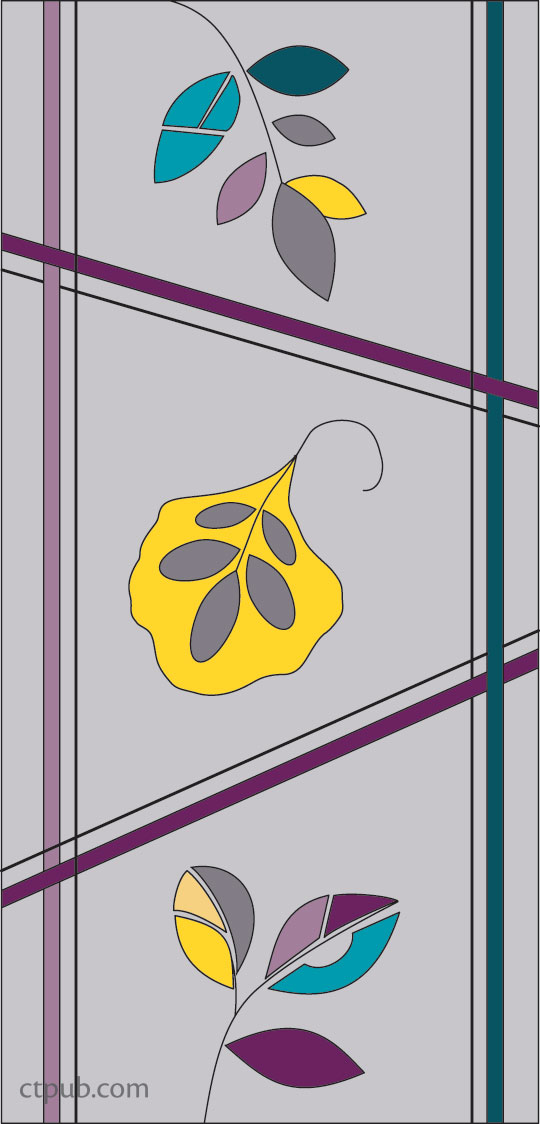
Use the Modern Meadow patterns (download here).
Gray felted wool
- Cut 2 each of pattern pieces I and J.
- Cut 1 each of pattern pieces A, D, K, and Q.
Teal Ultrasuede
- Cut 1 each of pattern pieces F, G, H, and N.
Gray gradation
- Cut 1 rectangle 16 ̋ × 35 ̋ for the background.
Binding
- Cut 3 strips 2 1/2 ̋ × WOF.
Modern Meadow is a great project that allows you to explore the variety of techniques in Appliquilting—Appliqué and Quilt at the Same Time! It uses both raw- and turned-edge methods and an array of unique fabrics!
Construction
APPLIQUÉ PREPARATION
Use the Modern Meadow patterns (download here).
This project uses both the turned-edge method and the raw-edge method.
Wash-Away Appliqué Sheets
1. Trace 1 each of appliqué patterns B, C, F, I, M, O, P, R and S onto wash-away appliqué sheets with the shiny (fusible) side up and the pattern right side up. Label the pattern letters on the nonshiny (nonfusible) side.
2. Cut out the appliqué foundations.
Preparing the Turned-Edge Appliqué
1. Fuse or glue wash-away appliqué foundations to the wrong side of the following fabrics, leaving a 1/4 ̋ seam allowance:
- Gold solid: pattern piece L
- Purple print: pattern piece M
- Multicolor print scrap: pattern piece E
2. Arrange the remaining wash-away appliqué foundations on the remaining fabrics as desired.
3. Cut the appliqué pieces from the fabrics, with a 1/4 ̋ seam allowance. Turn the edges.
ASSEMBLING THE LEAF DESIGNS
1. Trace the appliqué placement (download here). Build the designs, beginning with the bottom shapes and overlapping where necessary. Use washable glue with a micro tip attachment on the bottle to adhere the appliqué shapes to the background fabric. Apply glue in a thin bead close to the edges, using liberal amounts at the points.
3. Cut 3 strips from the fusible bias tape for the stems. (You will use the leftover bias tape as dividing strips.) Fuse or glue the bias stems in place.
ADDING THE DIVIDING STRIPS
1. If a turned edge, as shown here, is desired, turn under 1/4 ̋ on the long edges of the 1 ̋-wide assorted print strips.
2. Cut a strip in half through the width to yield 2 short strips.
3. Fuse or glue the strips in place, combining them with the remaining bias strips in a woven pattern. Refer to the
appliqué placement for placement.
FINISHING
1. Layer the quilt top, batting, and backing, or load onto a longarm machine.
2. Using your chosen stitch designs, stitch down all the appliqué designs, bias strips, and fabric strips.
QUILTING TIPS: Modern Meadow
- Since this project uses both raw-edge and turned-edge methods, you can vary the stitches for added interest and design exploration.
- Remember to travel from stopping points to new starting points by quilting. Try incorporating some of the appliqué elements into your quilting designs using Solvy.
3. Bind, using your preferred method.
Find out more about Gina's revolutionary new technique in Appliquilting—Appliqué and Quilt at the Same Time!


