
Tips for Sewing a Perfect 1/4˝ Seam
Posted by The Tech Editors on May 25th 2009

Are you frustrated because your pieced blocks are either slightly smaller or slightly larger than the stated size in the project directions? Or perhaps you are making a quilt using 2 different kinds of blocks and they do not match up when you sew them together. This may be because your 1/4˝ seams are really not exactly 1/4˝. Follow the following steps to find a solution.
Step 1
Find out what the issue is by sewing a test piece to see if your seam allowance is either too large or too small.
A. Cut 3 strips each 1 1/2˝ wide. (The length of the strips doesn’t matter but make them at least 3˝ long for a good test. Using scraps from the project you are working on gives the best indication because the fabric weight matters.)
B. Sew the 3 strips together side-by-side using a 1/4˝ seam allowance (or at least what you have been using as a 1/4˝ seam allowance).
C. Press the seam allowances toward the outside.
D. Measure the piece. It should be exactly 3 1/2″ wide.
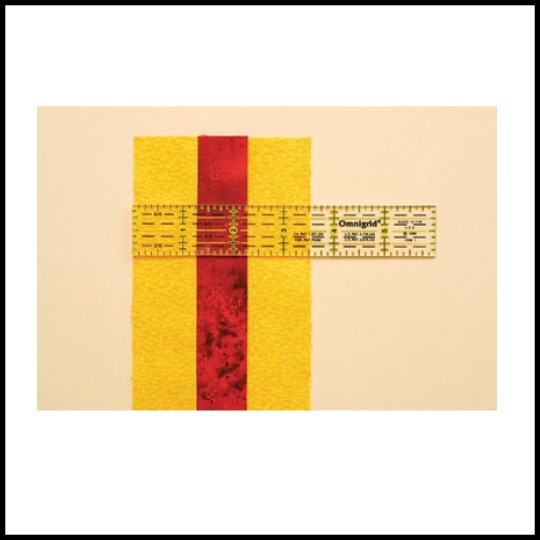
Step 2
If the piece is smaller than 3 1/2˝ wide, your seam allowances are too large. If the piece is larger than 3 1/2˝ wide, your seam allowances are too small. You may even be using the 1/4˝ foot on your machine but there is no denying it, the seams are not correct. How can this be?
Books often say to sew a scant 1/4˝ seam and there is a good reason for that. The thread itself takes up a tiny bit of space for the seam and when you press the seams toward one side, the fold over of the fabric takes a bit of space. It could be that the 1/4˝ foot or the seam guide you are using does not account for that, so you may need to make the seam allowance a tiny bit narrower. Even a tiny bit can make a big difference especially when there are a lot of seams!
What can you do to fix it?
Option 1: If your sewing machine allows you to change the needle position, move your needle to the right (to make the seam allowance a bit smaller) or to the left (to make the seam allowance a bit larger). Some 1/4˝ feet, in spite of their tiny needle hole, will let you move the needle 1 position either right or left. Try the test again and keep trying until you have the exact position needed. Write down the information for future reference and put the needle in that position every time you sew.
Option 2: Your machine may have a fabric guide you can attach. If you don’t have that, you can stack several pieces of painter’s tape or moleskin and place it 1/4″ to the right of the needle, just in front of presser foot. It will act as a fabric guide to be sure the fabric gets sewn at exactly the right place. This kind of guide will become inaccurate as the edges wear down, so you will need to replace it from time to time.

Option 3: Maybe it isn’t your sewing that is the issue—maybe it is your cutting. C&T author Jan Krentz has included a great cutting hint in her book Diamond Quilts and Beyond. She says to align the raw edge of the fabric to include the entire printed line on the ruler and then cut the strip. This increases the cut pieces by one thread width and voila, you have the perfect size after it is sewn.

Problem solved?
Well, yes and no. C&T authors suggest testing your seam allowance for each new project because fabrics vary in weight. At the very least, retest it if your blocks do not measure the stated size in the project.


