
Stenciling on mul•tex™
Posted by Tristan Gallagher on Apr 22nd 2012
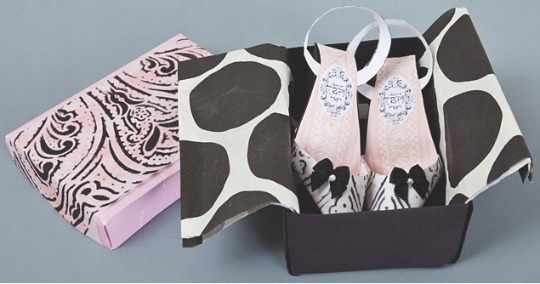
Rebecca Parsons is a mixed media artist and a member of our Creative Troupe. She shares her stenciling tips with us, which she used to paint mul•tex to incorporate into these lovely miniature shoes with a matching mini purse.
When I was first asked to explore my creativity with a new product called mul•tex, I was thrilled with the possibilities. Of course, my first inclination is to play with paint…and play I did. I created some wild designs and some even wilder designs. However, I finally settled on a beautifully glamorous stenciled damask design. mul•tex is perfect for stenciling as it is absorbent and textured enough to grab the acrylic paints without
bleeding. That is a big win for stencilers!
Supplies
- mul•tex - 1 yard length
- Stencil (an older Ralph Lauren damask stencil was used here)
- Black acrylic paint and a 1” stencil brush
- Paper towels and a foam plate
- Elegant Sole and Haute Tote patterns by Adela Rossol

Lay the mul•tex on a protected and absolutely flat surface, like a drop cloth on a table (any bumpiness will cause paint to run under the stencil). Attach the stencil with blue painters tape on top of the mul•tex.
Place a small amount of black paint on the plate. Dip the stencil brush bristles down in the puddle of paint. Rub it gently. Lift out of paint and place on another part of the plate and make some circles with the brush. This forces the paint up into the bristles and makes it uniform.
The most important part of stenciling is off-loading the brush. Place your brush flat against the paper towel at a 90-degree angle. Press your brush perpendicular to the paper towel and make at least three circles larger in diameter than your brush. Stenciling is a dry brush technique, so most of the paint needs to be removed first. Never go straight from loading your brush to the stencil. That will cause paint to run under the stencil.
Then place your brush perpendicular to the stencil and start by making small circles over the openings. Effective stenciling is not done quickly, it’s a slow build-up of paint.
Keep making the circular motions until all the paint is used, then reload and offload the brush to repeat until the stencil is finished. Periodically pull one of the stencil edges back to check the pattern to see if you missed any areas.

Once the paint is dry, cut your stenciled mul•tex for the outsides of the shoes and bag. Cut the same pieces from decorative scrapbook paper for the insides, then assemble the shoes and bag per the pattern instructions. The translucence of the mul•tex allows the colored paper underneath to show through…beautiful!
The shoebox is an origami-style box and lid folded from paper…check out this eBook, Fun with Folded Fabric Boxes, for some great ideas to showcase your miniature handmade treasures!


