

Sew an Arrow-Dynamic Quilt from Quilts for Scrap Lovers
Posted by Judy Gauthier on Feb 15th 2017
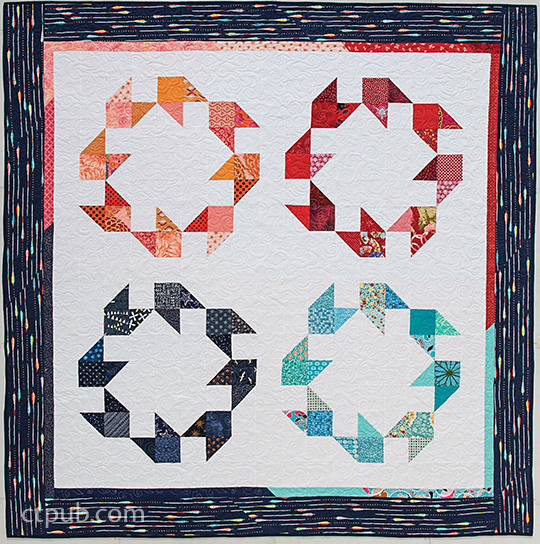
Finished Block: 28" x 28". Finished Quilt: 84 1/2" x 84 1/2".
I used a monochromatic theme for each block in this quilt (orange, red, navy, and turquoise), which allowed me to achieve a very cohesive pattern and appearance using some very odd scrap fabrics. I used solid white Kona Cotton for the background. The inside border is cut from a variety of bright prints, and I used a modern-looking print fabric by Cotton+Steel for the outer border to give the quilt an up-to-date look. The negative space is an ideal opportunity to showcase great quilting.
This quilt is made up of four very large blocks, which are each made using 49 squares and half-square triangles. This quilt is a great one for creating triangle scraps I call snippets.
Cutting
For each block
Use the 4 1/2˝ template from fast2cut Simple Square Templates or place tape on your rotary cutting ruler to cut 4 1/2˝ squares.
From similar color prints:
• Cut 24 squares 4 1/2˝ × 4 1/2˝.
From white:
• Cut 41 squares 41/2˝ × 41/2˝.
Sashing
From white:
• Cut 93 squares 41/2˝ × 41/2˝.
Borders (optional)
• Cut strips 2 1/2˝ × width of fabric as needed for the inner border.
• Cut strips 6 1/2˝ × width of fabric as needed for the outer border.
Stitch the Blocks
All seams are 1/4˝. Follow the pressing arrows.
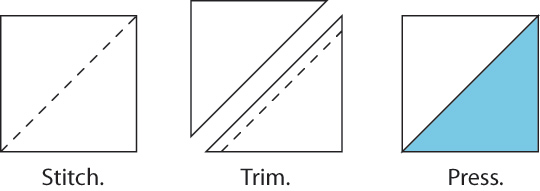
1. Using a marking pen and ruler, draw diagonal lines from corner to corner on the backs of 16 white 4 1/2˝ squares.
2. Place a print 4 1/2˝ square with a white square marked in Step 1, right sides together. Stitch on the line. Trim 1/4˝ from the stitching. Press the seams toward the print. Make 16.
Make 16.
Tip: Save the small scrap triangles to make another scrap quilt.
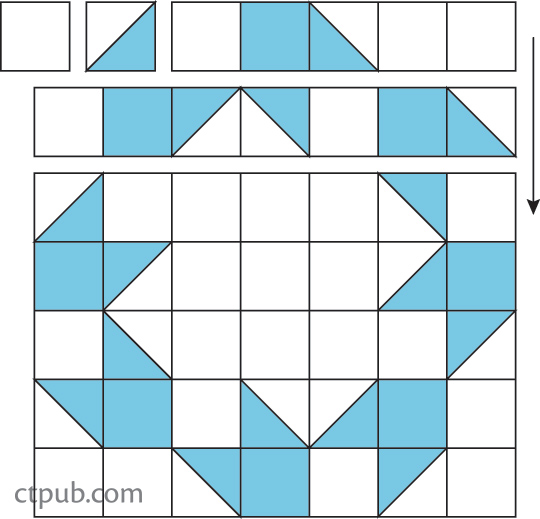
3. Refer to the block diagram to arrange the half-square triangles with the white and print 4 1/2˝ squares. Be sure to position the half-square triangle units carefully. Sew the rows; press the seams for the rows in alternating directions. Then sew the rows together, nesting the seams. Press the seams toward the bottom of the block. Make 4 blocks.
Stitch the Sashing
1. Sew 7 background 4 1/2˝ squares together; press all the seams in the same direction. Make a total of 6 rows of 7 squares. These are the vertical sashing strips.
2. Sew 17 background 4 1/2˝ squares together; press all the seams in the same direction. Make 3 rows. These are the horizontal sashing strips.
Construct the Quilt Top
Refer to the quilt diagram for the quilt in the project photo.
1. For the quilt center, sew 2 rows, each with a vertical sashing strip between 2 blocks and 1 on each end. Be sure to place the sashing strips so the pressed seams go in the opposite direction from the pressed seams of the block. This will allow the seams to nest. Press the seams toward the blocks.
2. Sew the 2 rows created in Step 1 between the 3 horizontal sashing strips. Press the seams toward the blocks.
3.Optional: Add borders.
4. Layer, baste, quilt, and bind as desired.
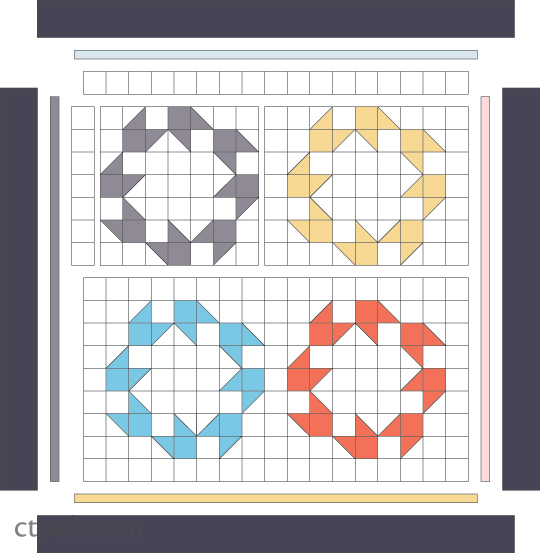
Quilt layout, 84 1/2˝ × 84 1/2˝.
Get more great projects from Judy's book, Quilts for Scrap Lovers!


