

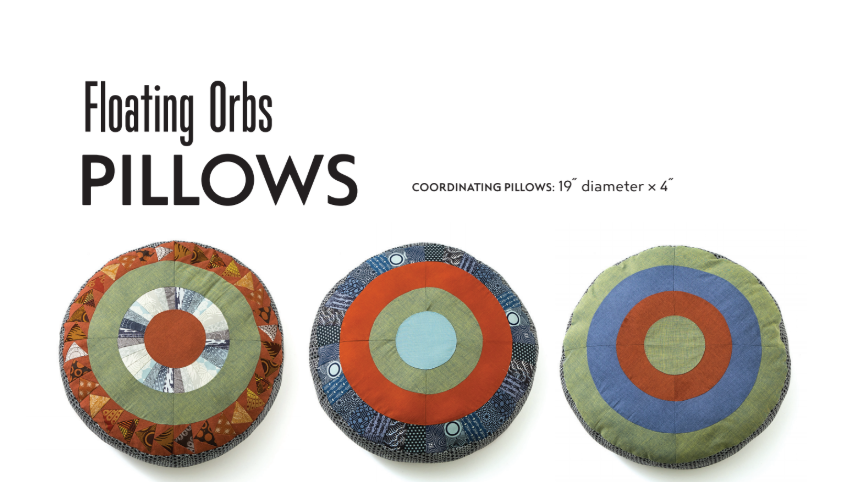
How to Make Floating Orbs Pillows
Jan 7th 2020
The content below is from New York Beauties and Flying Geese— try something new by making these fun pillows! P.S. Scroll to the bottom of the post for a giveaway.
MATERIALS
If you are making the quilt, you will have enough leftover fabric to make
at least 1 pillow top. To make all 5 pillows, you will need the following:
ASSORTED PRINTS: 8 fat eighths for each of 5 color groupings (40 total) for pieced arcs
GROUP A: Dark blue
GROUP B: Light blue
GROUP C: Dark green
GROUP D: Dark copper/yellow
GROUP E: Light copper/yellow
COORDINATING SOLIDS: For Flying Geese backgrounds and plain arcs
DARK BLUE SOLID: 3/8 yard
LIGHT BLUE SOLID: 3/4 yard
DARK GREEN SOLID: 11/4 yards
LIGHT GREEN SOLID: 3/8 yard
DARK COPPER SOLID: 7/8 yard
LIGHT COPPER SOLID: 3/8 yard
SMALL-SCALE BLACK PRINT: 13/8 yards for pillow sides
LARGE-SCALE BLACK PRINT: 13/4 yards for pillow backs
POLYESTER FIBERFILL: 5 pounds
Foundations and patterns
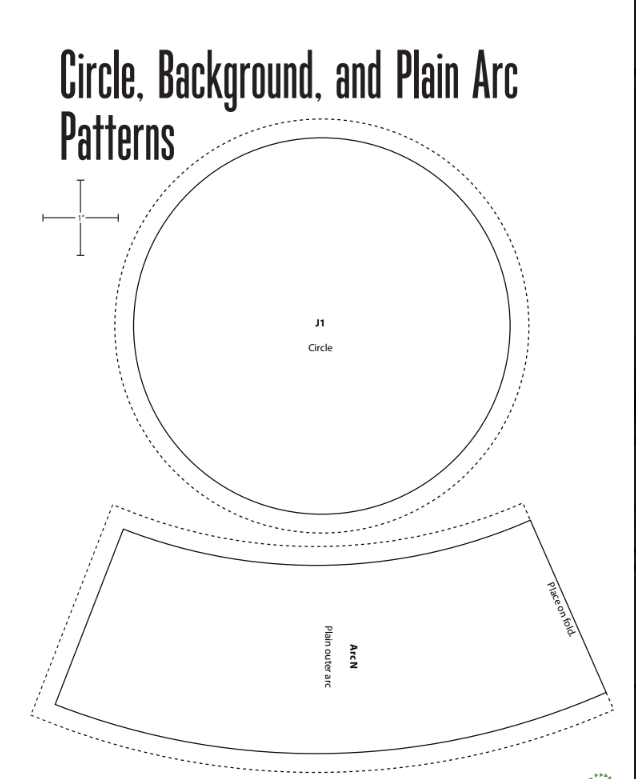
Refer to Foundation-Pieced Arc Patterns and Circle, Background, and Plain Arc Patterns. Photocopy the number of paper-piecing foundations listed. From template plastic, make templates for the circle and arc patterns.
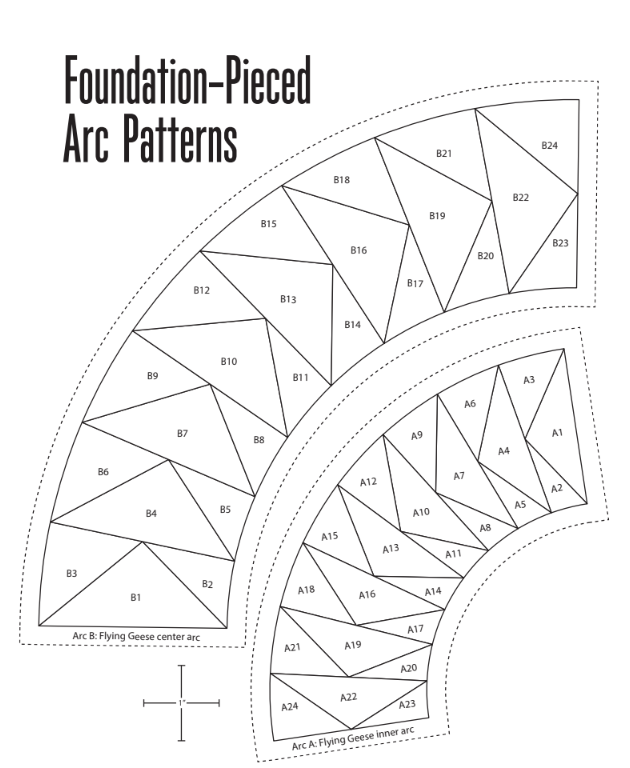
ARC A: 4
ARC C: 4
ARC D: 4
ARC E: 4
ARC F: 8
CIRCLE AND ARC PATTERNS:
J1, L, M, and N
CUTTING
GROUP A
GROUP C
From each fat eighth:
• From each fat eighth, cut 4 E rectangles.
DARK BLUE SOLID
• Cut 4 M arcs.
LIGHT BLUE SOLID
• Cut 4 L arcs.
• Cut 4 N arcs.
• Cut 2 J1 circles.
DARK GREEN SOLID
• Cut 32 A squares. Subcut each on the diagonal once.
• Cut 4 L arcs.
• Cut 4 M arcs.
• Cut 4 N arcs.
• Cut 1 J1 circle.
LIGHT GREEN SOLID
LARGE-SCALE BLACK PRINT
1. Using the techniques in Quilt Construction, Steps 1–3, sew any combination of inner, center, and outer arcs together to complete 4 quarter-circles for each pillow. To make the round pillows, do not add the K background pieces.
1. Arrange the assorted prints in a row within each group, with each fabric color flowing into the next. Choose the first fabric and label it Fabric 1. Working from left to right, label the rest of the fabrics 2–8.
2. Match the fabric pieces by letter with the foundations for the arcs. Foundation piece the arcs in sets of 4 arcs each.
3. Combine the pieced arcs with the L, M, and N plain arcs and the K and K-reverse backgrounds to make 4 matching quarter-blocks for each of Blocks 01, 02, 03, 05, 10, 11, 16, 17, 18, 21, 25, 29, and 30. Do not add the circle piece yet.
Use the colors in exactly the same positions in all the arcs.
2. Finishing the Pillow
1. Make a block that includes 4 quarter-circles and an appliquéd J1 circle at the center.
NOTE You will not need the K or K-reverse background pieces for these round pillows, since the K pieces are used to set a circle inside a square. Of course, if you want to make a square pillow, simply add the back-ground pieces to the block.
2. Fold the pillow backing fabric in half, right sides together, and press lightly on the fold. Open and fold in the other direction, right sides together, and press again to mark horizontal and vertical placement lines.
3. With the fabric still folded in half, lay the pillow top on top of the backing and line up the center of the pillow with the folds. Trace around the circle. Remove the top and cut out the back with scissors.
4. Sew 2 rectangles 41/2 ̋ × 303/8 ̋ together end to end, with a 1/4 ̋ seam, to form a 41/2 ̋-wide ring that will go around the outside of the pillow. Pin 1 edge of this side to the pillow top, right sides together.
5. Sew the pillow side to the pillow top with a 1/4 ̋ seam allowance.
6. Pin the backing to the pillow side. Leave a 4 ̋ opening to turn and stuff the pillow.
7. Sew the backing to the pillow side with a 1/4 ̋ seam, using a locking stitch at the beginning and end.
8. Turn the pillow through the opening and stuff with polyester fiberfill.
9. Hand stitch the opening closed.
-
Giveaway now closed.
Order New York Beauties and Flying Geese here.


