

Free Project: Painted Butterfly Mask
Posted by Stacey Merrill on Oct 19th 2015
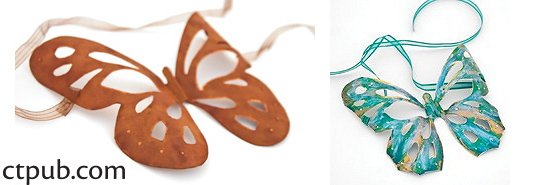
This Venetian-style butterfly mask made of Natural kraft-tex is decorated in vibrant colors. While delicate and mainly decorative, it can be carefully worn, and it would be the perfect costume piece to wear while handing out candy, attending a masked ball, or getting up to whatever other spooky goodness you have planned for this Halloween!
Materials:
small hole punch
scrap paper (brown paper bag or basic printer paper)
pencil
black marker
craft knife
paper clips
paintbrushes
fabric /ribbon stiffener spray
ribbon & thread
acrylic paints (Pthalo Blue, Pthalo Green, Iridescent Gold, Iridescent Silver, Interference Gold, Interference Blue)
gloss sealant spray
paper towel (optional)
Instructions:
1. First make mask pattern on scrap paper. This butterfly pattern was inspired by a paper punch from the Martha Stewart craft line. Enlarge the punched paper butterfly to between 9” -10” wide and print. Draw shape of mask onto this printout. Outline eyeholes with black marker. Also fill in any white spaces, altering pattern to your liking. Cut pattern with craft knife. (Alternatively, there are many free mask patterns online for printing. Or you can draw your own!)
2. With pencil, trace mask pattern onto kraft-tex.
3. Cut out kraft-tex mask. Fold mask vertically in center. Flatten and hold to your face. Shape nose area as needed. Remove mask and manipulate to improve shape.
4. Kraft-tex will lightly hold a crease. However, it holds the shape better if you apply fabric/ribbon stiffener to the shaped area. Kraft-tex gets floppier when wet. Hold your creases in place with paperclips, reshaping to your liking. Remove paperclips and manipulate mask during drying time as needed
5. Mix equal parts Pthalo Green and Silver paints. Paint front of mask. If mask gets too floppy when wet, reshape as needed. Air dry.
6. Mix equal parts Pthalo Blue and Silver paints. Paint inside of mask. Air dry.
7. Paint streaks of Blue and Silver on front of mask. While wet, smudge with brush or paper towel to blend as desired. Do the same with Iridescent Gold paint.
7. When dry, paint around eyes and cut-out spaces with Interference Gold. Paint highlights and blend as desired.
8. Paint Interference Blue streaks over mask and blend with paper towel or brush. Air dry.
9. Seal mask with glossy acrylic spray. This will enhance the colors while protecting the piece.
10. Cut 2 lengths of ribbon. Thread each ribbon through slot near edge of mask and eyeholes. Fold threaded ends of ribbon over and sew with a few stitches.
Your mask is finished! Can't you just see yourself as a fairy queen, beautiful butterfly, or Venetian reveler? No matter what you choose, have a happy Halloween!
Today's project comes from Stacey Merrill, a member of our Creative Troupe. You can find more of her fantastic projects over at http://artsnark.blogspot.com/.


