

Basic Bag-Making Techniques
May 6th 2020
What fun new projects are you trying? The following information is from The Better Bag Maker by Nicole Mallalieu- learn some helpful tips to begin your bag making journey! Plus, be sure to scroll to the bottom for a chance to win an ebook copy in our giveaway.
ALTERING PATTERNS
Before you alter any pattern, it’s a good idea to sew together a sample made from the original pattern. This way, you’ll learn which pattern pieces make each part of the bag and will easily be able to visualize where and how the alterations work on each pattern piece.
The techniques of slash and open and slash and close allow you to change the width and length of bag components while maintaining the positions of key pattern markings. Once you understand these basic techniques, you’ll be free to customize any bag pattern in the same way.
The pattern pieces all have slash lines marked on them, and the individual project instructions will direct you to add to or subtract from the pattern length or width at these lines. When you trace off a new pattern alteration, label each pattern piece with exactly what the alteration is and file it. Some of the projects will use the same alterations as others, and some pieces will be interchangeable, so it’s worth keeping the whole collection.
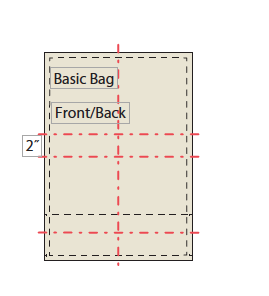
Slash and Open
When you want to make a bag wider or longer than the original pattern, you will slash the pattern and add in extra width or length. You could physically slash (cut) the pattern, add in extra paper, and tape it together, but tracing gives more accurate results and will preserve the original pattern.
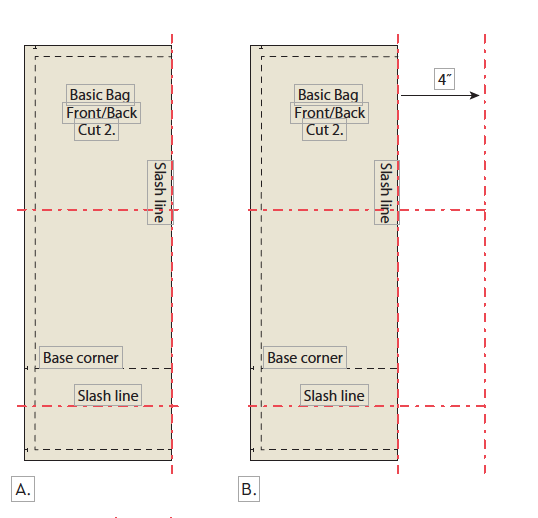
1. Take a piece of paper that is larger than the pattern piece and trace all of the slash lines on the original pattern—vertical and horizontal—to create a framework on which to build the new pattern. They will help you to keep the 2 halves of the pattern aligned and square when you make the alteration.
2. Decide where the extra width or length needs to be added in the pattern, and identify the slash line that will be used.
3. Trace the first part of the pattern, including all notches and pattern markings, to the slash line that will be used. (Fig. A). Measure the required extra length or width away from the slash line, and draw a parallel line at this distance. (Fig. B)
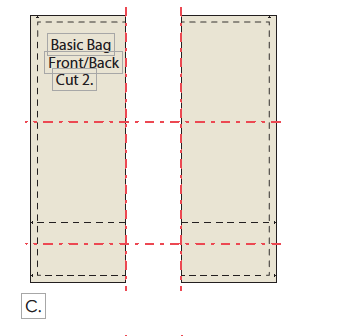
4. Align the new line with the slash line on the original pattern, and check that the horizontal slash lines on the pattern line up with the horizontal lines that you traced in Step 1. When it’s all square and accurately aligned, trace the second part of the pattern. Rememberto trace the notches and pattern markings, except center-front/center-back (CF/CB) if your slash has affected this area. (Fig. C)
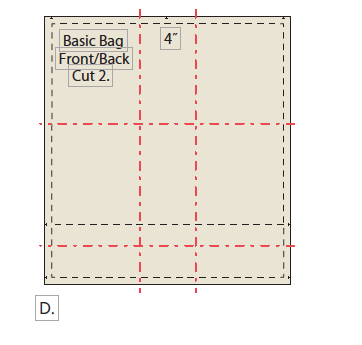
6. Join the lines of the pattern pieces and, if necessary, mark in a new CF/CB notch in the center of the expanded section or sections. (Fig. D)
7. Repeat the process, adding exactly the same measurement at the corresponding slash lines on any other pattern piece that has to match to this piece. The individual project instructions will tell you which pieces will need to be altered, but if you look at a finished bag sample, you should be able to see which pattern pieces will be affected by changing the dimensions of one piece. If you get used to thinking it through this way, you’ll need less instruction.
There are 2 slash lines called “horizontal slash line #2” on the bag base and bag base support pattern pieces and 2 slash lines called “vertical slash line #2” on the side panel and lining side panel pieces. These correspond with the slash lines on the facing piece, and if you expand or reduce the same measurement at each of these lines, the pattern will match together perfectly.

Enter our giveaway for a chance to win a free ebook copy!
-


