Miniature Felt Toy: Teeny-Weeny Bear
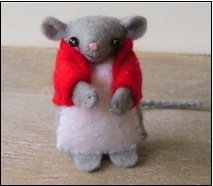
Miniature Felt Toy: Mister Mousy
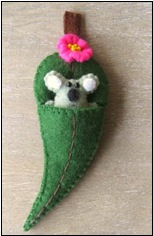
Miniature Felt Toy Set: Koala in a Gum Leaf Bed
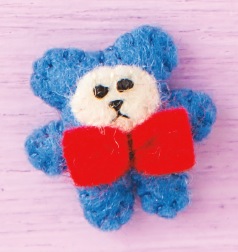
Miniature Felt Toy: Teeny-Weeny Bear

From Pipsqueaks - Itsy-Bitsy Felt Creations to Stitch and Love by Sally Dixon
Class Description:
Teeny-Weeny Bear (p. 81) requires beginner sewing skills (although the tiny nature of the project might be a little challenging to a novice sewer).
This project will teach students how to make a miniature teddy bear from sheet felt. Skills involved include:
- Pattern transfer
- Hand cutting of tiny pattern pieces
- Basic embroidery stitches
Students will take away a miniature felt teddy bear (or two).
This novelty item can be turned into a brooch, a set of earrings, or even a magnet. Teeny-Weeny Bear is rather cute!
And here's an idea: why not decorate an empty matchbox and turn it into a bed for Teeny-Weeny? Children will love to play with this toy.
Class Length:
This project should take about one hour to complete. If students are fast sewers, they should be able to make more than one teddy.
Class Supply List:
• Pipsqueaks - Itsy-Bitsy Felt Creations to Stitch & Love by Sally Dixon
(p. 81-84)
- Small embroidery scissors
- Felt sheets (various colors)
- Embroidery floss (various colors)
- Polyfill stuffing
- Pins
- Hand sewing needles
- Bamboo skewer (or Alex Anderson's 4-in-1 Essential Sewing Tool, available from C&T Publishing)
Optional supplies:
- Tracing paper and transfer pen
- Miniature brooch backs or safety pins
- Earring findings (French hooks)
- Small ceramic magnets
- Craft glue
- Matchboxes
- Decorative paper for matchbox
- Fabric scraps to make bed linen for the matchbox bed
Classroom Preparation:
Students each need a space at a table. (They don't need a large area to spread out as the project is tiny.)
Useful Communal Tools:
- Scissors
- Small embroidery scissors
- Pins and needles
- Pinking shears (to make bed linen for matchbox)
Class Agenda:
Refer to p. 81-84 of Pipsqueaks - Itsy-Bitsy Felt Creations to Stitch & Love by Sally Dixon.
1. Transfer the pattern pieces onto paper.
2. Cut out the patterns pieces in chosen felt colors.
3. Sew and embroider teddy-bear face.
4. Attach bow tie.
5. If creating a brooch, attach the brooch pin (or safety pin) to the back of the bear.
6. Blanket stitch around the teddy pieces and stuff.
7. If creating earrings, attach the earring findings at this stage.
8. If creating a magnet, glue the magnet to the back of the completed teddy.
Miniature Felt Toy: Mister Mousy

From Pipsqueaks—Itsy-Bitsy Felt Creations to Stitch and Love by Sally Dixon
Class Description:
Mister Mousy (p. 63) requires beginner sewing skills (although the tiny nature of the project might be a little challenging to a novice sewer).
This project will teach students how to make miniature felt creations from sheet felt. Skills involved:
- Hand cutting of tiny pattern pieces
- Basic embroidery stitches
Students will take away a miniature felt mouse.
And here's an idea: why not create some miniature accessories for Mister Mousy to hold and play with? He might like a cupcake (p. 76); strawberry (p. 85); pet doggy (p. 88); or ice-cream cone (p. 92).
Mister Mousy can easily become a Miss Mousy with the addition of embroidered eyelashes or a fragment of felt around the jacket collar.
Class Length:
This project should take 2–3 hours to complete. If students are fast sewers, they should be able to make more mice, accessories, or begin a new project.
Class Supply List:
- Pipsqueaks—Itsy-Bitsy Felt Creations to Stitch & Love by Sally Dixon (pp. 63–70)
- Small embroidery scissors
- Felt sheets (various colors)
- Embroidery floss (various colors)
- Polyfill stuffing
- Beads
- Pins
- Hand-sewing needles
- Bamboo skewer (or another long tool for stuffing)
Optional supplies:Tracing paper and transfer pen, or a photocopy of the pattern
Classroom Preparation:
Students each need a space at a table. (They don't need a large area to spread out as the project is tiny.)
Useful Communal Tools:
- Sewing scissors
- Small embroidery scissors
- Pins and needles
Class Agenda:
Refer to pp. 63–70 of Pipsqueaks—Itsy-Bitsy Felt Creations to Stich & Love by Sally Dixon.
1. Transfer the pattern pieces onto tracing paper.
2. Cut out the pattern pieces in chosen felt colors.
3. Sew tail and paws according to the instructions.
4. Create mouse head according to instructions.
5. Stitch mouse body according to instructions, inserting tail and paws when appropriate. Stuff. Attach head.
6. Stitch mouse jacket according to instructions. Attach jacket to mouse.
Other Available Resources:
The following may be available for purchase throughout the workshop:
- Pipsqueaks—Itsy-Bitsy Felt Creations to Stitch & Love by Sally Dixon
- Other original patterns by Sally Dixon
- Sewing kits, complete with pattern and materials
- 100% wool felt packs
Handmade felt toys and accessories by Sally Dixon
Miniature Felt Toy Set: Koala in a Gum Leaf Bed

From Pipsqueaks—Itsy-Bitsy Felt Creations to Stitch and Love by Sally Dixon
Class Description:
Koala in a Gum Leaf Bed (p. 53) requires beginner sewing skills (although the tiny nature of the project might be a little challenging to a novice sewer).
This project will teach students how to make miniature felt creations from sheet felt. Skills involved:
- Hand cutting of tiny pattern pieces
- Basic embroidery stitches
Students will take away a miniature felt koala and gum leaf.
And here's an idea: why not attach a magnet to the gum leaf to make a novelty fridge magnet?
Class Length:
This project should take 2–3 hours to complete. If students are fast sewers, they should be able to make more koalas or begin a new project.
Class Supply List:
- Pipsqueaks—Itsy-Bitsy Felt Creations to Stitch & Love by Sally Dixon (pp. 53–57)
- Small embroidery scissors
- Felt sheets (various colors)
- Embroidery floss (various colors)
- Polyfill stuffing
- Beads—black and yellow
- Pins
- Hand-sewing needles
- Bamboo skewer (or another long tool for stuffing)
Optional supplies:Tracing paper and transfer pen, or a photocopy of the pattern.
Classroom Preparation:
Students each need a space at a table. (They don't need a large area to spread out as the project is tiny.)
Useful Communal Tools:
- Sewing scissors
- Small embroidery scissors
- Pins and needles
Class Agenda:
Refer to pp. 53–57 of Pipsqueaks—Itsy-Bitsy Felt Creations to Stich & Love by Sally Dixon.
1. Transfer the pattern pieces onto tracing paper.
2. Cut out the pattern pieces in chosen felt colors.
3. Sew and embroider koala face, ears, and tummy.
4. Blanket stitch around the koala, and stuff.
5. Stitch detail onto gum leaf and stitch the stem.
6. Blanket stitch around the gum leaf.
7. Prepare blossom. Attach to gum leaf with beads.
Other Available Resources:
The following may be available for purchase throughout the workshop:
- Pipsqueaks—Itsy-Bitsy Felt Creations to Stitch & Love by Sally Dixon
- Other original patterns by Sally Dixon
- Sewing kits, complete with pattern and materials
- 100% wool felt packs
Handmade felt toys and accessories by Sally Dixon


