Use Your Yardage with Betsy's Quilt!
Posted by Joyce Dean Gieszler on May 3rd 2018
Please enjoy this free project from Fantastic Stash Quilts by Joyce Dean Gieszler.
Finished unit: 4˝ × 4˝ • Finished quilt: 64½˝ × 64½˝
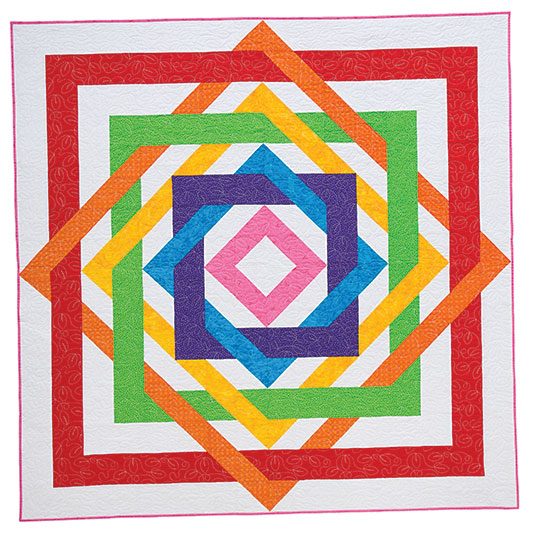
Betsy’s Quilt, 64½˝ × 64½˝, made by Joyce Dean Gieszler, quilted by Cheryl Ferris, 2014
Materials
The feature project uses yardage for a consistent colorway. For a scrappy version, see Betsy’s Scrappy Quilt.
PINK 3/4 yard (includes binding)
PURPLE ½ yard
BLUE ½ yard
GREEN 7/8 yard
YELLOW ½ yard
RED 11/3 yards
ORANGE 5/8 yard
WHITE 17/8 yards
BACKING: 4 yards
BATTING: 72˝ × 72˝
This project actually named itself. My friend Betsy loved it so much that she tested the pattern before it was even written. She had a chart with cutting instructions and some very general sewing instructions, and off she went. Betsy’s longarm quilter loved the quilt so much that she posted it on her blog with the title “Betsy’s quilt.” Unfortunately for me, the longarm quilter lives in my area, and I had planned to use this pattern as a mystery quilt for a class for my local guild. I ended up waiting nearly three years to use this quilt for the mystery class in case anyone had seen it online!
Cutting
PINK
• Cut 1 strip 5˝ × the width of fabric. Subcut 6 squares 5˝ × 5˝.
• Cut 7 strips 21/4˝ × the width of fabric for the binding.
PURPLE
• Cut 1 strip 5˝ × the width of fabric. Subcut 4 squares 5˝ × 5˝. From the remainder of the strip, cut 1 rectangle 4½ ˝ × 12½ ˝.
• Cut 1 strip 4½ ˝ × the width of fabric. Subcut 3 rectangles 4½ ˝ × 12½ ˝.
BLUE
• Cut 2 strips 5˝ × the width of fabric. Subcut 10 squares 5˝ × 5˝.
GREEN
• Cut 1 strip 5˝ × the width of fabric. Subcut 8 squares 5˝ × 5˝.
• Cut 4 strips 4½ ˝ × the width of fabric. Subcut 4 rectangles 4½ ˝ × 20½ ˝.
YELLOW
• Cut 2 strips 5˝ × the width of fabric. Subcut 16 squares 5˝ × 5˝.
RED
• Cut 1 strip 5˝ × the width of fabric. Subcut 4 squares 5˝ × 5˝.
• Cut 8 strips 4½ ˝ × the width of fabric. Subcut 4 rectangles 4½ ˝ × 24½ ˝. Subcut 4 rectangles 4½ ˝ × 20½ ˝.
ORANGE
• Cut 3 strips 5˝ × the width of fabric. Subcut 22 squares 5˝ × 5˝.
WHITE
• Cut 5 strips 5˝ × the width of fabric. Subcut 38 squares 5˝ × 5˝.
• Cut 8 strips 4½ ˝ × the width of fabric. Subcut 4 rectangles 4½ ˝ × 28½ ˝. Subcut 4 rectangles 4½ ˝ × 24½ ˝. Subcut 4 rectangles 4½ ˝ × 12½ ˝. Subcut 4 rectangles 4½ ˝ × 8½ ˝.
Quilt Construction
When you make the half-square triangles, press the seams toward the darker fabric. Press all other seams according to the arrows in the diagrams.
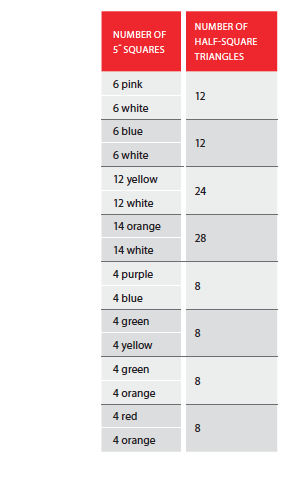
Half-Square Triangles
Make the number of half-square triangles in the color combinations shown in the chart. Trim each to 4 1/2˝ × 4 1/2˝.
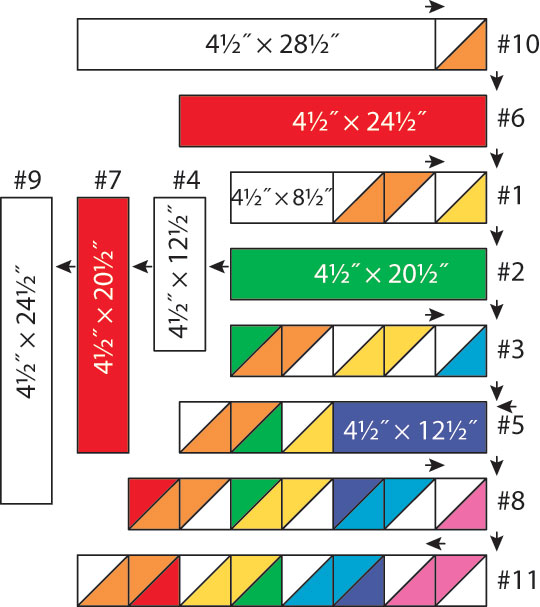
Quilt Quarters
Lay out a quarter of the quilt as shown. Get happy that you’ve got all the lines flowing in the right direction.
1. Sew the units into rows.
2. Sew Row 1 to Row 2.
3. Sew Row 3 to the bottom of Row 2.
4. Sew Row 4 to the sides of Rows 1/2/3.
5. Continue to add rows in numerical order until the quilt quarter is complete.
Quilt Assembly
Sew the 4 quarters together—the seams should nest nicely for you! Press the final seams open to reduce bulk.

Quilting and Finishing
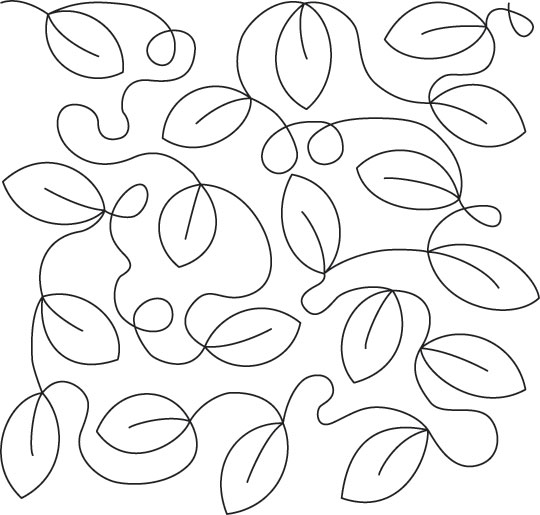
Quilt and bind the quilt as desired. Cheryl Ferris quilted both of these quilts with an allover pantograph design called All Leaf Simple by Kim Diamond of Sweet Dreams Quilt Studio.