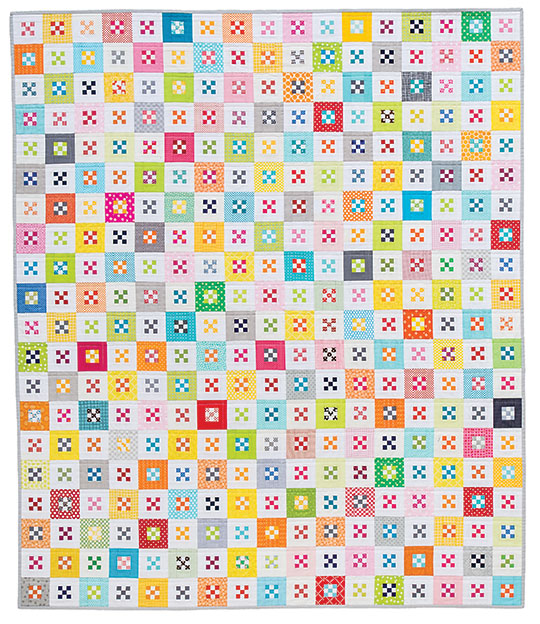
Use Up Your Scraps with a Mini Nines Quilt!
Do you have more scraps than you know what to do with? Use up your tiniest scraps with this free project taken from No Scrap Left Behind by Amanda Jean Nyberg.

Finished block: 3 1/2" × 3 1/2" • Finished quilt: 59 1/2" × 70"
When I first started making this quilt, I cut individual 1 ̋ × 1 ̋ squares and sewed them together to make the Nine-Patches. Thankfully a friend suggested that I use strip-piecing methods to make the Nine-Patch blocks in order to speed up the process. At first I was hesitant to do so, but after making a few blocks, I knew it was the only way to go. My speed dramatically increased and my piecing accuracy improved.
Pieced and quilted by Amanda Jean Nyberg
Tiny Piecing
Tiny piecing can be frustrating, especially if you aren’t an extremely accurate sewist. (I know I fit into that category.) Before cutting out all of the pieces for this quilt, I highly recommend that you make a few test blocks following the tips below and that you test the accuracy of your seam allowance.
If you’re still having difficulties, you may want to consider cutting the block border pieces a little larger than the instructions state to give yourself some wiggle room. (Adjust according to your personal preference.) If you choose to make the blocks oversized, trim each block down to 4 ̋ × 4 ̋ (unfinished) after piecing.
Other tips for accuracy:
• Cutting accurately is very important. If your pieces aren’t cut correctly, an accurate seam allowance is a moot point. Every inaccuracy will continue to cause problems (and perhaps be magnified) as you progress through your project.
• Use the same sewing machine for piecing the entire quilt top.
• Use a thin (50wt) thread for piecing. Thicker thread will shrink your seam allowance.
• Press—don’t iron. Press carefully! It does make a difference.
Materials
A variety of small-scale prints and solids: 68 strips 1 ̋ × 27 ̋ for the Nine-Patch centers, and 170 strips 1 1/2 ̋ × 12 1/2 ̋ for the block borders
White: 3 1/2 yards
Backing: 4 yards
Binding: 5/8 yard
Cotton batting: 68 ̋ × 78 ̋
Cutting
WOF = width of fabric
SMALL-SCALE PRINTS AND SOLIDS
Nine-Patch centers. From each of the 68 strips, cut:
• 1 piece 1 ̋ × 5 1/2 ̋
• 2 pieces 1 ̋ × 10 1/2 ̋
Keep the sets of pieces cut from the same fabric together.
Block borders. From each of the 170 strips, cut:
• 2 pieces 1 1/2 ̋ × 2 ̋
• 2 pieces 1 1/2 ̋ × 4 ̋
Keep the sets of pieces cut from the same fabric together.
WHITE
Nine-Patch centers. Cut 40 strips 1 ̋ × WOF.
Subcut:
• 68 pieces 1 ̋ × 10 1/2 ̋
• 136 pieces 1 ̋ × 5 1/2 ̋
Block borders. Cut 51 strips 1 1/2 ̋ × WOF.
Subcut:
• 340 pieces 1 1/2 ̋ × 2 ̋
• 340 pieces 1 1/2 ̋ × 4 ̋
BINDING
Cut 8 strips 2 1/2 ̋ × WOF.
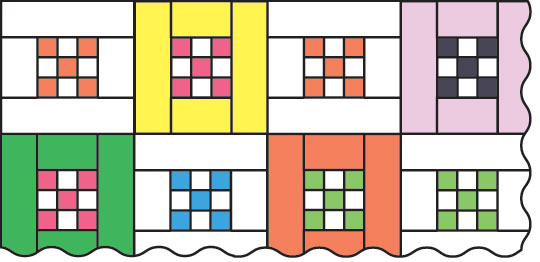
Fabric Selection: Each of the individual squares within the Nine-Patch blocks finishes at 1/2 ̋ × 1/2 ̋, so choose extremely small-scale prints or solids for those pieces. For the block borders, use a variety of solids and small-scale prints. Half of the blocks are bordered with a print or a solid color, and the rest of the blocks are bordered in white.
Construction
All seam allowances are 1/4 ̋ unless otherwise noted. Use a smaller stitch length for the strip sets to avoid seams opening up after subcutting.
1. Arrange 2 colored 1 ̋ × 10 1/2 ̋ pieces and 1 white 1 ̋ × 10 1/2 ̋ piece. Sew the pieces together. Press the seams open. Cut the strip set into 1 ̋ segments. Each strip set will yield 10 pieces. Fig. A
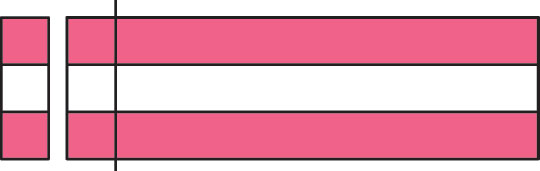
Fig. A
2. Arrange 2 white 1 ̋ × 5 1/2 ̋ pieces and 1 colored 1 ̋ × 5 1/2 ̋ piece. Sew the pieces together. Press the seams open. Cut the strip set into 1 ̋ segments. Each strip set will yield 5 pieces. Fig. B
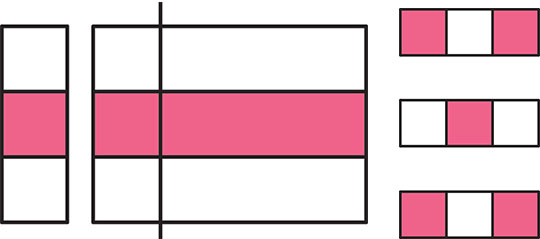
Fig. B and Fig. C
3. Arrange 2 segments from Step 1 and 1 segment from Step 2, as shown, to create a checkerboard pattern. Fig. C
4. Sew 3 rows together to make 1 Nine-Patch center. Press the seams open. Repeat to make a total of 5 Nine-Patch centers. Fig. D
5. Repeat Steps 1–4 with the remaining 67 fabrics to make a total of 340 Nine-Patch centers.
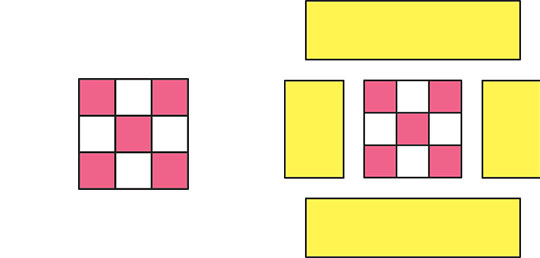
Fig. D and Fig. E
6. Arrange a Nine-Patch center and 4 border pieces. Fig. E
7. Sew the 11/2 ̋ × 2 ̋ border pieces to the left and the right of the Nine-Patch block. Press the seams toward the outside.
8. Sew the 1 1/2 ̋ × 4 ̋ border pieces to the top and bottom of the block. Press the seams toward the outside. Fig. F
9. Repeat Steps 6–8 to border a total of 170 blocks with small-scale or solid-colored fabrics.
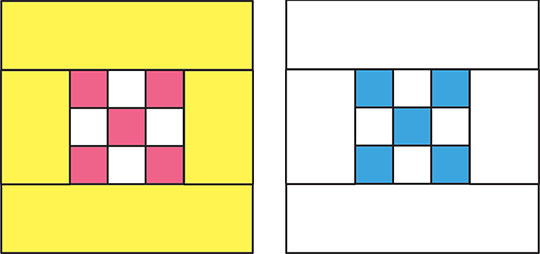
Fig. F and Fig. G
10. Repeat Steps 6–8 to border the remaining 170 blocks with white fabric. Fig. G
11. Arrange the blocks according to the quilt assembly diagram.
12 . Sew the blocks into rows. Press. Sew the rows together to complete the quilt top. Press the quilt top well.
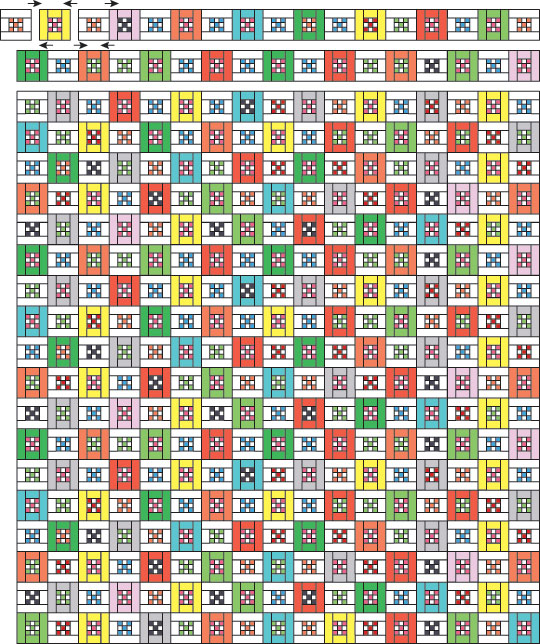
Quilt assembly
Alternating Seam Directions
When arranging the blocks, place all of the seamlines of the white-bordered blocks horizontally. Place all of the seamlines of the color-bordered blocks vertically. This will make assembly easier, and it will prevent bulky seams between the blocks.