

The Travelers: Present in the Past, Plus a Redwork Holiday Star for Children of All Ages!
Posted by Elaine Schmidt on Sep 28th 2015
We're taking a trip back in time for today's National Sewing Month post, as Elaine Schmidt, author of The Travelers and The Travelers Companion, talks about the inspiration for her novel and treasuring family heirloom quilts.
It’s fun to think about what it would be like to spend some time in the 1890s, or perhaps the 1920s, or any number of fascinating times in history. Imagine seeing the Eiffel Tower constructed, or hearing the first ringing of Big Ben’s chimes. You might want to see Babe Ruth play baseball or hear Chopin play the piano. Think for a moment about the historical events you would visit if given the chance.
In The Travelers: Present in the Past, three 13-year-old time travelers from different time periods are uprooted from their own times and thrown together in a series of time-travel adventures. Although the book is a work of fiction, one of those three characters is not entirely fictional. The character of Winnie Longenecker was inspired by a young lady who was born in 1879, near Paola, Kansas. In her teens, she kept a journal, which is now fragile and faded, and stitched a beautiful quilt, which has been handed down carefully through generations of her family to the present day.
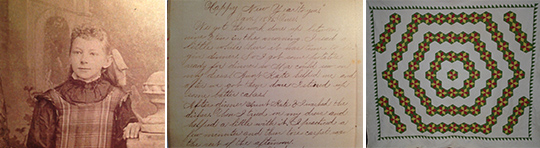
From left to right: Winnie Longenecker; from Winnie’s journal; Winnie’s quilt, the A Little Girl’s Star variation of the Kansas City Star pattern, made in the 1890s
This would be a good time to look around at the quilts in your life and make sure you know who made each one and what those people’s stories were. Label your quilts! Hand stitch a label to the back of each quilt you own, with the date the quilt was made, if you have that information, and any information you have on the quiltmaker. This will help ensure that the quilts stay in your family and that future generations remember the quiltmakers of previous generations. This is no time to be shy–label your own quilt creations, too.
If you have old quilts, it’s not a bad idea to take them to an appraiser, or at least to an appraisal event at a local quilt shop or quilt show. For a fee, appraisers can tell you the age of a quilt and can place an insurance value on each quilt. You may just be surprised by the value of your old quilts.
You can read about the fictional adventures of Winnie, and her friends Nona and Henry, in the first of The Travelers novels, The Travelers: Present in the Past. You can also read more about the real-life Winnie, and learn how to make her quilt and some other projects that she would have made as a girl in the 1890s, in The Travelers Companion.
The Travelers Companion introduces readers to the real Winnie Longenecker, born in 1879, who inspired the character of Winnie in The Travelers: Present in the Past . The Companion introduces children, from preschool/kindergarten age to teens, to some of the handwork skills that were essential for children of Winnie’s era. Each project is presented with three levels of difficulty and should be achievable by a child working alongside an adult. The handwork skills presented in the Companion were so important in Winnie’s time that school classes and printed textbooks on the subject were quite common.
Redwork, an inexpensive, simple style of embroidery, was wildly popular by the time Winnie learned to thread a needle. The following Holiday Star pattern includes instructions for children and teens who can handle a sharp needle.
To do this project with younger children, you can use a long, fairly blunt craft needle with red yarn and omit the innermost star. For children who are not yet ready to handle a needle, you can trace the stars onto the felt and let them glue red yarn on the traced lines. For very young children, trace the star(s) onto quilted white or off-white muslin and let the child decorate the star by coloring with fabric markers or attaching buttons and bits of trim or other pretty little bits you have on hand with glue.
No matter what age child you are working with, make sure you have a version of the star to make as well. Remember that part of the joy of doing projects with children is the chance to spend some quiet, technology-free time working together and talking.
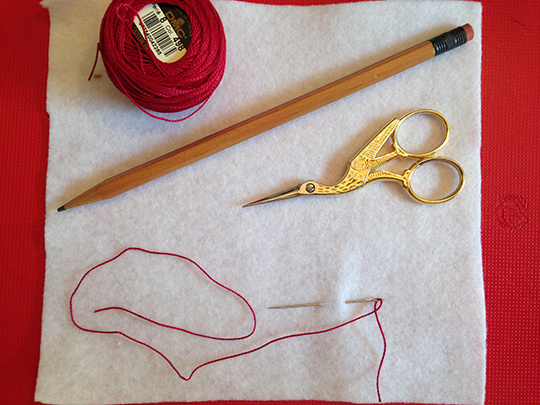
Supplies:
1 piece of white paper, at least 4˝ square
1 piece of thick white felt, at least 4˝ square
Red embroidery floss or thread (I used DMC #498 thread) (use thread if working with someone new to stitching so the child can work with a single strand)
Pencil
Scissors
Crewel needle
1 piece of red ribbon, at least 8˝ long
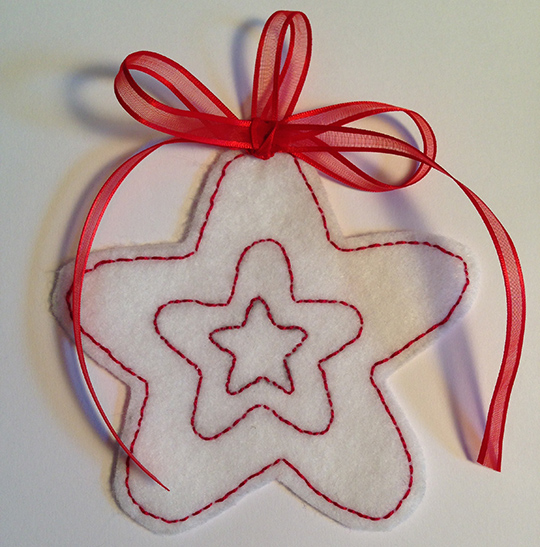
This simple redwork star can be stitched in about an hour by an adult or can be done as an adult/child project in an afternoon. The final step is attaching a bow and a loop for hanging the star. You may also want to trace and embroider initials (either the child’s or those of the person for whom the child is making the star) inside the center star. Another option is omitting the center star and embroidering a full name there to create a reusable gift tag or a personalized ornament.
Since the heavy felt holds its shape well, it does not have to reinforced or doubled. The redwork stitching creates a reverse image of the embroidery on the backside of the star, in stitching that is a little heavier and not as decorative as that on the front.
CUTTING AND MARKING: Print the star pattern (download here) and cut along the lines of the larger star. Make one cut through the larger star to the next smallest star and cut that star out of the middle of the largest star. Pierce the middle of the smallest star and cut it out as well. The donut-like, large paper star is your template for cutting the star from the felt and for marking the next-smallest star on the felt. The smaller star donut can then be lined up to the middle star to trace the smallest, interior star.
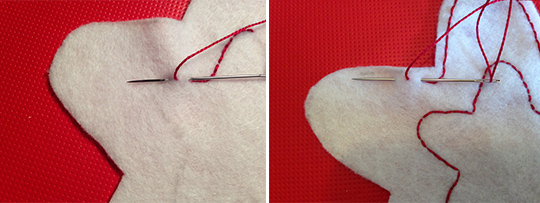
Pin the donut star to your piece of felt and trace both the large and medium stars on the felt in pencil. Note that you will have to pass over the felt several times with the pencil lead to make a distinct line. Remove the template and check that your pencil markings are legible, remarking any that are not. Cut the larger star from the piece of felt. If you are going to use the smallest star, do not trace it until the other embroidery is done, as handling the felt during stitching can blur and erase the pencil lines.
STITCHING: Use a simple backstitch (instructions below) to embroider along the lines of the medium star. Once that is completed, run a similar line of stitching about 1/4˝ from the outside edge of the large star. If you are going to embroidery the smallest star, make it and stitch it last.
BACKSTITCH: Knot your thread. Bring your needle up through the felt about 1/8˝ or 1/4˝ from the starting point of the line you are embroidering. Pull the thread through until the knot is snug against the back of your fabric. Poke the needle through the fabric at your starting point and back up again about 1/8-1/4˝ from where you first pulled the thread through. This constitutes a stitch. You will repeat this process, always inserting the needle in the hole of the previous stitch to create a long line of unbroken red stitches. Always knot your thread on the backside of the star when you have to re-thread your needle and when you are done stitching.
If the felt star is rumpled after the stitching is completed, simply press it using a steam iron. Make sure to use a pressing cloth to protect the felt. Cut 3˝ off of your piece of ribbon, using the remainder to create a bow. Use the 3˝ piece of ribbon to form a loop (for hanging the star) and tack it and the bow to the top of the star using the red embroidery floss or thread, hiding the raw edges of the loop under the bow.
Remember to encourage and praise the child who’s working with you. If the child has a tough time using the needle at first, you might try taking a stitch or two with the needle switched to your non-dominant hand. That should provide a laugh for both of you and give you a chance to point out how practice makes things better. Let your project partner know that he or she is learning a skill that a lot of adults don’t have today. You may also want to point out that the backstitch used for the star is the same stitch used for hand repairs of everything from clothing to backpacks and tents. Enjoy yourself!
Plus, win a copy of both books, The Travelers and The Travelers Companion by entering the giveaway here: a Rafflecopter giveaway! US residents only; giveaway lasts one week and winner will be announced next Monday.
Congratulations to Nancy W., winner of this giveaway! I hope you enjoy sharing these books and projects with a young one in your life.


