


The Definitive Guide to Piecing Curved Seams
This straightforward, definitive guide comes from the Piecing Tips & Tricks Tool.
To piece curved seams, mark tic marks on BOTH templates (the dots along the seams in these illustrations) so that the pieces will match EXACTLY. You will need more tic marks on tight curves than you do on gentle curves. Clip the concave edges before pinning. Match and pin at the tic marks and the end points, opening up the clips, and sew with the concave piece on top.
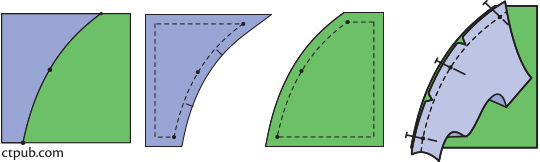
Finished unit; Concave; Convex; Clip and pin.
Clip a slightly tighter-radius curve edge and pin in at least four places.
Finished unit; Concave; Convex; Clip and pin.
Clip an even tighter-radius curve edge more closely than the previous one and pin in at least five places.

Finished unit; Concave; Convex.
Clip a very tight-radius curve edge very closely (possibly every 1/8") at the tight inner bend. Pin in at least seven places.
Finished unit; Concave; Convex.
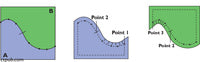
With S curves, part of the seam is concave on each piece. You may find this seam easier to piece if you have the concave edge on top while sewing each part of the seam. Place piece A on top of piece B and sew from point 1 to point 2. Turn the unit over and sew from point 3 to point 2.
Finished unit; Piece A; Piece B.


