


Terrific Triangle Tote
Today for our National Sewing Month post, we have Bernadette Kent, author of Rubies, Diamonds and Garnets, Too with a great tutorial on creating a Terrific Triangle Tote! Take it away Bernadette!
Create the Pieces for Your Bag
Get Ready to Create
- 8 fat eighths: medium prints
- 2 fat eighths: lighter prints
- 1 yard desired material for handles, bottom lining, and binding
- 1 yard of fusible batting
- Thread that matches project (50 wt 3-ply)
Get Ready to Cut
For large triangles cut:
- 10 squares measuring 6˝. Then cut each square diagonally into 2 triangles. fig. 1
For medium triangles cut:
- 44 squares measuring 3˝. Then cut each square diagonally into 2 triangles. fig. 1
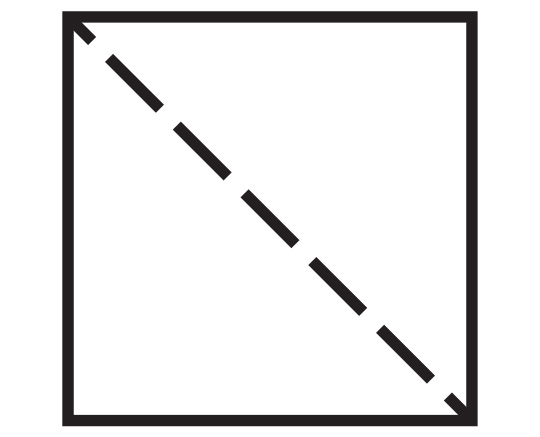
fig. 1
Get Ready to Sew
1. To make the medium triangle unit, sew 2 triangles together to make a half square triangle and trim square to 3˝. Then sew together a medium triangle on either side. fig. 2
2. Use fourteen of the above units and add a large triangle to the bottom. fig. 3
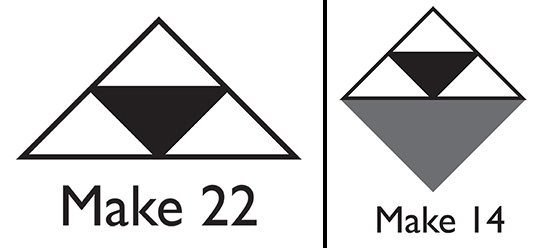
fig. 2; fig. 3
3. Then sew the units together as shown in fig. 4
Make two of these units.
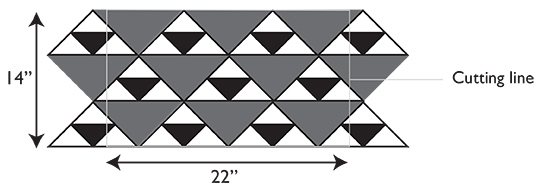
fig. 4
Bag Construction Part I
Get Ready to Cut
For front and back lining cut:
- 2 fabric pieces 22˝ x 14˝
For the bottom cut:
- 2 fabric pieces 5˝ x 19˝
- 1 batting piece 5˝ x 19˝
For side binding cut:
- 2 pieces 2˝ x 14˝
For bottom binding cut:
- 1 piece 2˝ x WOF
For top binding cut:
- 1 piece 2˝ x WOF
Get Ready to Sew
4. To make the bottom of the tote, cut two pieces of fabric and one piece of batting measuring 5˝ x 19˝. Layer the batting between the two fabrics and make sure the fabrics are right side out.
Quilt a narrow channel stitch as shown in fig. 5. Trim to measure 18˝ x 4˝.
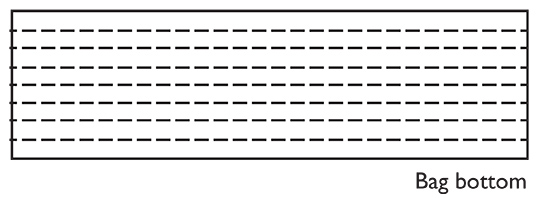
fig. 5
5. To make the handles, cut two strips of fabric measuring 33˝ x 3˝. Cut two pieces of batting measuring 33˝ x 1˝.
Press the fabric in half lengthwise. Open the fabric and lay down with the wrong side facing up. Lay the batting down with edge of the batting along the fold line. Press the shorter seam allowance over the batting. Make the same press line on the other side of the handle and refold the first press line.
Stitch along the open side and then stitch another row on the other side. fig. 6

fig. 6
Bag Construction Part II
6. To attach the handles, use a seam ripper to make an opening where the bottom point of the medium triangle meets the large triangle. You will need to make two openings on the front and two on the back.
Insert the
end of the handle about a
![]() 1/2˝.
Pin and sew in place.
1/2˝.
Pin and sew in place.
7. If desired, iron the interfacing to the wrong side of the front and back lining fabric. Pin one lining to the front piece and the other lining to the back. Using the template provided, quilt the front unit. Quilt the back unit as desired.
8. Lay the quilted back and front units right sides together. Stitch together down the sides. Finish the seams with binding.
9. To attach the bottom, first round the four corners. fig. 7
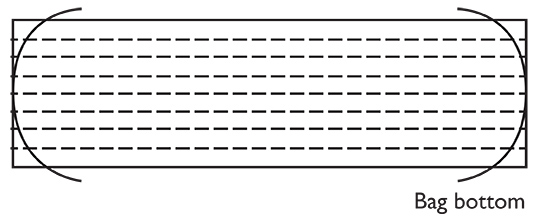
fig. 7
With the bag inside out, pin the bottom piece in place. Then attach binding to finish off the seam.
10. To finish the bag, attach the binding around the top and hand stitch the inside in place.
Hope you enjoy your Triangle Tote! Want to win a copy of Rubies, Diamonds and Garnets, Too, for more great projects from Bernadette? Enter our giveaway here: a Rafflecopter giveaway. Open to US residents only; winner will be announced one week from today.
Congratulations to Debby G., winner of this giveaway! We hope you enjoy making all the sparkling blocks in it! And thank you so much to everyone who entered.


