


Stitching and Pressing with Alex Anderson
Today we're sharing an amazing excerpt from Make Your First Quilt with Alex Anderson. Alex is an expert quilter, and her stitching and pressing instructions are amazingly helpful, whether you're a beginning quilter just starting out or whether you're an experienced sewist looking for a reminder.
Stitching
Set the stitch length on your machine just long enough so that your seam ripper slides nicely under the stitches. Backstitching is not necessary for this project because all the seam ends will be enclosed by other seams.
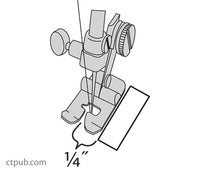
1/4˝ Seam Allowance
To piece the quilt top, you will always use a 1/4˝ seam allowance. The shapes in this book are all cut with the seam allowance included. Many machines have an exact 1/4˝ foot. If yours does, you are home free. If not, put your clear plastic rotary cutting ruler under the sewing machine needle, drop the presser foot, and then manually ease the needle down on top of the 1/4˝ mark. Take a thin piece of masking tape and mark the 1/4˝ measurement on the throat plate, using the edge of the ruler as your guide.
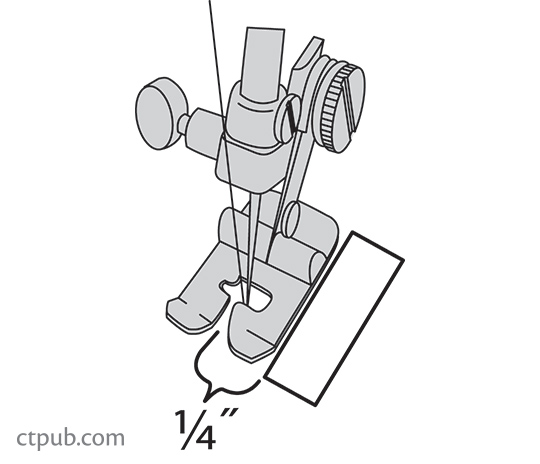
As you sew the pieces together, use this piece of tape as your seam guide. This is an extremely important step for ensuring accuracy. Take the time to understand your machine’s 1/4˝. My kids’ term close enough will only reward you with yards of frustration.
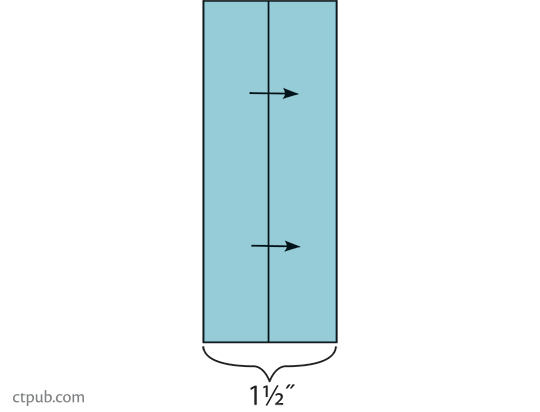
Tip: To check your ¼˝, Sally Collins of Walnut Creek, California, recommends that you cut 2 strips of fabric each 1˝ × 3½˝. Sew the 2 strips together along one 3½˝ side, press, and measure. The sewn unit should be 1½˝ wide. If not, try again until you find your machine’s perfect ¼˝.
Seam Ripping
On occasion, you will need to pick out a seam. Cut every third stitch on one side of the fabric; then lift the thread off the other side of the fabric.
Pressing
Pressing is a very important component of quiltmaking. Many beginners approach the pressing portion of quiltmaking as if they were ironing the weekly laundry. Old habits are hard to break, but you must learn this new technique if you want to have super-looking quilts. The following tips are for pieced units.
Press on a firm surface (an ironing board with a single pad). Seams are usually pressed in either one direction or the other (not open). Press in the direction indicated by the arrows in the instructions—first on the wrong side, then on the right side. This helps the seams align in your block construction and prevents tucks from being pressed into the sewn seams.
Want more useful tips? Pick up a copy of Make Your First Quilt with Alex Anderson today!


