


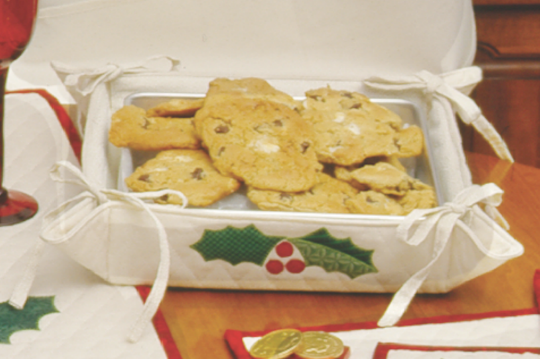
Meet the Insul-Fleece Craft Pack and make a Christmas casserole carrier
It’s easy to sew through and you can machine wash and tumble dry with no bunching. And with just one craft pack you can make a whole lunch bag, several pot holders, or two of the below handy, dandy Christmas Casserole Carriers featured in Christmas with Possibilities by Lynda Milligan and Nancy Smith. To get your Insul-Fleece experience underway (as well as get you started on your holiday crafting nice and early this year), read on for the Casserole Carrier project.
Holly Casserole Carrier
by Lynda Milligan and Nancy Smith
Materials and Yardage
Yardage is based on fabric that is at least 42″ wide.
Prewash fabric and Insul-Fleece so carrier will fit after laundering.
- Fabric: 1 1/8 yards
- Insul-Fleece: 1 square 15″ x 15″
- Heavy cardboard: 1 square 7¼” x 7¼”, 4 pieces 2″ x 7¼”
Cutting Fabric
- Base: 1 square 15″ x 15″ and 1 square 14″ x 14″
- Center Pocket: 1 piece 9″ x 9½”
- Side pockets: 4 pieces 6″ x 9″
- Ties: 8 pieces 1½” x 12″
Directions
Use 1/4˝ seam allowance unless otherwise noted.
1. Layer in order and pin: Insul-Fleece square, 15˝ × 15˝ fabric square right side up, and 14˝ × 14˝ fabric square right side down, and centered.
2. Stitch around the smaller square with a 3⁄8 ˝ seam allowance, leaving 4˝ open on one side for turning. Trim the large square even with the small square. Clip the corners, and turn through the opening so the Insul-Fleece is sandwiched between the fabric layers. Press. Pin the opening closed, and topstitch very close to the entire outside edge of the carrier.
3. Lightly mark a diagonal 2˝ grid on the outside of the carrier, and machine quilt on the lines.
4. Mark the fold lines on the inside of the carrier 21⁄2˝ from each side.
5. To hem one 9˝ side of the center pocket piece: Press 1⁄2 ˝ to the wrong side, then press 1⁄2 ˝ to the wrong side again. Stitch close to the fold. The pocket should measure 81⁄2˝ high by 9˝ wide.
6. Place the pocket wrong side down on the inside of the carrier, matching the hemmed edge with one marked fold line. Tuck under and pin 3 raw edges to meet the marked fold lines on the carrier. Press the pocket. Stitch the pinned edges very close to the folds.
7. Press the ties in half lengthwise, wrong sides together. Unfold. Press the long raw edges in to meet the pressed line. Fold in one end, then refold along the center line. Stitch across the end and along the double-folded edge.
8. Press the side pockets in half lengthwise, wrong sides together, to 3˝ × 9˝. Place one side pocket on the side of the carrier with the fold next to the edge of the center pocket. Tuck under and pin the 3 raw edges to meet the marked fold lines and on the outside edge of the carrier. Press the pocket. Repeat for the other 3 side pockets.
9. Tuck the raw end of a tie under the corner of the side pocket at each corner of the carrier. Pin in place. Stitch the pinned edges of the pockets, catching the ties in the stitching.
10. Trim the cardboard pieces slightly, if necessary, to fit the pockets. Slide the cardboard into the pockets. Fold up the sides of carrier, and tie each corner in a bow.


