

Making the Best Cut with Bonnie Hunter
Posted by Bonnie Hunter on Apr 11th 2016
Hi, everyone!
I'm so excited at being asked to contribute a monthly post to the C&T blog. What a great way to share with you some of the things I have learned along the way that have made my projects fall together so much better!
You can look forward to my posts showing up on the second Monday of the month right here on the C&T blog.
I have been traveling and teaching internationally now for more than ten years, and I have done a lot of observing to find out where the perils and pitfalls of patchwork might show up, and it has been very revealing in many ways.
So many folks say that they have trouble with a 1/4" seam, but when we get down to it, it isn't the seam that is the culprit at all, it goes way back to the CUTTING of the fabric.
I hope what I share with you today will help you achieve better results, just as it has my students.
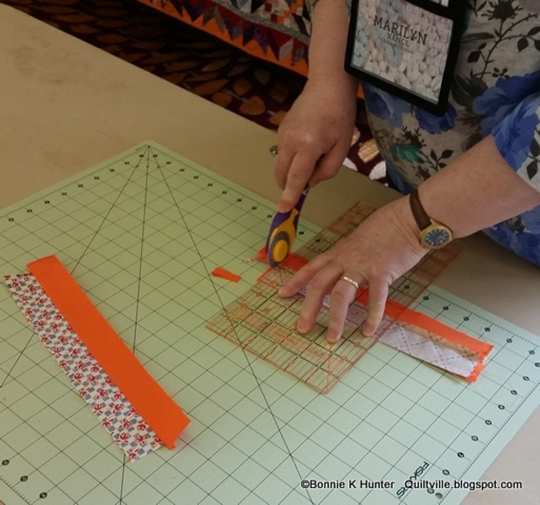
Shown here are the hands of my student Marilyn as she goes about sub-cutting some strip sets for four-patches during last week’s workshops in Naperville, Illinois. Little did she know she would become a hand model for this post!
Rotary Cutting 101:
Never use the lines on the mat to measure and cut by. It’s a sure fire way to wear out your mat too quickly, as this creates deep grooves in the mat that won’t heal. Cutting in the same place on the mat again and again is also a way to get inaccurate cuts as your fabric is pushed down into the grooves creating an inaccurate measurement, not to mention dulling your blade way before its time.
Use the lines on the ruler to measure your cuts, and move your work around the mat to avoid cutting in the same place all the time. Your mat and your blades will enjoy a much longer life.
The ONLY time I will use the lines on my mat for measuring are when I need to cut extra-large squares, 15" or larger, and then slice them with an X on both diagonals to give me the setting triangles I need for on-point quilt settings. I use the lines on the mat when the shape I am cutting is larger than any ruler I have.
A common bad habit...
This is one thing I see quilters doing time and time again: when you cut, you slide the line on the ruler you are measuring by right up against the outside edge of the fabric, but the whole line is left OFF the fabric.
You’ve left the line behind…on the mat! It’s next to the fabric, but not on it.
You can short yourself several threads when doing this, and it might not seem like much, but over the number of seams within a block, you can easily end up a 1/4" too small on your block, no matter how “perfect” your 1/4" seam is.
Don’t blame the seam! It might be the cutting!
In other words, if your strips are too narrow to begin with, it’s not going to be what you want it to be. Add into the equation that we have all those places where we have pressed the seams one direction or another, and we now have the thickness of the seam to add into the mix. To compensate for that this is what I do:
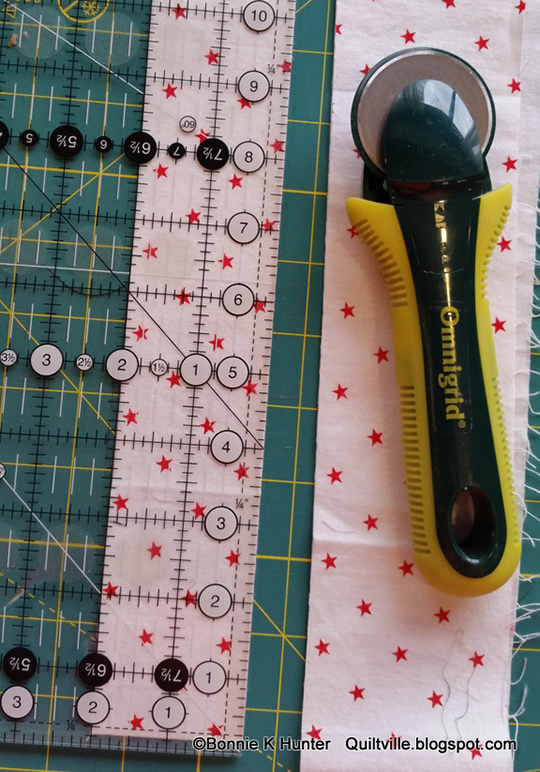
I hope you can see in this picture how I cut this 2" strip as a right-handed quilter.
Pardon the worn name tag on my ruler, I use my tools hard and they show it!
I’ve got the 2" line—the WHOLE LINE—ON THE FABRIC with the left-side edge of the line at the outside edge of the fabric. There is no fabric showing beyond the line, but the whole line is ON the fabric. This helps me make sure that I have not shorted myself on the strip width, and it may give me a couple extra threads that help me with the fabric I lose when pressing seams over the thread to one side after sewing.
The height of the seam can shrink a unit because it does take up space.
To show you what happens if you cut with the line on the ruler NEXT to the fabric, instead of including it ON the fabric, I took this picture:
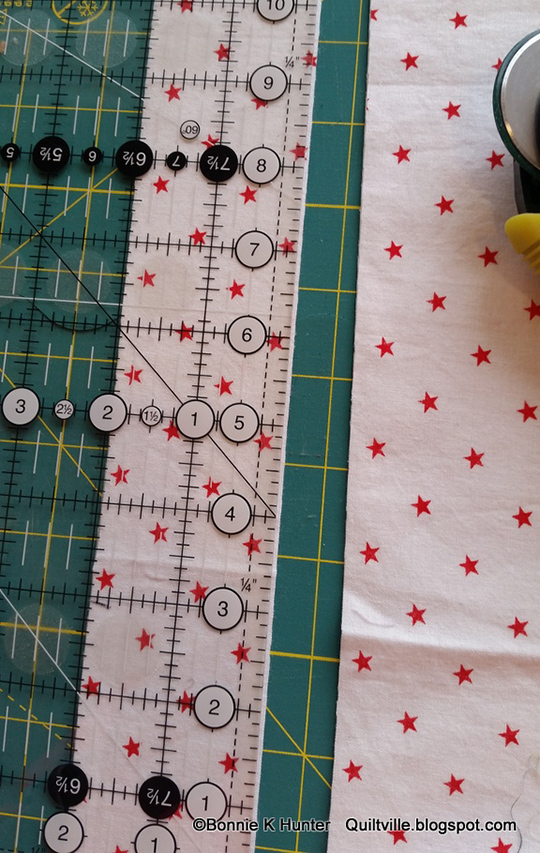
Can you see the difference? The line is now right next to the fabric, and touching the fabric, but look at the excess that is at the right edge of the ruler. If I had trimmed here, I would have shorted myself THAT MUCH. And over time within my blocks, that shortage will add up, giving me units and blocks that are too small. I even got one extra shot so I could show the sliver of difference between line on, and line off. THIS is how much you can short yourself if you don't put the line you are measuring by ON the fabric.
As I’m thinking about how to word this and explain why I do what I do, I realize that basically instead of having to excessively “scant down” my 1/4" seam allowance, I’m “scanting up” my strip widths to compensate for the thicknesses of pressed-to-the-side seams and bulky intersections, and I get the best results with my patchwork if I follow this simple rule I made for myself.
LINE ON! Not LINE OFF!
So that’s your basic cutting lesson today. Find the right tools that work for you. Look for rulers with easy-to-read numbers, thin lines for accuracy, and while you're at it, treat yourself to a new blade—you and your mat and your fabric deserve it!
Is there a topic you would like me to discuss or a question you would like answered in a future blog post? Leave me a comment below and we may feature you in a future post.
Bonnie K. Hunter is the author of several C&T titles, including Scraps & Shirttails, Scraps & Shirttails II, String Fling, Adventures with Leaders & Enders, and More Adventures with Leaders & Enders.
Be watching for a new book release from Bonnie and C&T in the fall of 2016!
Bonnie is also the Addicted to Scraps columnist for Quiltmaker magazine, giving hints, help, and tips in every issue to help put your own Scrap User's System to good use, making more quilts in less time.
Follow Bonnie's Daily blog at http://quiltville.blogspot.com
Facebook: http://facebook.com/quiltvillefriends
Facebook Group: Quiltville's Open Studio
Instagram: @quiltville_bonnie


