

Make a Simple Sundress with This Free Project
Posted by Patty Young on Jul 20th 2017
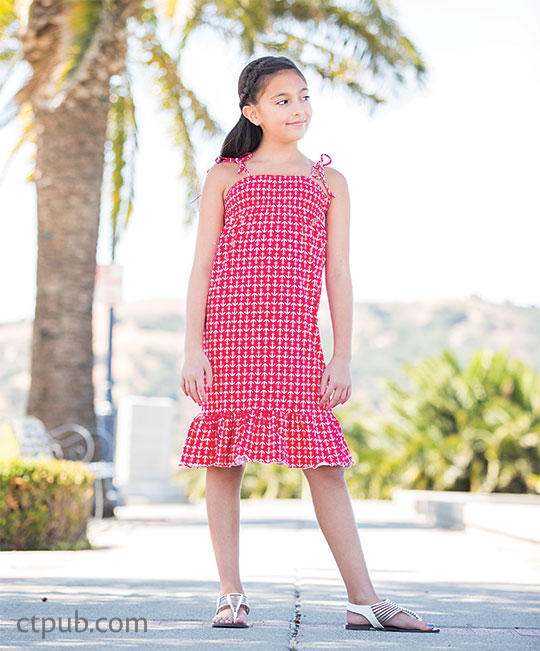
Who would’ve thought that you could create such a fun and flattering dress with one piece of fabric and a roll of elastic thread? This Simple Sundress will be your go-to dress for all summertime events, whether you are attending a family barbeque or a friend’s pool party. Find more patternless projects in my book, Patternless Sewing Mod Style.
FABRIC AND NOTIONS
Use stretch fabrics, such as cotton interlocks, jerseys, rib knits, stretch velvet, or stretch velour, 58˝/60˝ wide. Avoid thicker fabrics, such as double knits, because they will be difficult to shirr. Top-weight woven fabrics, such as quilting cottons, shirtings, lawns, voiles,satins, and eyelets also work well for this style of dress.
The amount of fabric you need to buy will vary depending on size, dress length, and add-ons. Refer to the cutting instructions to determine the yardage. Always purchase at least 1/4 yard extra to allow for fabric shrinkage.
• 1/2–1 1/2 yards (depending on size) of 1/2˝-wide knit elastic
• 1 spool of elastic thread
• Coordinating thread
• Rotary cutter and self-healing mat, or dressmaking shears
• Flexible measuring tape
CUTTING
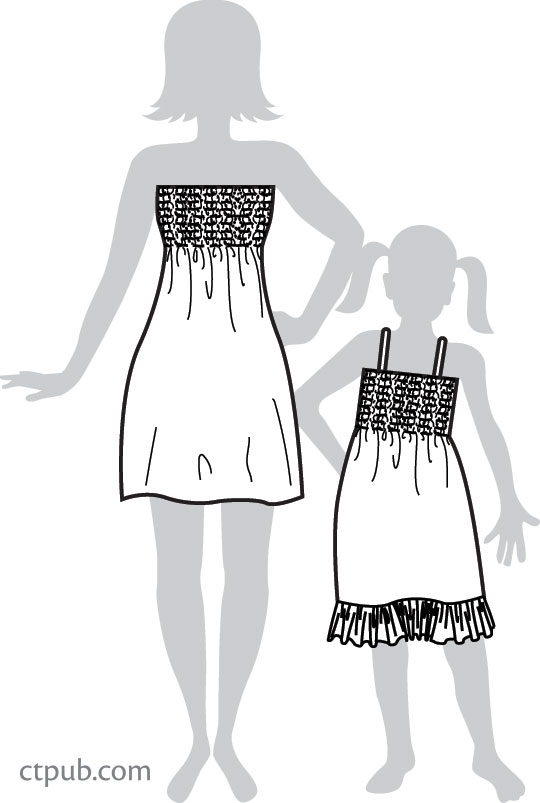
These directions are based on fabrics at least 58˝ wide. Calculate the width of your dress (C); for Girls/Tweens, the Chest measurement (all the way around her chest, just under her armpit, where a sleeveless dress would start), or for Women/Teens, the Full Bust measurement (all the way around your body at the fullest part of your bust and the widest part of your back. Don't let the tape measure sag in the back). Base the length on M, the Strapless Dress Length (from your upper bust down to where you would like your dresses to fall). Grab your calculator because you will need it for this one!
1. Cut 1 dress panel, or 2 for larger sizes, following these formulas to get the size:
Width: C + 1/3 of C. Round up your numbers. For example, if my Full Bust measures 40˝, the width of my fabric panel will be 40˝ + 14˝ = 54˝.
Note: If the total width of your dress is wider than the width of your fabric (most knits come in 58"/60" width), divide the dress width in half, add 1" for seam allowances, and cut 2 identical pieces.
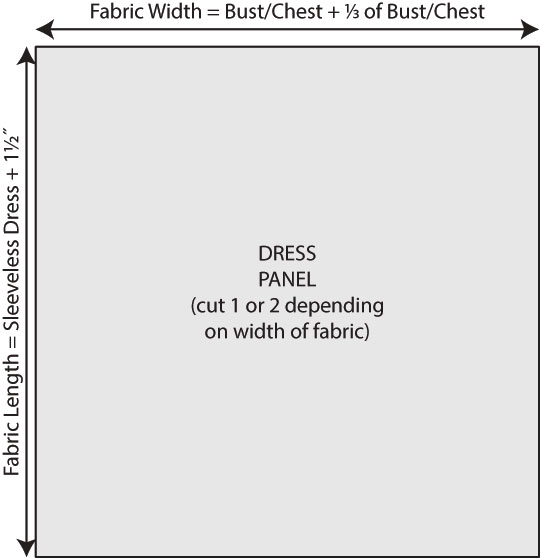
Length: Strapless Dress Length (M) + 1 1/2˝ to allow for hem and casing allowances. For example, if my Strapless Dress Length measurement is 32˝, the length of my fabric will be 33 1/2˝.
2. Cut the 1/2˝-wide elastic:
Length: girls' sizes: C − 2˝; women's/teen's sizes: Upper Bust (B) – 2˝
ASSEMBLE
All seams are 1/2˝. Backstitch at the beginning and end of all seams.
1. If you cut 2 panels for your dress, the seams will be on the sides. Place the fabric right sides together with the side seams aligned, and stitch down 1 side only. Finish the seam with a serger or a zigzag stitch and press to the side. Leave the other side open so you can shirr the garment while it is still flat. If your dress will be made from a single panel, the seam will be in the back. No need to sew up any seams at this point; you will want to shirr the garment while the fabric is flat.
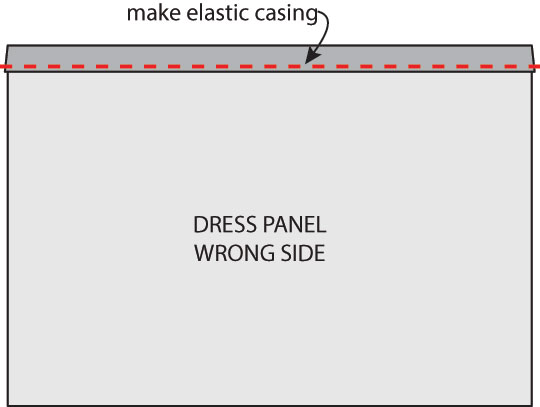
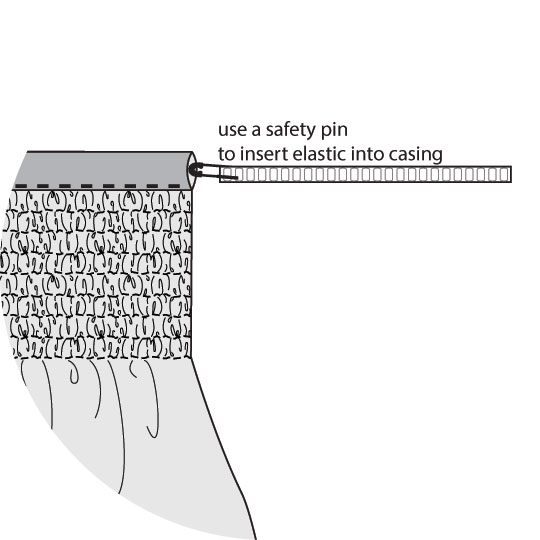
2. Serge the top edge of the dress panel or finish with a zigzag stitch. Create an elastic casing at the top of the dress panel by folding the top edge down 3/4˝ toward the wrong side, pressing well, and then stitching along the serged/finished edge all the way across the top of the dress panel. Don’t insert the elastic yet. It’s much easier to do this after you shirr the top portion of the dress.
Note: If you use a coverstitch magazine, you don't need to serge or zigzag first. Just stitch the raw edge down after folding and pressing.
3. Determine the height of the portion to be shirred by measuring from the top folded edge down. Typically, you want the shirring to cover just the chest/bust area to create an empire waist. Mark the end of the shirred portion on the right side of the fabric with a water-soluble marker, some masking tape, or a row of pins (use ballpoint pins if you are working with knit fabric).
4. Shirr the marked portion, working with the dress panel right side up on the sewing machine so the elastic thread will be on the wrong side of your garment. Make sure the rows of shirring are as wide as your standard presser foot and the last line of stitching aligns with your mark. Shoot the shirred section with steam to gather the fabric fully.
5. Insert the 1/2˝ knit elastic into the casing from Step 2. Use a bodkin or large safety pin to help guide the elastic through. Secure both ends by stitching close to the edge of the casing.
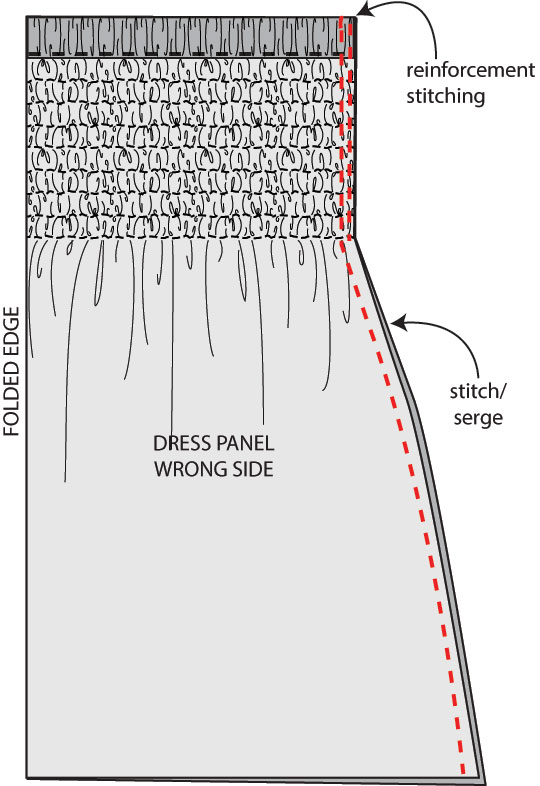
6. Fold the dress in half vertically, right sides together, and pin. Pinning is key to ensuring that the shirred rows and the top and bottom edges are perfectly aligned. Stitch/serge from top to bottom. Within the seam allowance, make another row of stitching across all the shirred rows to reinforce this area. Finally, press the seam to the side and topstitch it down to avoid extra bulk,especially where the elastic and elastic threads meet.
7. Hem the dress. For woven fabrics, press 1/4˝ toward the wrong side and then another 1/2˝. Topstitch close to the inner folded edge. For knits, create a 3/4˝ hem by serging the raw edge, pressing the hem up 3/4˝, and stitching close to the edge with a stretch or zigzag stitch. If you use a coverstitch machine to hem, you won’t need to serge the edge first. You can also make a lettuce-edge rolled hem on your serger.


