

Make a Hugs and Kisses Precut Quilt
Posted by Deirdre Quirk on Oct 31st 2017
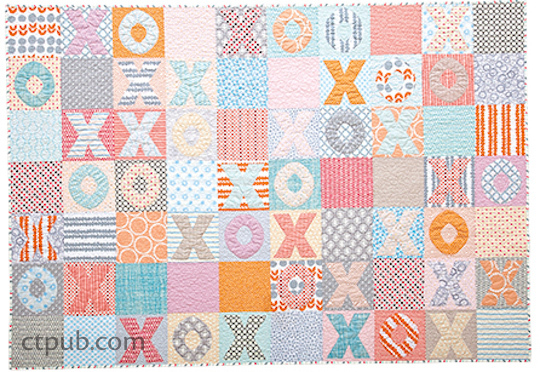
This fun Hugs and Kisses quilt, designed by Cheryl Arkison, is take from Make Precut Quilts.
FINISHED QUILT: 90 ̋ × 63 ̋ • FINISHED BLOCK: 9 ̋ × 9 ̋
This quilt comes entirely from a sketch my daughter made. She was learning how to play tic-tac-toe, and her random scratches of X’s and O’s struck me for their graphic nature. Together we drew and came up with this quilt. The X’s and O’s are raw-edge appliquéd to the background pieces. Piece the X’s precisely or in an improv style. Hand appliqué the O’s for a more refined look.
Materials
Amounts are based on a fabric width of 42 ̋.
Quilt top: 3 Layer Cakes or 35 fat quarters (for maximum variety)
Batting: 94 ̋ × 67 ̋
Backing: 5 1/2 yards
Binding: 3/4 yard
Freezer paper (optional)
Fabric glue or lightweight fusible web (optional)
Cutting
QUILT TOP:
Cut 2 squares 9 1/2 ̋ × 9 1/2 ̋ from each fat quarter for a total of 70 squares.
X’S AND O’S:
Draw a template for the O’s using a compass, 2 bowls/plates, or freehand to create an O shape no longer or wider than 8 ̋. The width of the “lines” that make up the O should be about 1 1/2 ̋– 2 ̋. Cut out your template.
Draw a template for the X’s using a ruler or by eye. The X should be no longer or wider than 8 ̋. The width of the “lines” that make up the X should be about 1 1/2 ̋– 2 ̋. Cut out your template.
Cut 18 O’s and 24 X’s from a variety of fabrics and appliqué, using fusible web and the manufacturer’s directions.
BINDING:
Cut as needed for your preferred method of binding.
Some Assembly Required
Seam allowances are 1/4 ̋.
1. Pair up the X’s and O’s with background squares. Evaluate the value to make sure there is contrast between the appliqué and the background.
2. Appliqué the X’s and O’s to the background blocks.
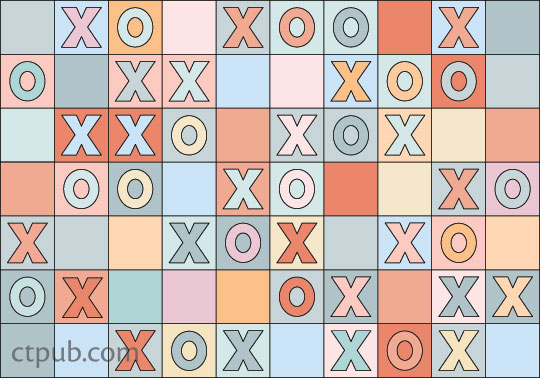
3. Arrange the blocks into 7 rows of 10 blocks each. You can follow the quilt top assembly diagram or arrange the blocks in a way that works for you. (For that matter, you can also make more or less appliqués to suit your design preference.)
4. Assemble the quilt top using chain piecing. If you are pressing the seams to one side, be sure to alternate the direction so the seams nest when you sew together the rows.
5. Sew the rows together and press the seams open or in one direction.
6. Assemble the quilt back to measure 94 ̋ × 67 ̋.
7. Layer the backing, batting, and quilt top. Baste with your preferred method.
Ready, Set, Quilt!
You have choices when it comes to quilting this quilt. You can outline your X’s and O’s by repeating the appliqué stitching and then stitch a background design. Or you can stitch an allover design that tacks down the raw-edge appliqué. This quilt will look better the more it is used and washed, so don’t fuss too much about the quilting—those raw edges will become nice and soft over time.
Finishing
Trim the excess batting and backing, square up the quilt, and attach the binding.
Turn Up the Volume
Pick your favorite color combination to give a whole pile of hugs and kisses to someone you love. A single background color with bold choices for the X's and O's is a surefire way to declare your love from the rooftops for all to hear.
CHERYL ARKISON has been sewing her entire life, which has developed into her talents as a quilter, pattern designer, book author, magazine writer, teacher, and blogger (on Dining Room Empire) about quilting and crafts, as well as creativity, food, and family. Cheryl lives in Alberta, Canada. cherylarkison.com
This project originally appeared in A Month of Sundays—Family, Friends, Food & Quilts by Cheryl Arkison.


