


Lone Star: Free Quilt Project

Please enjoy this project excerpted from Modern Roots—Today's Quilts from Yesterday's Inspiration!
FINISHED QUILT: 75 1/2˝ × 75 1/2˝ • FINISHED STAR: 36 1/2˝ × 36 1/2˝
Made from cottons by an unknown maker; Maine; c. 1890
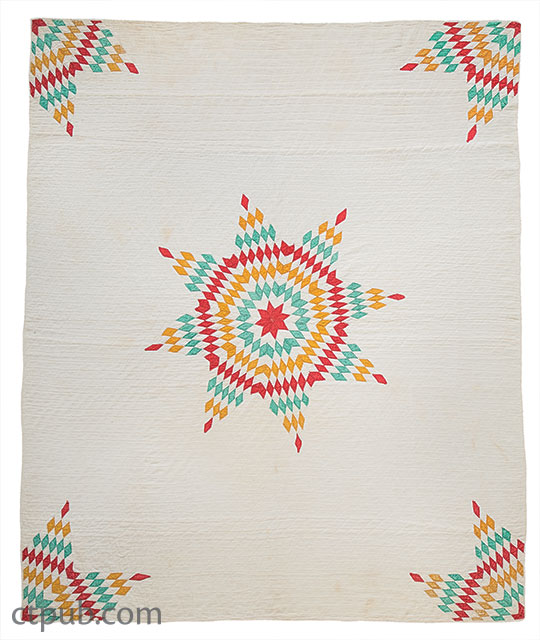
The star is a familiar motif in American patchwork quilting and with good reason—it’s been around a long time. Some of the earliest American pieced quilts include stars. Eight-pointed LeMoyne Stars as well as stars with triangles pieced to the edges of squares are commonly seen in the early patchwork designs. Large, central stars made of smaller pieced diamonds appear a bit later, in the second quarter of the nineteenth century, with designs known as Lone Star or Star of Bethlehem.
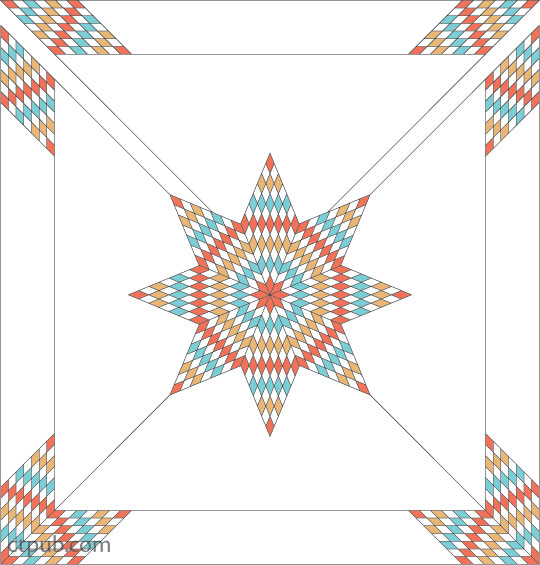
This Lone Star quilt came from Blueberry Hill Antiques in Rangeley, Maine, and was purchased in August 1994. It was made around 1890 and was one of the first quilts acquired by the Volckening Collection. The quilt is an unusual example of a Lone Star. Typically the star is set with either one or two tips pointing upward. This star is slightly skewed. Often the central star will occupy most of the quilt, but this star is smaller, allowing much more white space.
The quilt is predominantly red, white, and green, with some cheddar orange. Each of the 8 points in the central star and in the corners has 35 diamond-shaped pieces, for a total of more than 560 pieces in the quilt. It is a lacy, open design with rows of white diamonds alternating with the rows of colored diamonds. Star quilts were not always easy to put together. Many examples of the Lone Star design were never finished due to a common technical problem. When joining the star points at the center, the center point often became tent like with distortion from the many bias-cut seams. Bulky seams were also a problem. Today’s rotary cutters and rulers allow for precise cutting, making construction much easier. For this quilt, pressing seams open helps alleviate bulky seams.
This Lone Star is hand-quilted with a basic Hanging Diamonds design, approximately 6 stitches per inch with about an inch between rows, for around 33,000 quilting stitches. Hanging Diamonds is a basic, utilitarian quilting design with rows of parallel lines intersecting at a 45° angle. If this quilt were made with today’s fabrics, the white space would allow many creative possibilities. Low-volume fabrics could add interest and texture. Free-motion swirls, curves, and feathers could add richness to the background, and geometric designs could elegantly define those areas.
Construction Notes
The original quilt is rectangular (67˝ × 84˝) and the stars and corner diamonds were appliquéd. If you wish to reproduce the original, piece the background to whatever size you want and appliqué the star and corners as desired. The pattern that follows is for a square quilt with an appliquéd center star and pieced corner diamonds.
Materials
Yardage requirements are based on 40˝-wide fabric.
Fabric A: 1/2 yard for Diamond A
Fabric B: 6 3/8 yards for background, borders, and Diamond B
Fabric B or alternative: 1/2 yard to make 1/4˝ finished double-fold binding
Fabric C: 3/8 yard for Diamond C
Fabric D: 3/8 yard for Diamond D
Backing: 83˝ × 83˝
Batting: 83˝ × 83˝
Cutting
Fabric A: Cut 9 strips 1 1/2˝ × width of fabric.
Fabric B:
• Cut 24 strips 1 1/2˝ × width of fabric.
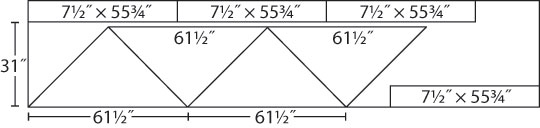
• From remaining yardage, cut 1 strip 7 1/2˝ × length of fabric; subcut 3 strips 7 1/2˝ × 55 1/2˝.
• From remaining length of fabric, cut 4 right triangles 31˝ × 61 1/2˝ and 1 strip 7 1/2˝ × 55 1/2˝as shown.
Fabric C: Cut 8 strips 1 1/2˝ × width of fabric.
Fabric D:Cut 8 strips 1 1/2˝ × width of fabric.
Binding: Cut 9 strips 1 5/8˝ × width of fabric
Construction
Large Diamond Assembly
Sew all seams with a 1/4˝ seam allowance unless otherwise noted.
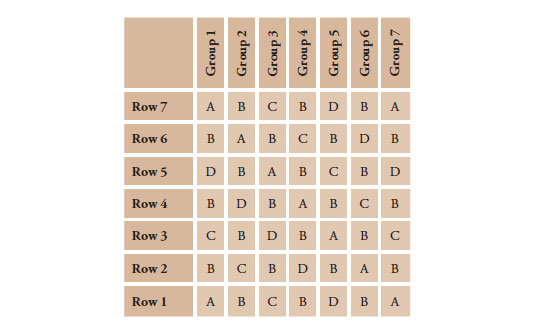
1. Arrange the strips into groups as shown:
2. Beginning with Group 1, place an A strip (row 1) right side up. Then place a B strip (row 2) above it and 1˝ to the right of the A strip.
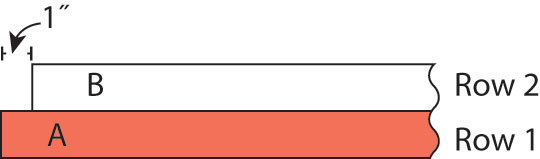
3. Continue to place each successive strip 1˝ to the right of the strip beneath it.
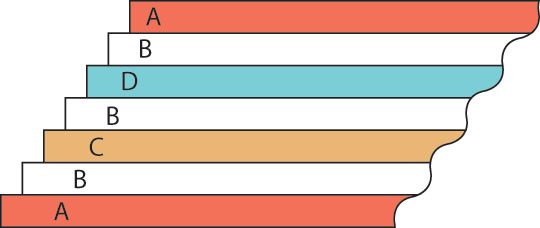
4. Sew the strips together, pressing the seams open.
5. Repeat Steps 2–4 to sew the 7 groups.
6. Starting with Group 1, place a ruler along the left edge of the group, aligning the 45° line with a seam, and trim away the stair-stepped edge.
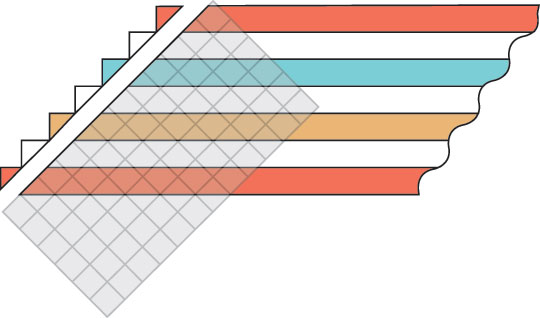
7. Cut 16 strips 1 1/2˝ wide, keeping ruler at 45°.
8. Repeat Steps 6 and 7 for remaining sets.
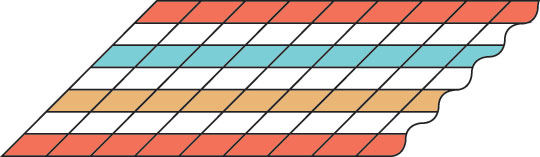
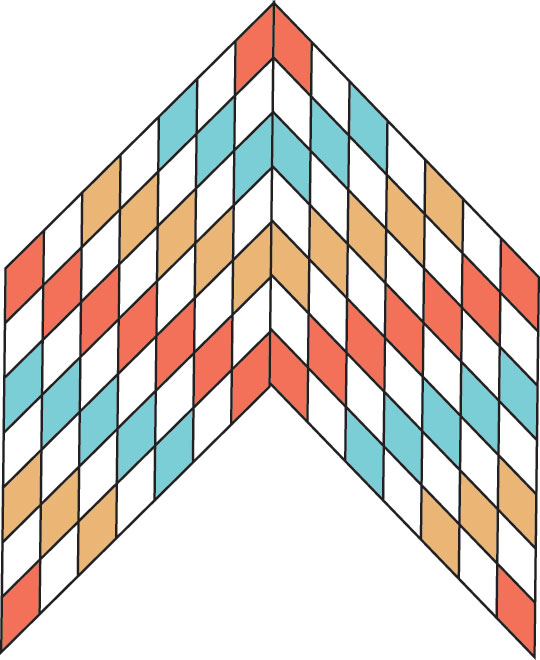
9. Arrange a strip from each group into a diamond as shown.
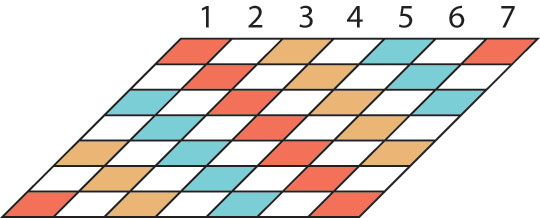
10. Sew the strips together and press the seams open.
11. Repeat Steps 9 and 10 to make 16 large diamonds. Set aside 8 for corners.
Large Star and Corner Assembly
1. Stitch 2 diamonds together as shown, carefully matching each small diamond seam. Press the seam open.
2. Repeat Step 1 to make 4 pairs.
3. Stitch 2 pairs together, carefully matching each small diamond seam. Press the seam open.
4. Repeat Step 3 to make 2 half-stars.
5. Stitch 2 half-stars together, carefully matching each small diamond seam. Press the seam open.
6. Stay stitch the edge by stitching a scant 1/4˝ all around raw edge of star.
Border Assembly
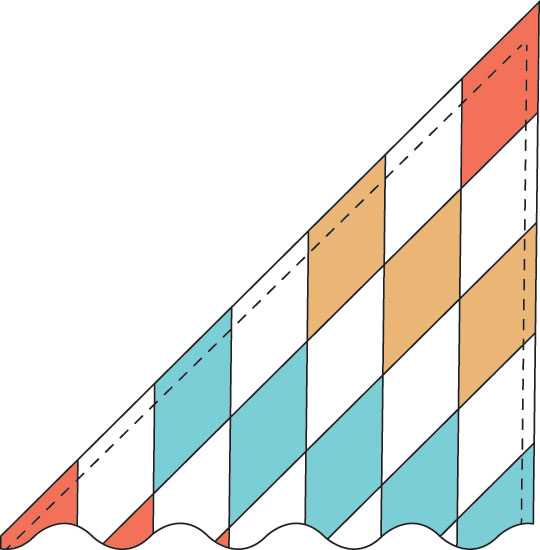
1. Fold the corner of a 7 1/2˝ × 55 3/4˝border strip along the 45° diagonal and crease.
2. Measure 1/4˝ above the crease and mark a line.
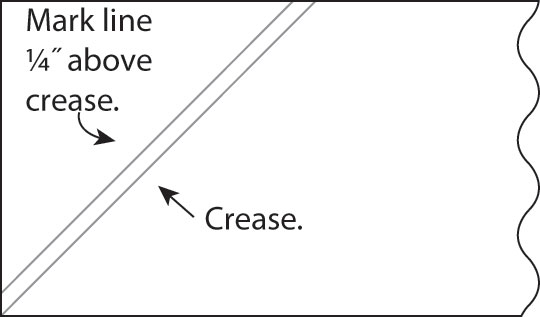
3. Place a diamond at the end of the border, right sides together, with raw edge of diamond along the marked line. Stitch the diamond to the border and check that the angle is 45° and the outer edges are even before trimming off the triangle at the end of the border.

4. Repeat Steps 1–3 for other end of border, noting reversed orientation of diamond.
5. Repeat Steps 1–4 to make 4 identical borders.
Quilt Assembly
1. Fold a background triangle in half along the long edge and finger-press a crease at the center point.
2. Fold a border strip in half and finger-press a crease at the center point along the shorter inner edge.
3. With right sides together, match the center marks and the ends of a triangle to a border piece, and pin.
4. Sew the border piece to the background triangle. Press the seams toward background.
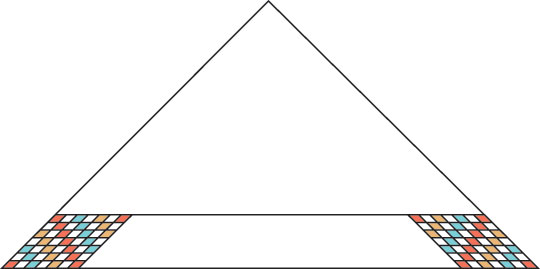
5. Repeat Steps 1–4 to make 4 background/border triangles.
6. Place 2 background/border triangles right sides together, matching the corner diamond seams, and center point. Pin.
7. Sew the pieces together and press the seam open.
8. Repeat Steps 6 and 7 to make the second large background/border triangle.
9. Place the 2 triangles together, matching the diamond seams at both ends, and pin. Sew the pieces together to make a square. Press the seam open.
10. Center the star on the background as desired, or place so that 4 points match the 4 seams, and pin.
11. Turn under edge of star at stay stitching line and appliqué with your favorite method.
Finishing
1. Layer the quilt top, batting, and backing.
2. Baste using your preferred method.
3. Quilt as desired.
4. Bind the quilt using your preferred method.
Quilt assembly


