

Crown Project Tutorial
Posted by Kirsten Varga on Oct 1st 2015
Enjoy this free project, perfect for Halloween!
Materials:
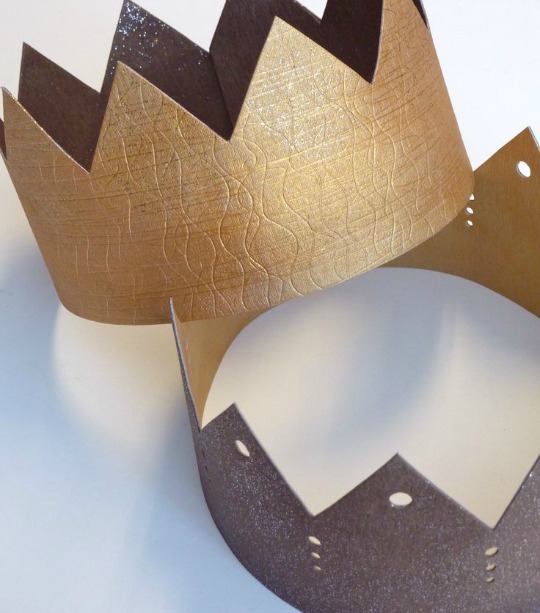
• 2 rolls of kraft•tex: In Chocolate and Stone, cut to 3.75” x 27" - Completed project will be a circumference of 20 inches.
• Crown template (or make your own!)
• Iron-on adhesive, cut to 3.5" x 26.5"
• Sharp scissors
• Rotary cutter
• Ruler
• Cutting mat
• Metallic and Glitter craft paint in gold
• Foam brush
• For Closure: needle and thread, glue, Velcro, or snaps. Just choose what is easiest for you!
• Hole punch
• Ballpoint Stylus or small knitting needle to draw into surface of kraft•tex
Instructions:
1. Optional: wash and dry the pieces of kraft•tex to bring out a nice leather-like texture. If you do this, you will need to iron the pieces to flatten them out a bit before step #2.
2. Following the directions of the iron-on adhesive, adhere the two pieces of kraft•tex together.
3. To add texture to the surface, take your pointed stylus and “draw” into one side (or both!) of the kraft•tex. Try repeated lines, squiggles, hearts, stars, etc. The harder you press the deeper the line and the more texture you’ll achieve.
4. Apply glitter paint to the Chocolate side. Paint the Stone side a gold color and then gold glitter paint if desired.
5. After the paint has dried, trace your crown template onto the surface to the desired length. Make sure there will be overlap for your desired closure. Cut out points of crown with scissors. Trim the bottom of the crown with a rotary cutter and ruler.
6. Optional: embellish using hole punches. You can punch through the kraft•tex with a hand held punch, leather punch, screw punch or an anywhere hole punch. The design is up to you!
7. Closure: attach the ends together using any method you want. Snaps, glue, hand-stitching or Velcro are a few examples. By using snaps it can be reversible.
8. Enjoy! You have just made a durable crown fit for a King or Queen!


