


Adventures in Chain Pressing!
Hi, everyone!
Can you believe that August is here already?
Here in North Carolina, autumn will soon be upon us with all that we look forward to: back to school, cooler temperatures, the changing of the seasons, and the turning of leaves into glorious colors.
Summers are busy for many, and sometimes quilting takes a backseat during the summer, but when the calendar turns to fall, we are ready to spend the crisp autumn days inside at our machines with not-too-far-off holiday gift-giving in mind.
I love to share how some simple streamlining of every day quilty processes really does save me time and keep me more organized.
It might mean a slight change in the way that you’ve always done things, and what I’m showing you today is not quilt rocket science, but maybe you’ve never thought about it or seen it done before.

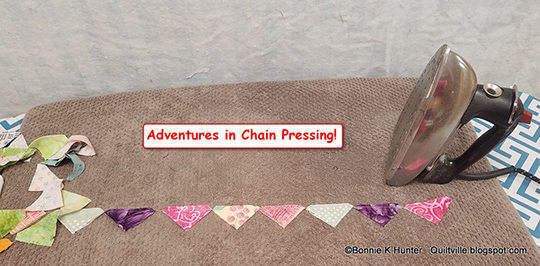
Our first photo above is of a half a gazillion (or what feels like it!) half-square triangle units being sewn for a scrappy triangle border.
Now, I know a lot of folks who LOVE to take their chain of units and cut it apart before pressing, either with scissors, snips, a seam ripper upended into a wooden block or empty spool, or even using a razor blade gadget meant for cutting chains. Great.
But take a moment to think about the action and the energy exerted here, and what it means for the next step, the pressing.
If you cut the units all apart first, you now have a messy pile of units all out of order, and they have to be picked up one at a time, rotated into position, pressed, and set aside—and then you have to pick up the next one, giving it a quarter turn the other way….it’s a lot of WORK. It takes more TIME.
Because you cut first, pressed second.
What if we do it the other way around?
These next couple of photos are from my pressing area at the cabin. No fancy schmancy here, I keep things simple!
And it starts with the SEWING! Can you tell by the photo that all of my dark fabrics are on top, the neutrals underneath? This is so I can quickly press them all in one direction without having to flip-flop the motion of the iron.
I like to lay my chain of units, be they triangles, four-patches, nine-patches, flying geese, or whatever while still connected in a chain on top of the ironing board.
I use an old towel on top of my ironing board because it grabs the pieces and keeps them from shifting around while I press.
It also keeps the ironing board cover from getting stained and nasty, and when the towel is covered with threads, I simply wash it, and I am good to go again.
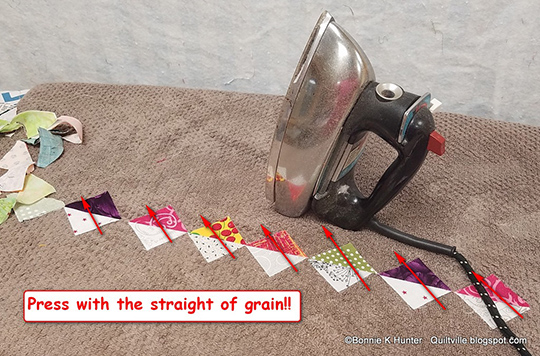
Because I was working with half-square triangles it brought to mind that perhaps some simple explanation of how bias and grain can affect units would be in order.
Do you see the arrows going from flat side to flat side across the units? This is the straight of grain for these units. My iron presses (notice I said PRESS not IRON!) this direction, from side to side, when pressing half-square triangles.
If I press from corner to corner across the unit along the direction of the seam, the weight and heat of the iron can stretch these units into wonky proportions because I am pressing with the bias.
The same thing happens if I move the iron from bottom point to top point. I’ll get very misshapen units.
Pressing with the straight of grain ensures that my units are pressed SQUARE, and there is much less trimming of oddly shaped units.
I am also “old school” in that I don’t use steam when pressing individual units. I believe the addition of heat and steam can change the shape of a unit into dimensions that you don’t want your units to remain in. If I do steam, it is usually after the quilt top is assembled, before loading it in the longarm for quilting.
My irons also have long, extended lives because I never add water into the iron. I use a spray bottle and spritz and press where needed.
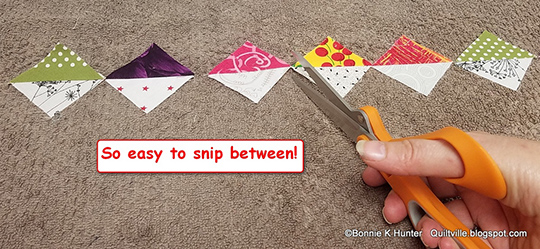
Here is my chain all nice and pressed. How easy is it to come right up between each unit and cut the threads? Because the units are all in the same orientation with the darks pointed up, I can easily pick them up after snipping them apart and stack them neatly in piles—also in the same orientation—because I didn’t cut them apart willy-nilly with some standing razor-blade thing. It makes it easy to take them back to my machine, lay them out for the next step, and keep on sewing.
Would you like to see the top these went on? Here it is:
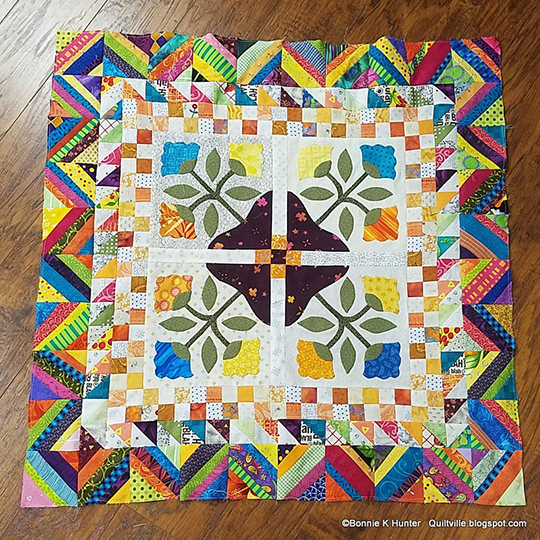
This is my new design, Spanish Rose, and I’m teaching it this month on a Mediterranean Cruise with 50 quilting cruisers with me!
Now to get it quilted and bound, label and hanging sleeve on, and the pattern written before we set sail!
I hope this info is helpful to you, and as always, if there is something you’d like to see me post about in the future, please leave a comment below! Your question may be featured in a future post!
Bonnie K. Hunter is the author of several C&T titles, including Scraps & Shirttails, Scraps & Shirttails II, String Fling, Adventures with Leaders & Enders, and More Adventures with Leaders & Enders, and soon-to-be-released Addicted to Scraps—the book!
Bonnie is also the Addicted to Scraps columnist for Quiltmaker magazine, giving hints, help, and tips in every issue to help put your own Scrap User's System to good use, making more quilts in less time.
Follow Bonnie's daily blog at http://quiltville.blogspot.com.
Facebook: http://facebook.com/quiltvillefriends
Facebook Group: Quiltville's Open Studio
Instagram: @quiltville_bonnie


